Getting started tutorial
Before you begin building your own application with Grexx Platform, we recommend completing the interactive tutorial. The tutorial walks you through the process of building a simple HR management application for onboarding new employees and recording the outcome of discussions between employees and their managers. You can access the tutorial from your personal Grexx Studio.
The tutorial walks you through the process of building a simple HR management application that includes the following functionality:
- Add and edit employees' basic details.
- Record new employees' start dates.
- Add and edit departments.
- Record an employee's department and use it to identify their direct manager.
- Make employees users of the application so that they can log in and update their details.
- Store signed copies of employment contracts.
- Set deadlines for completing onboarding activities relative to the new employee's start date.
- Keep track of the devices that have been assigned to employees.
- Record notes from meetings between employees and their managers.
- Provide application users with a list of tasks awaiting completion.
- Display the number of employees in each department.
It typically takes a total of one to three days to complete the tutorial, but you are free to work at your own pace. The tutorial is broken down into individual lessons, so you can easily stop and resume when you are ready. Depending on your availability, you can choose to complete the tutorial over several weeks - there is no time limit for completing the lessons.
Completing the tutorial will help you:
- Familiarize yourself with Grexx Studio and the process of previewing your changes in your Development environment.
- Start thinking about your data and processes in terms of casetypes, attributes, and activities.
- Learn how to build functionality so that your users can view, add, and edit data from your application.
Full instructions are provided within your Grexx Studio. To get started, use the link in the email invitation to log in to your personal Grexx Studio and click the tutorial icon. Below you will find an outline of each lesson to help you refresh your memory and consolidate your understanding as you work through the lessons.
The tutorial is available from your personal Grexx Studio. If you have been granted access to an existing project, you will also have access to the Grexx Studio for that project from MyGrexx. To access your personal Grexx Studio, use the link in the invitation email.
Lesson 1 - Starting to develop with Grexx Studio
To help you get started, a few basic elements of the HR application have already been added to your Grexx Studio. This includes the application homepage - the first thing that our users will see when they log in to the HR application.
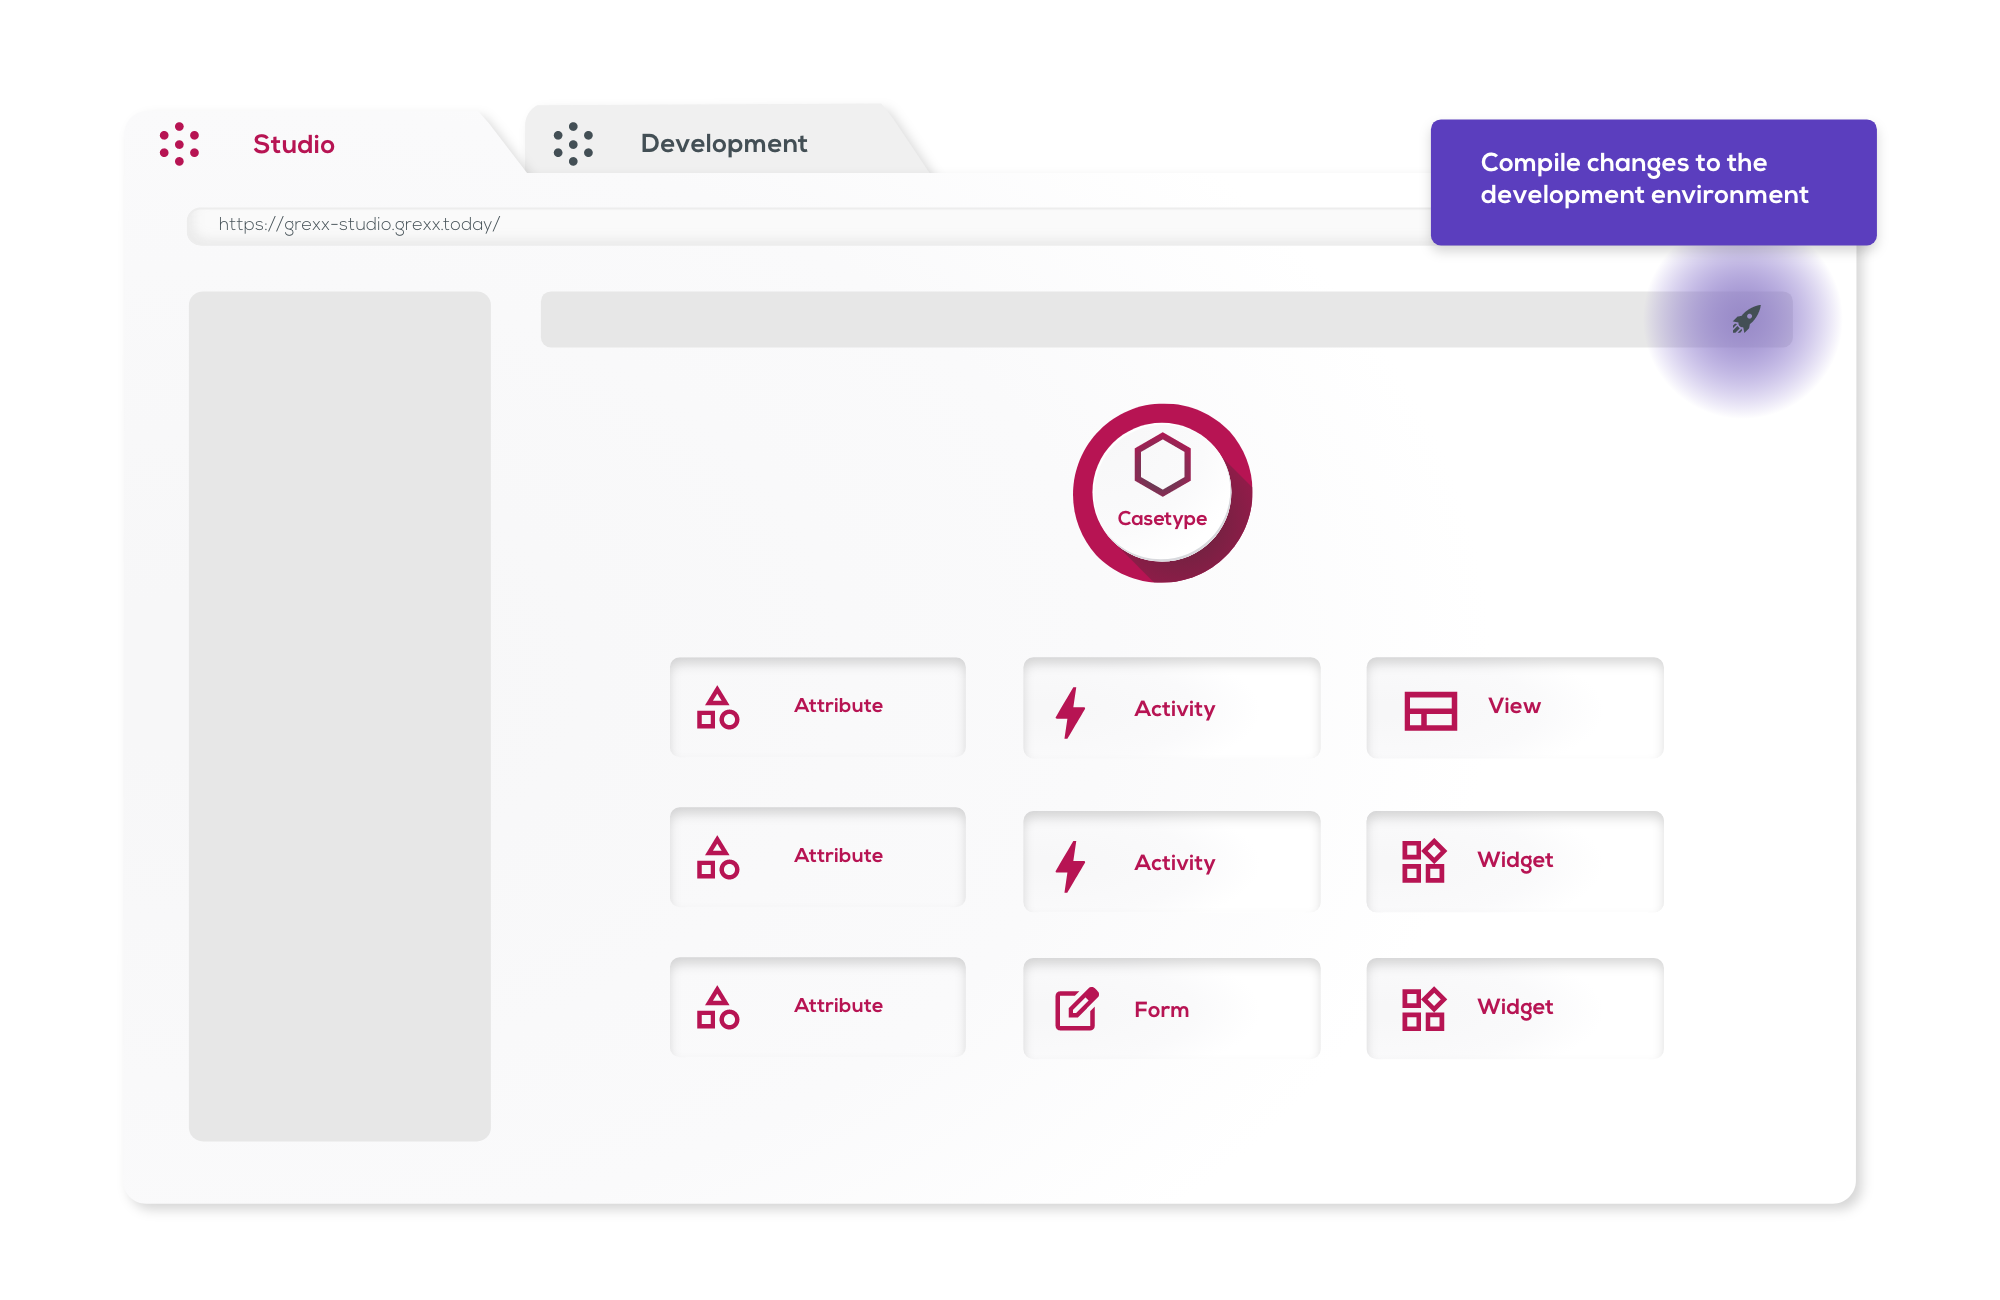
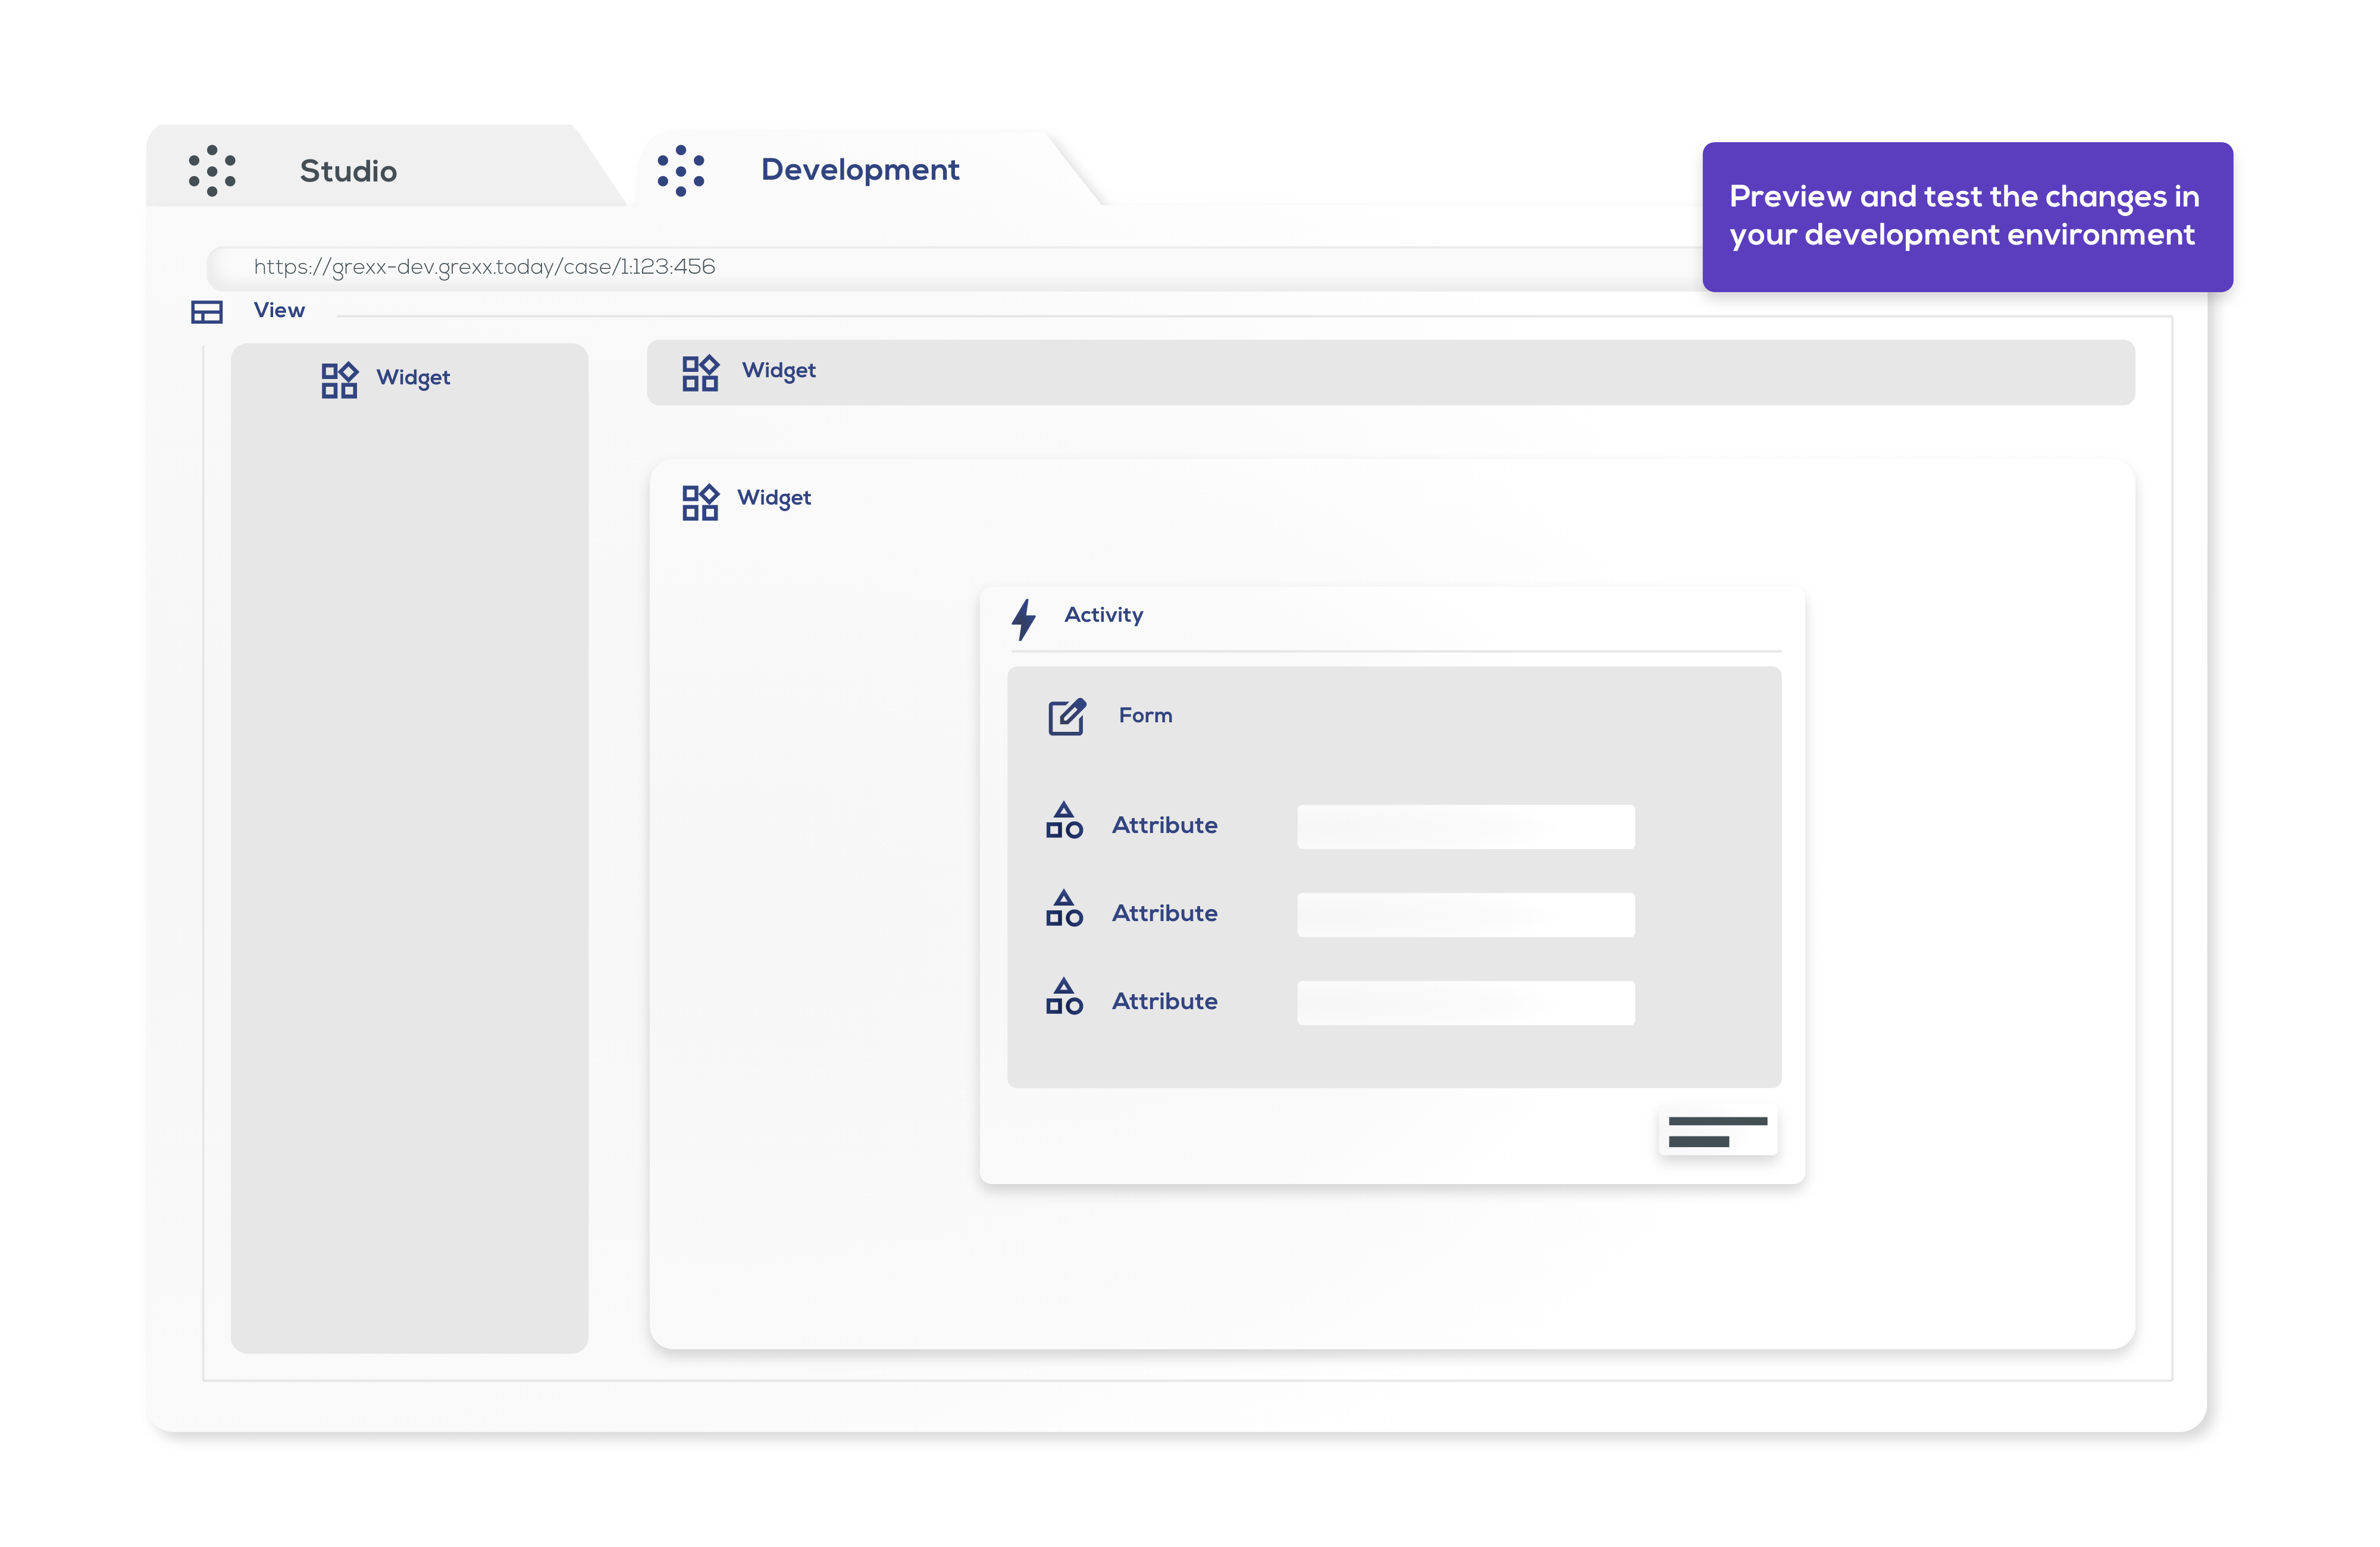
Each page in the application is built using a View. A view can contain one or more widgets. To change what is displayed on the homepage, edit the View for the Homepage casetype. We can see the effect of our changes by compiling the application and then opening the Development environment (either from the Studio homepage or the information icon).
To test that the application works as intended we need to add data to it. In this lesson, we start by adding an employee to the application in our Development environment.
Lesson 2 - Working with casetypes
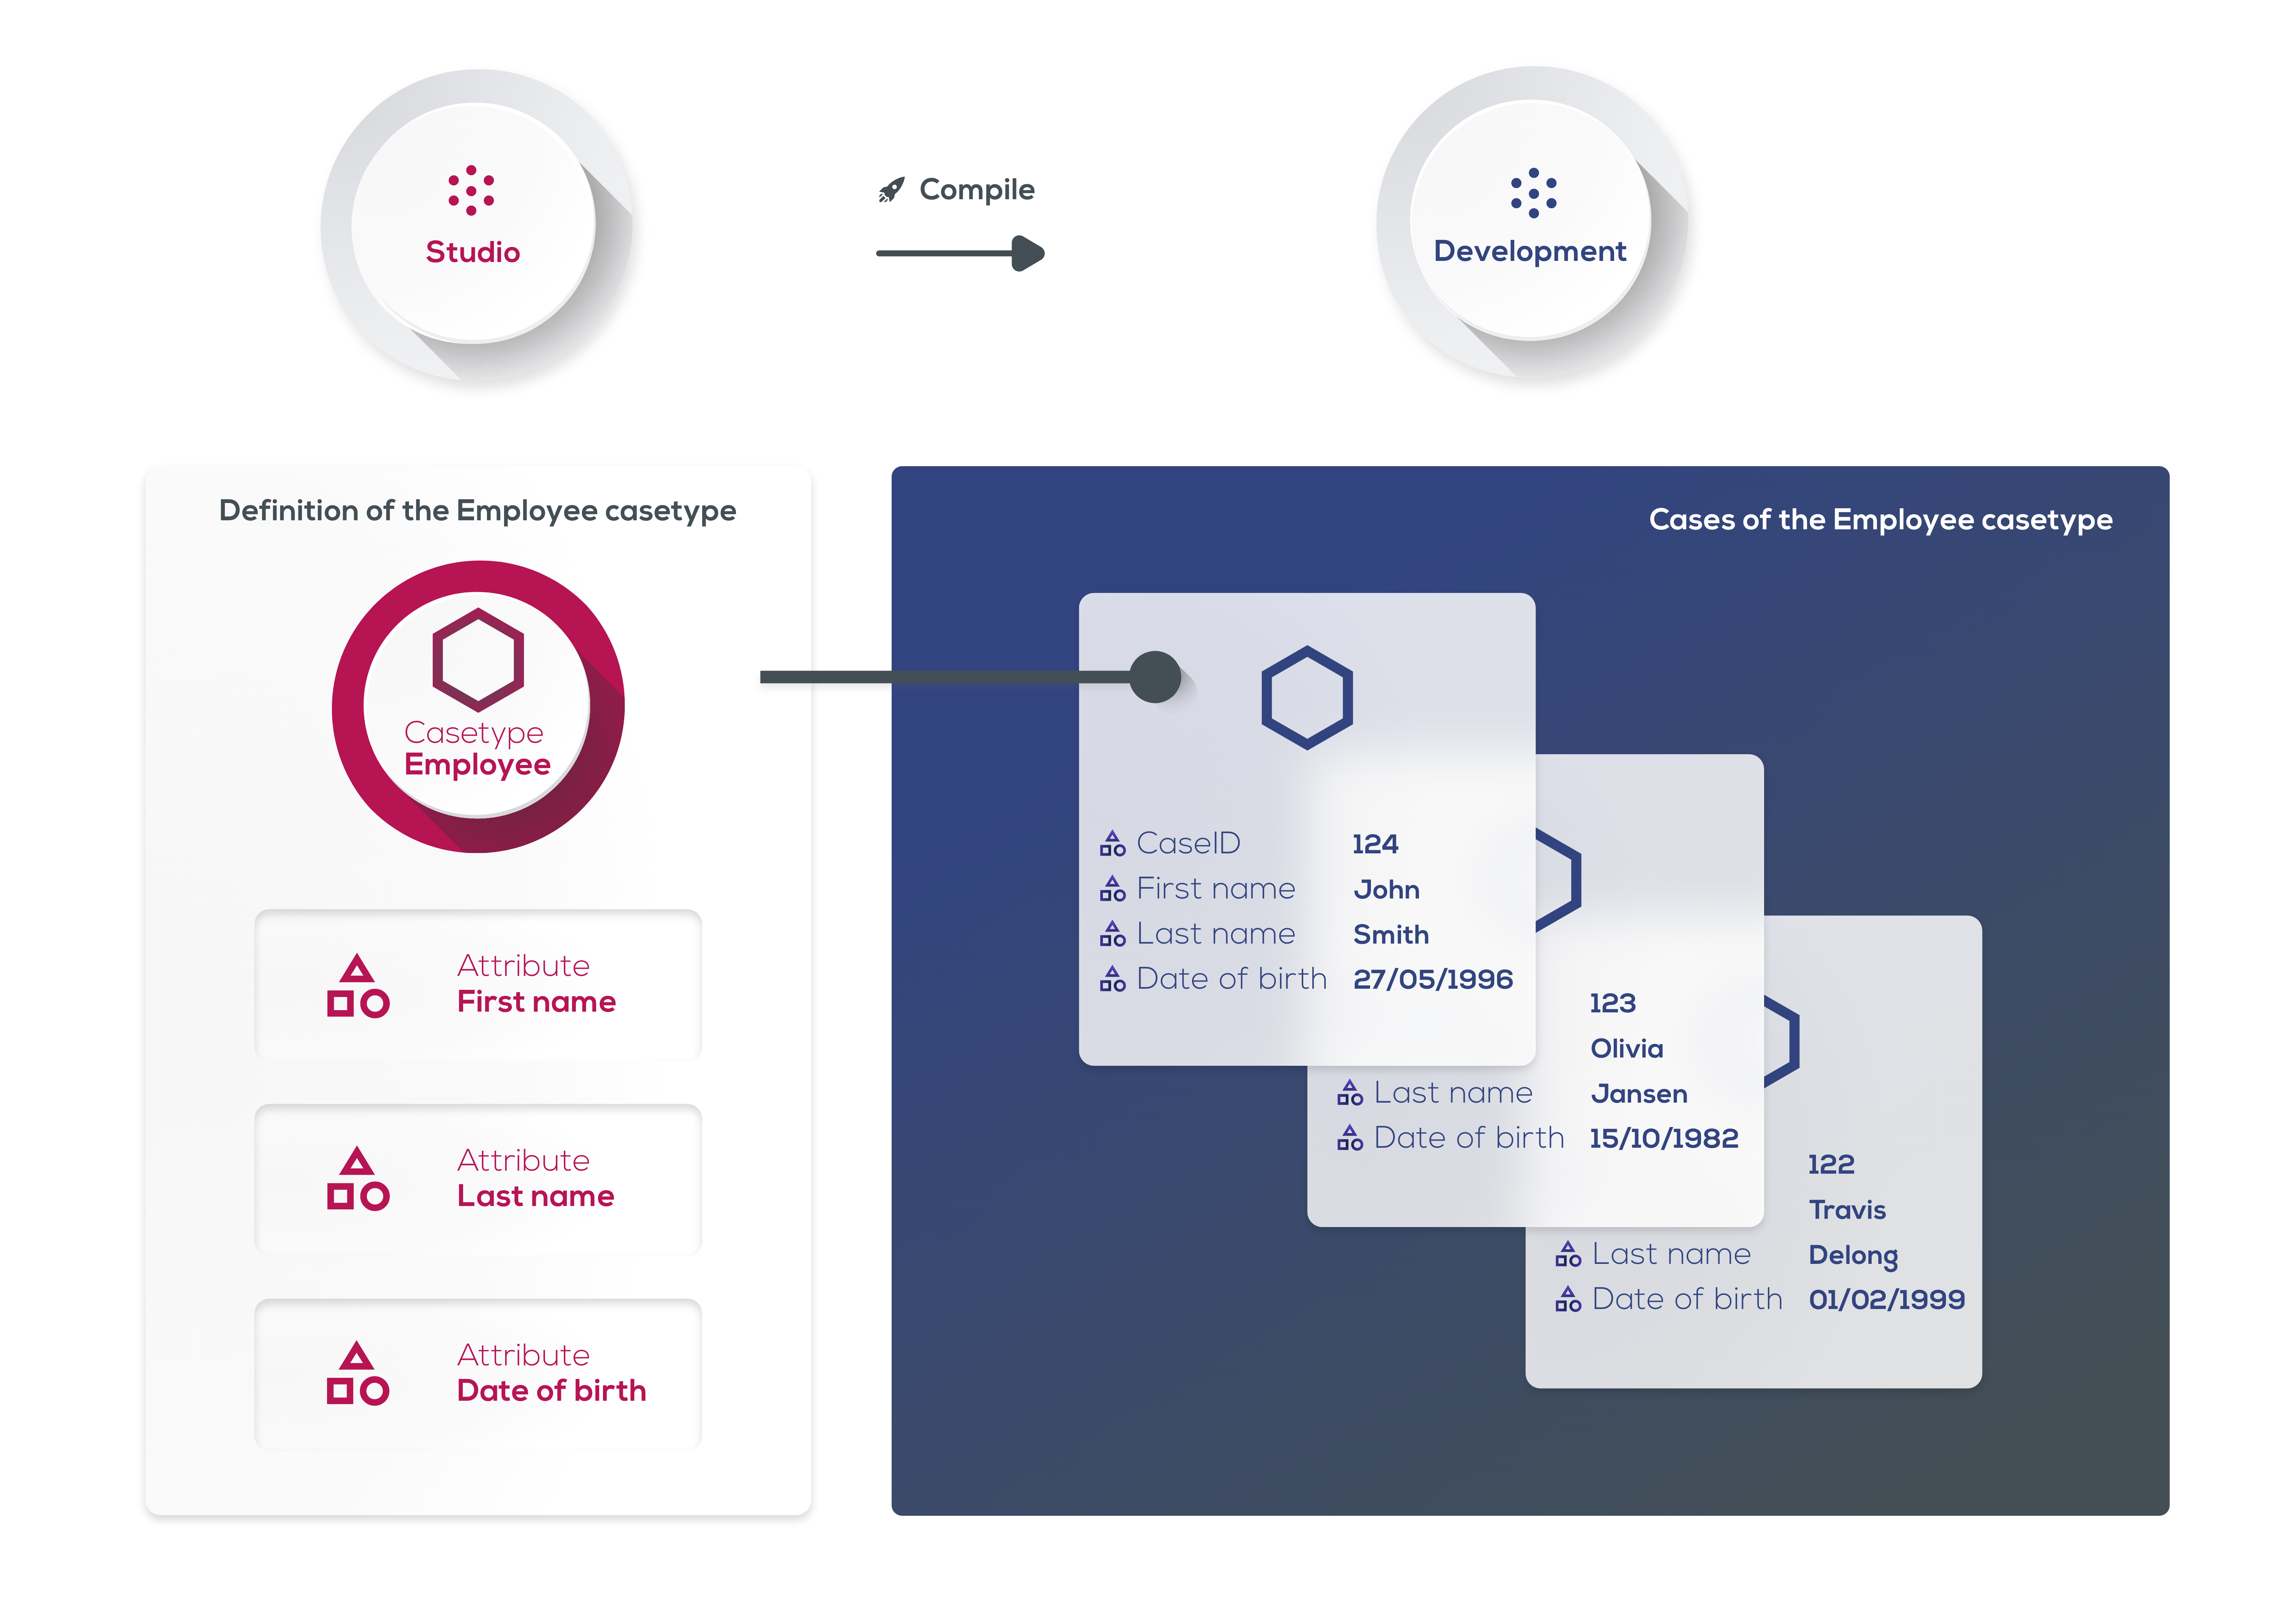
Cases are a fundamental part of any application you build with Grexx Platform. A case can represent:
- A thing, such as an employee or a device.
- A process, such as sending an email or booking annual leave.
- A page in the application, such as the homepage.
- A user.
Each case belongs to a particular casetype. A casetype defines several things, including:
- The data that can be recorded for each case - known as
attributes. - The user interface for entering that data manually - known as
forms. - The things you can do with a case - known as
activities.
In this lesson, we update the Employee casetype to:
- Make the
Last nameattribute a mandatory field on theEdit employeeform. - Add a new attribute to record an employee's email address and include it as a mandatory field on the
Edit employeeform.
This ensures that when users add a new employee to the Development environment, they will have to specify at least their last name and their email address.
Lesson 3 - Roles and rights
Grexx Platform has been designed with strong security at its core. This includes the principle of least privilege, which means users are never granted more access than they need. As a result, you will find that your application users do not have permission to do anything in your application by default. Instead, you need to grant permissions explicitly so that users can view data and make changes in your application.
In this lesson, we create the HR employee user role so that in future lessons, we can grant users in the HR employee role permission to view data and perform specific activities.
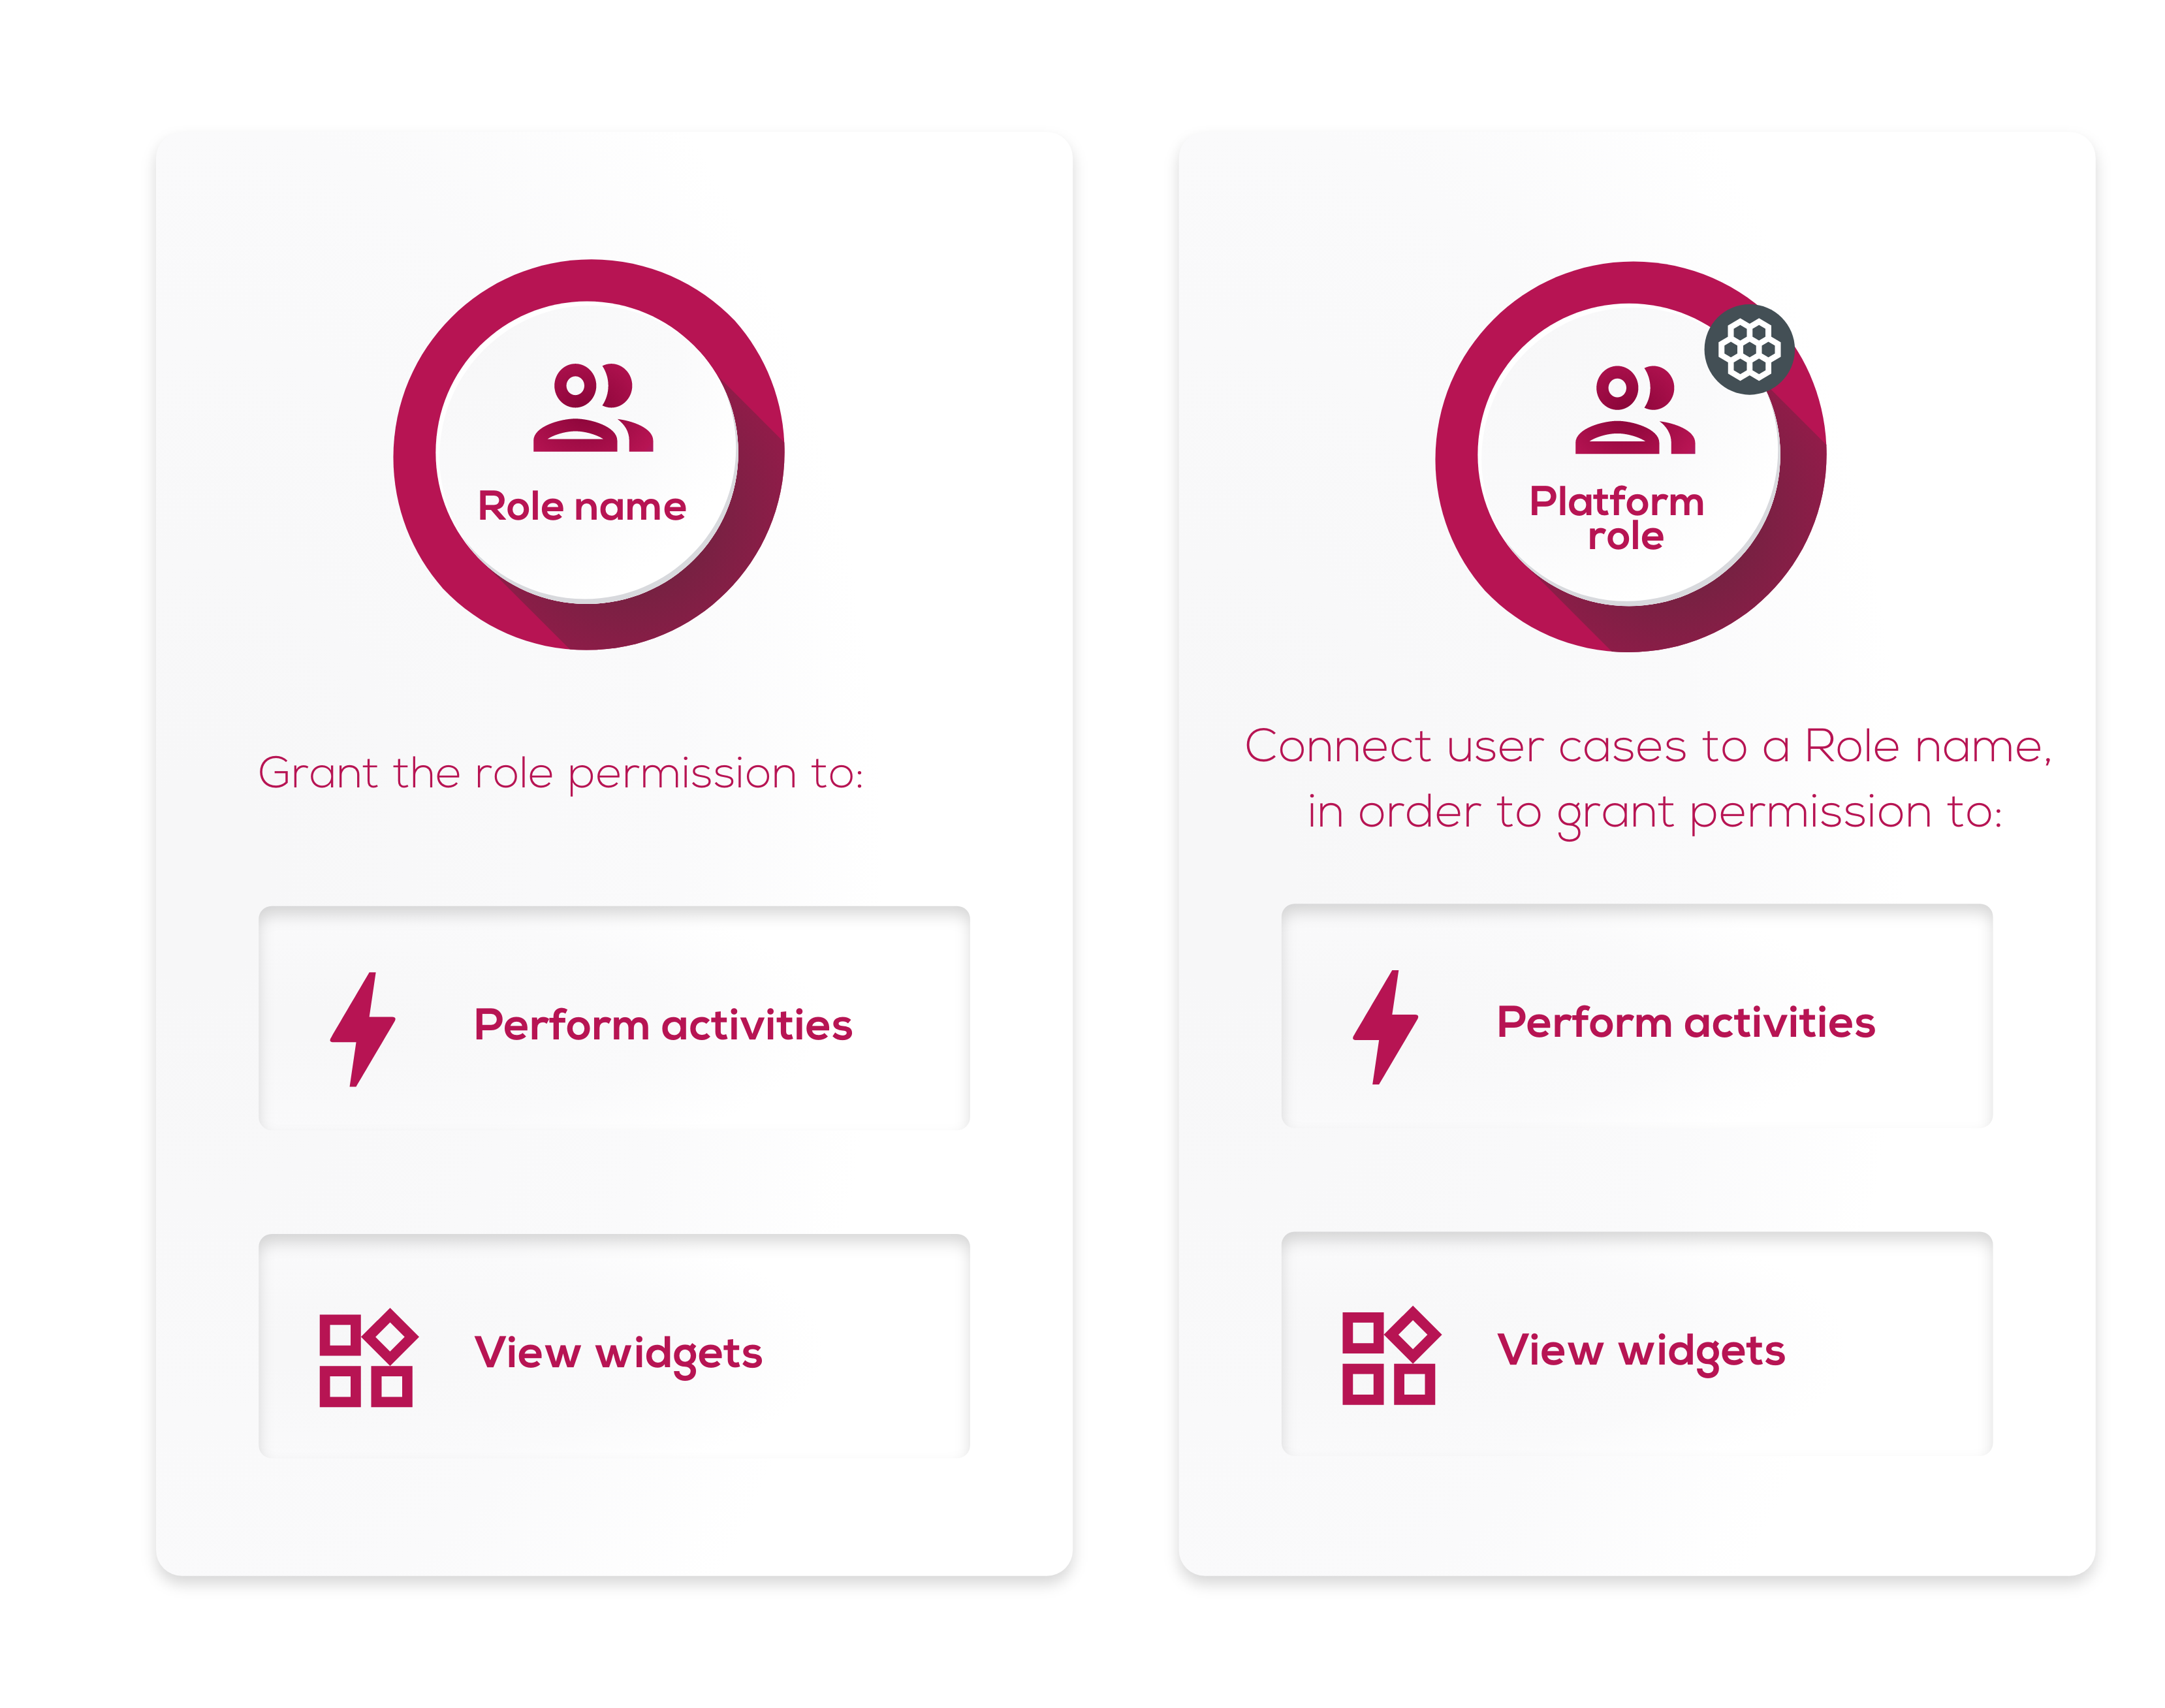
We create the new role and make it possible for application users to add users to the role with the following steps:
- Add an attribute to the
Homepagecasetype that will record the application users that have been added to the newHR employeerole. Associate the attribute with theAll userspicklist, so that any existing application user can be added to the role. - Create the
HR employeerole name and then create theHR employeeplatform role. Platform roles can be given permissions on all casetypes. - Add an
Edit HR employeesactivity and associated form to theHomepagecasetype. The form contains theHR employeeattribute, which allows the user to select from a picklist of all users. - Give authenticated users (a platform role included by default in your system) request rights on the new
Edit HR employeesactivity. This ensures all logged in users can add application users to theHR employeeplatform role when testing the application in the Development environment.
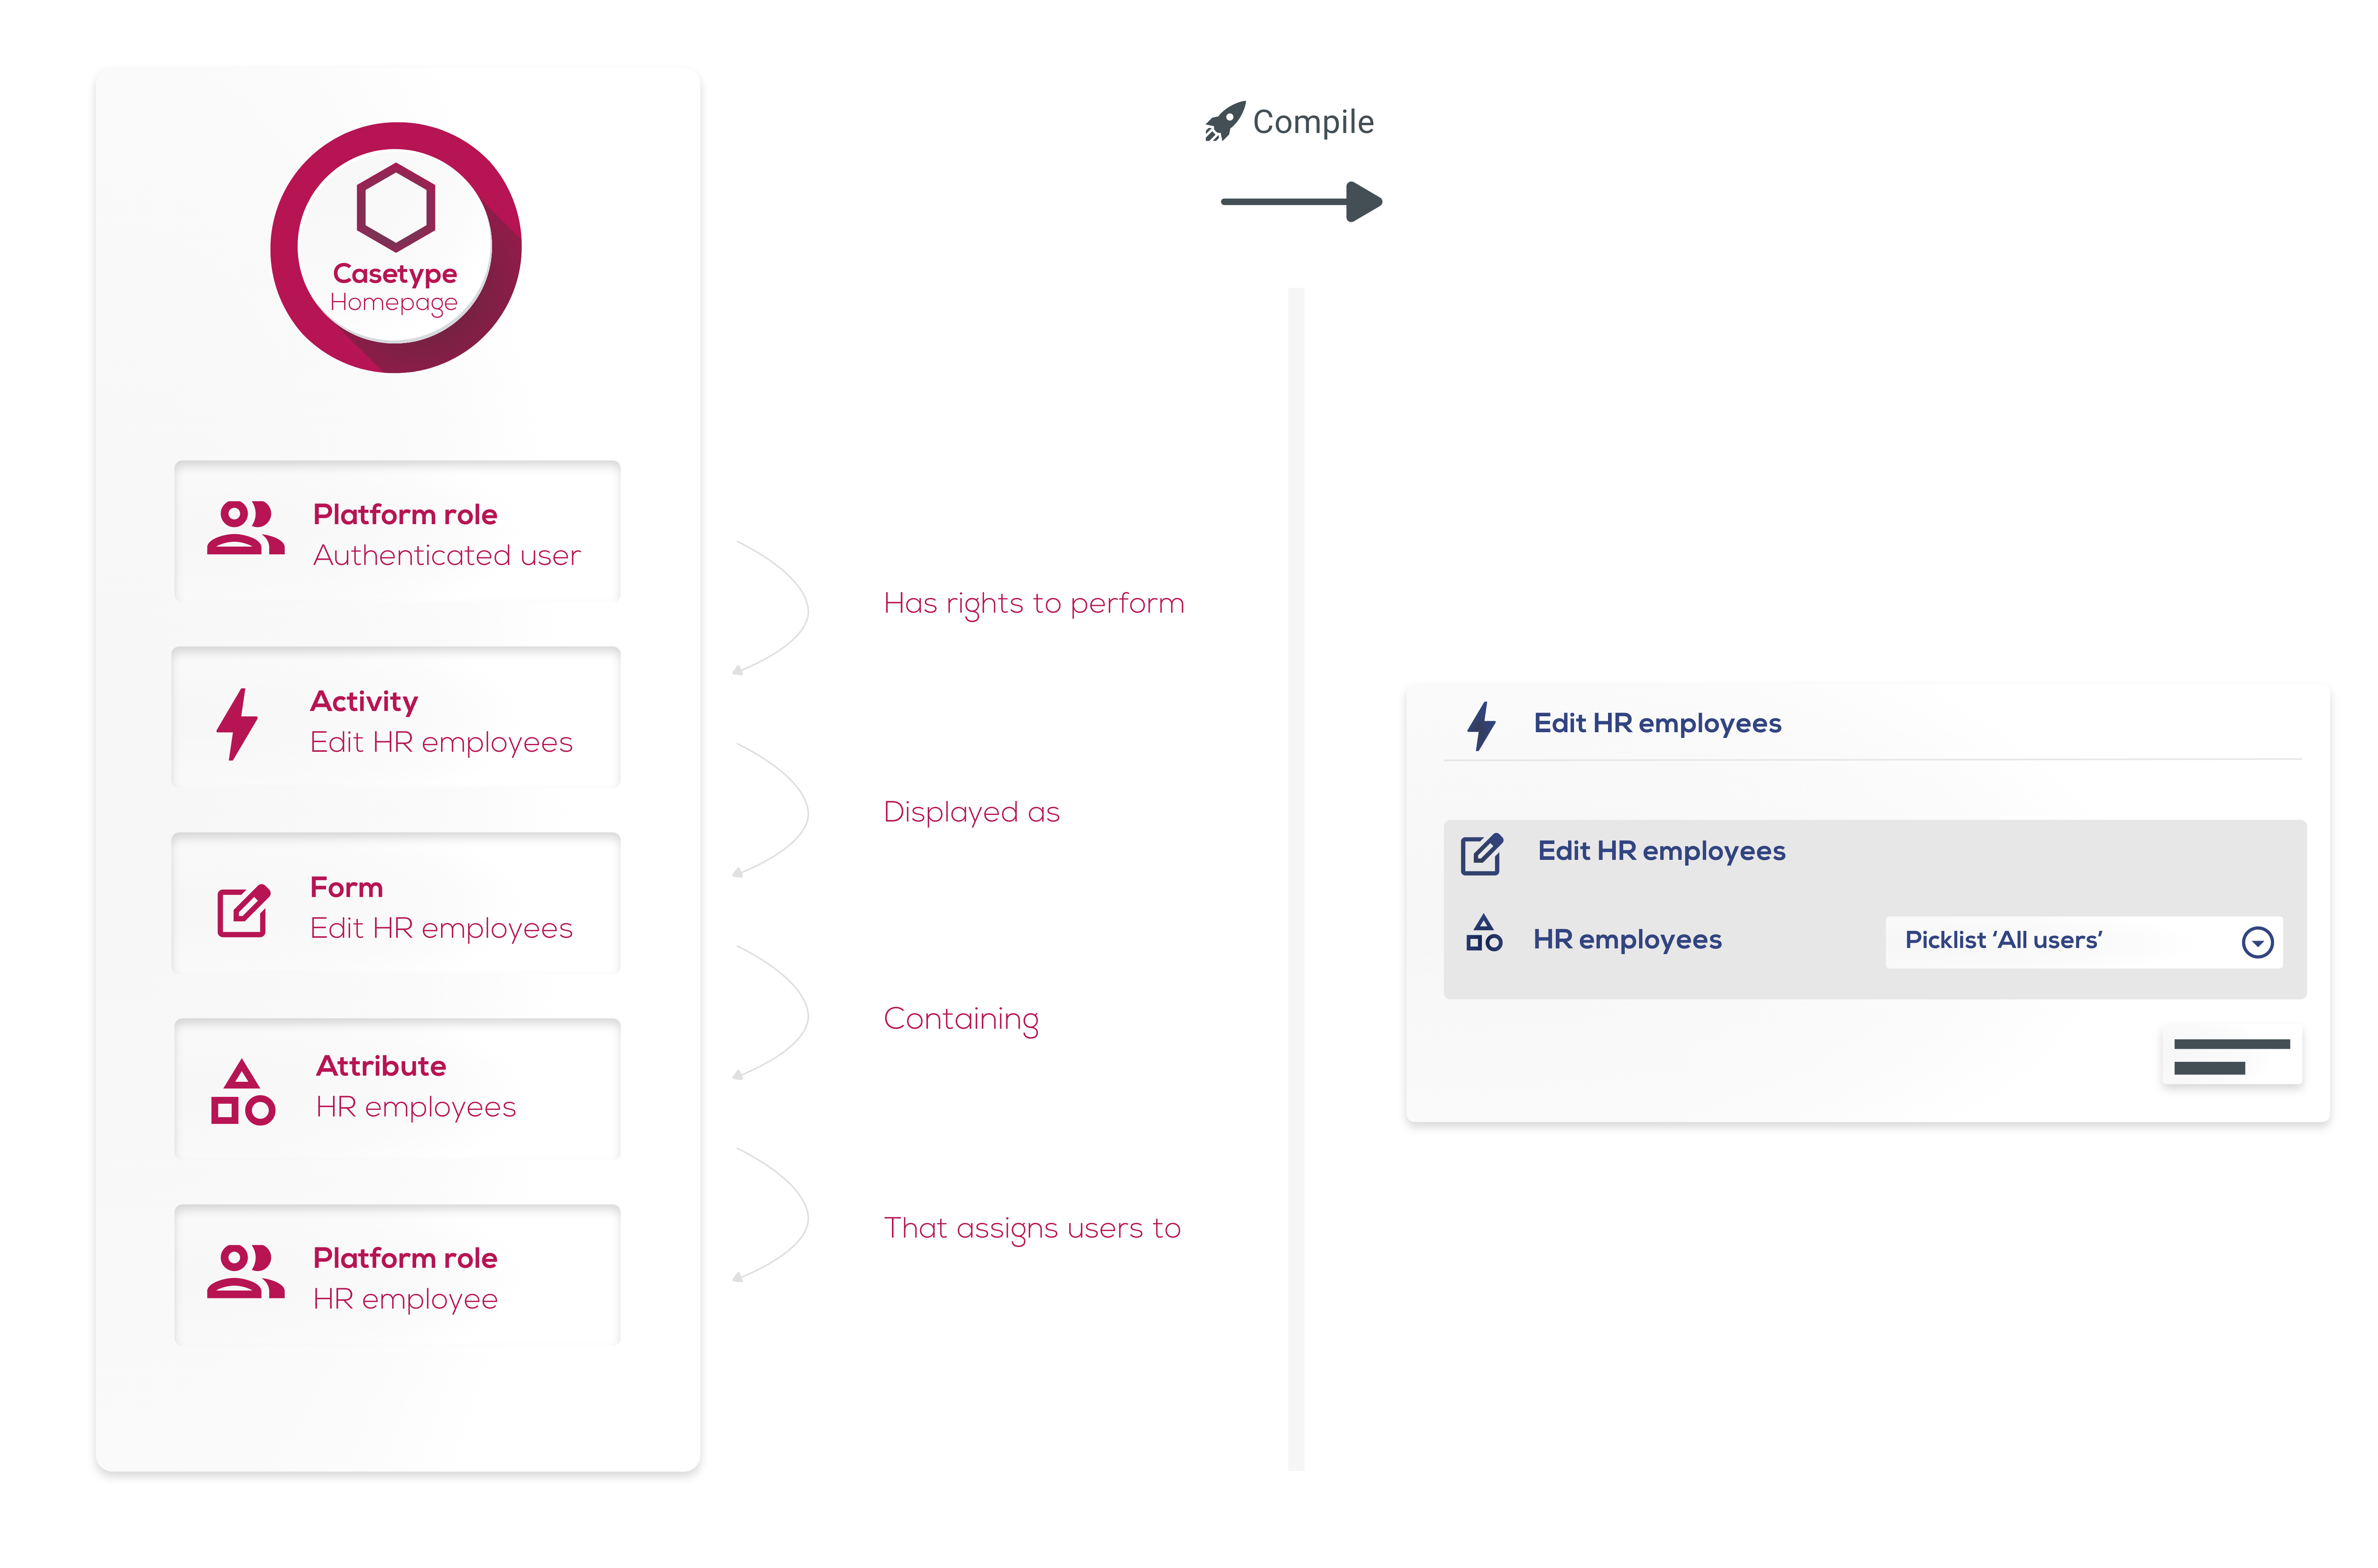
Before using the application in Production, we recommend changing from this approach to a dedicated user management page that can only be accessed by a subset of users.
Lesson 4 - The beginning of a process
In lesson 2, we added an attribute to the Employee casetype and updated the Edit employee form to make two of the attributes mandatory. In this lesson, we add another attribute so that we can record each employee's start date. We then add a mandatory activity that uses a form to ask HR users to enter a start date for each new employee. We also add an Edit employee activity so that HR users can use the Edit employee form to update employees' details on an ad hoc basis.
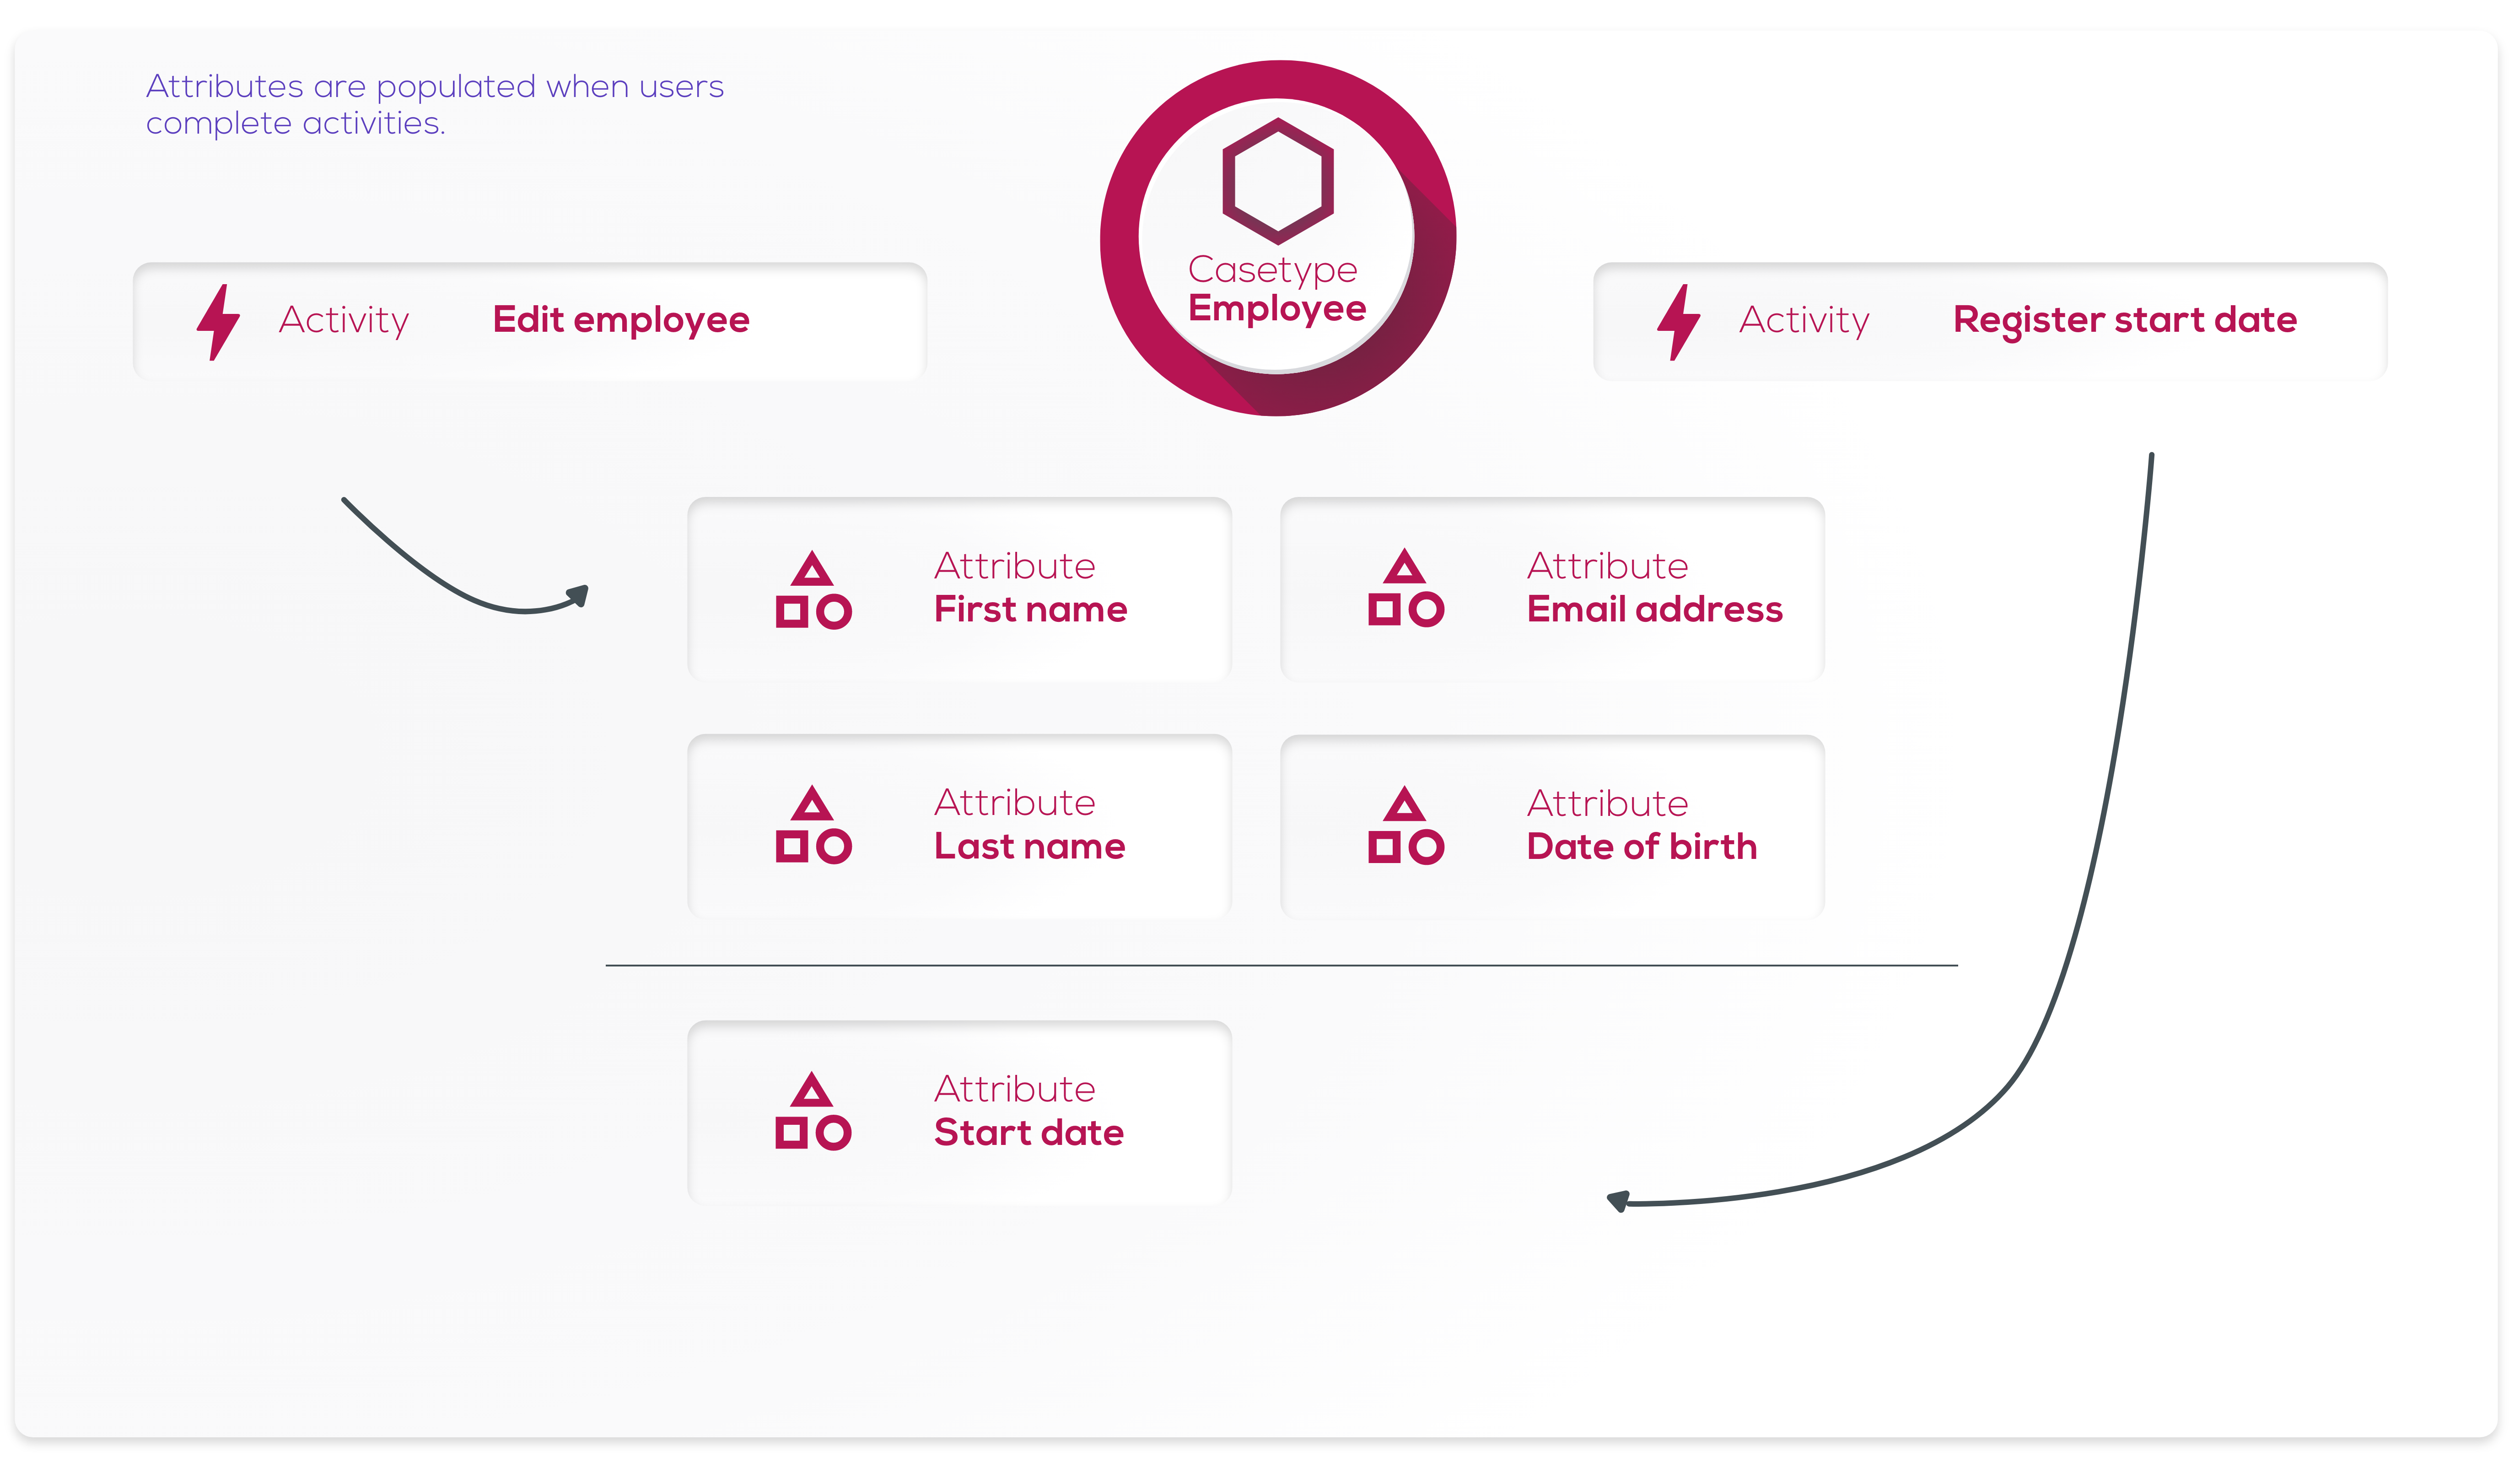
We could have included the new Start date attribute on the existing Edit employee form. However, for our use case it makes more sense to record the start date as a separate activity. This is partly because a start date does not need to be recorded for existing employees, and partly because the HR team often create a new employee in the system before their start date has been agreed.
Lesson 5 - Creating casetypes
We want to extend the functionality of our application to record each employee's department - such as finance, sales or HR. The first step is to create a new casetype for departments. We then add attributes to the new department casetype so we can record a name and a description for each department that we add.
We use the default Start department form to provide users with a way to add and edit departments. We give all authenticated users permission to perform the Edit department activity (which uses the Start department form). However, this on its own is not enough to make the form visible to users; we need to be able to open the form from somewhere.
To achieve this, we add a Create department activity to the Homepage casetype so that users can add new departments. The activity is a casetype activity. This means that each time a user completes the activity, they create a new Department case.
As well as creating new departments, we want users to be able to view a list of all existing departments from the homepage. We add a grid widget to the Homepage view to display the Department cases. If we wanted to display the list of departments on a dedicated page, we could instead have defined the view for the Department casetype.
Finally, we test our changes in the Development environment by creating a new department and checking that it is displayed in the new grid on the homepage.
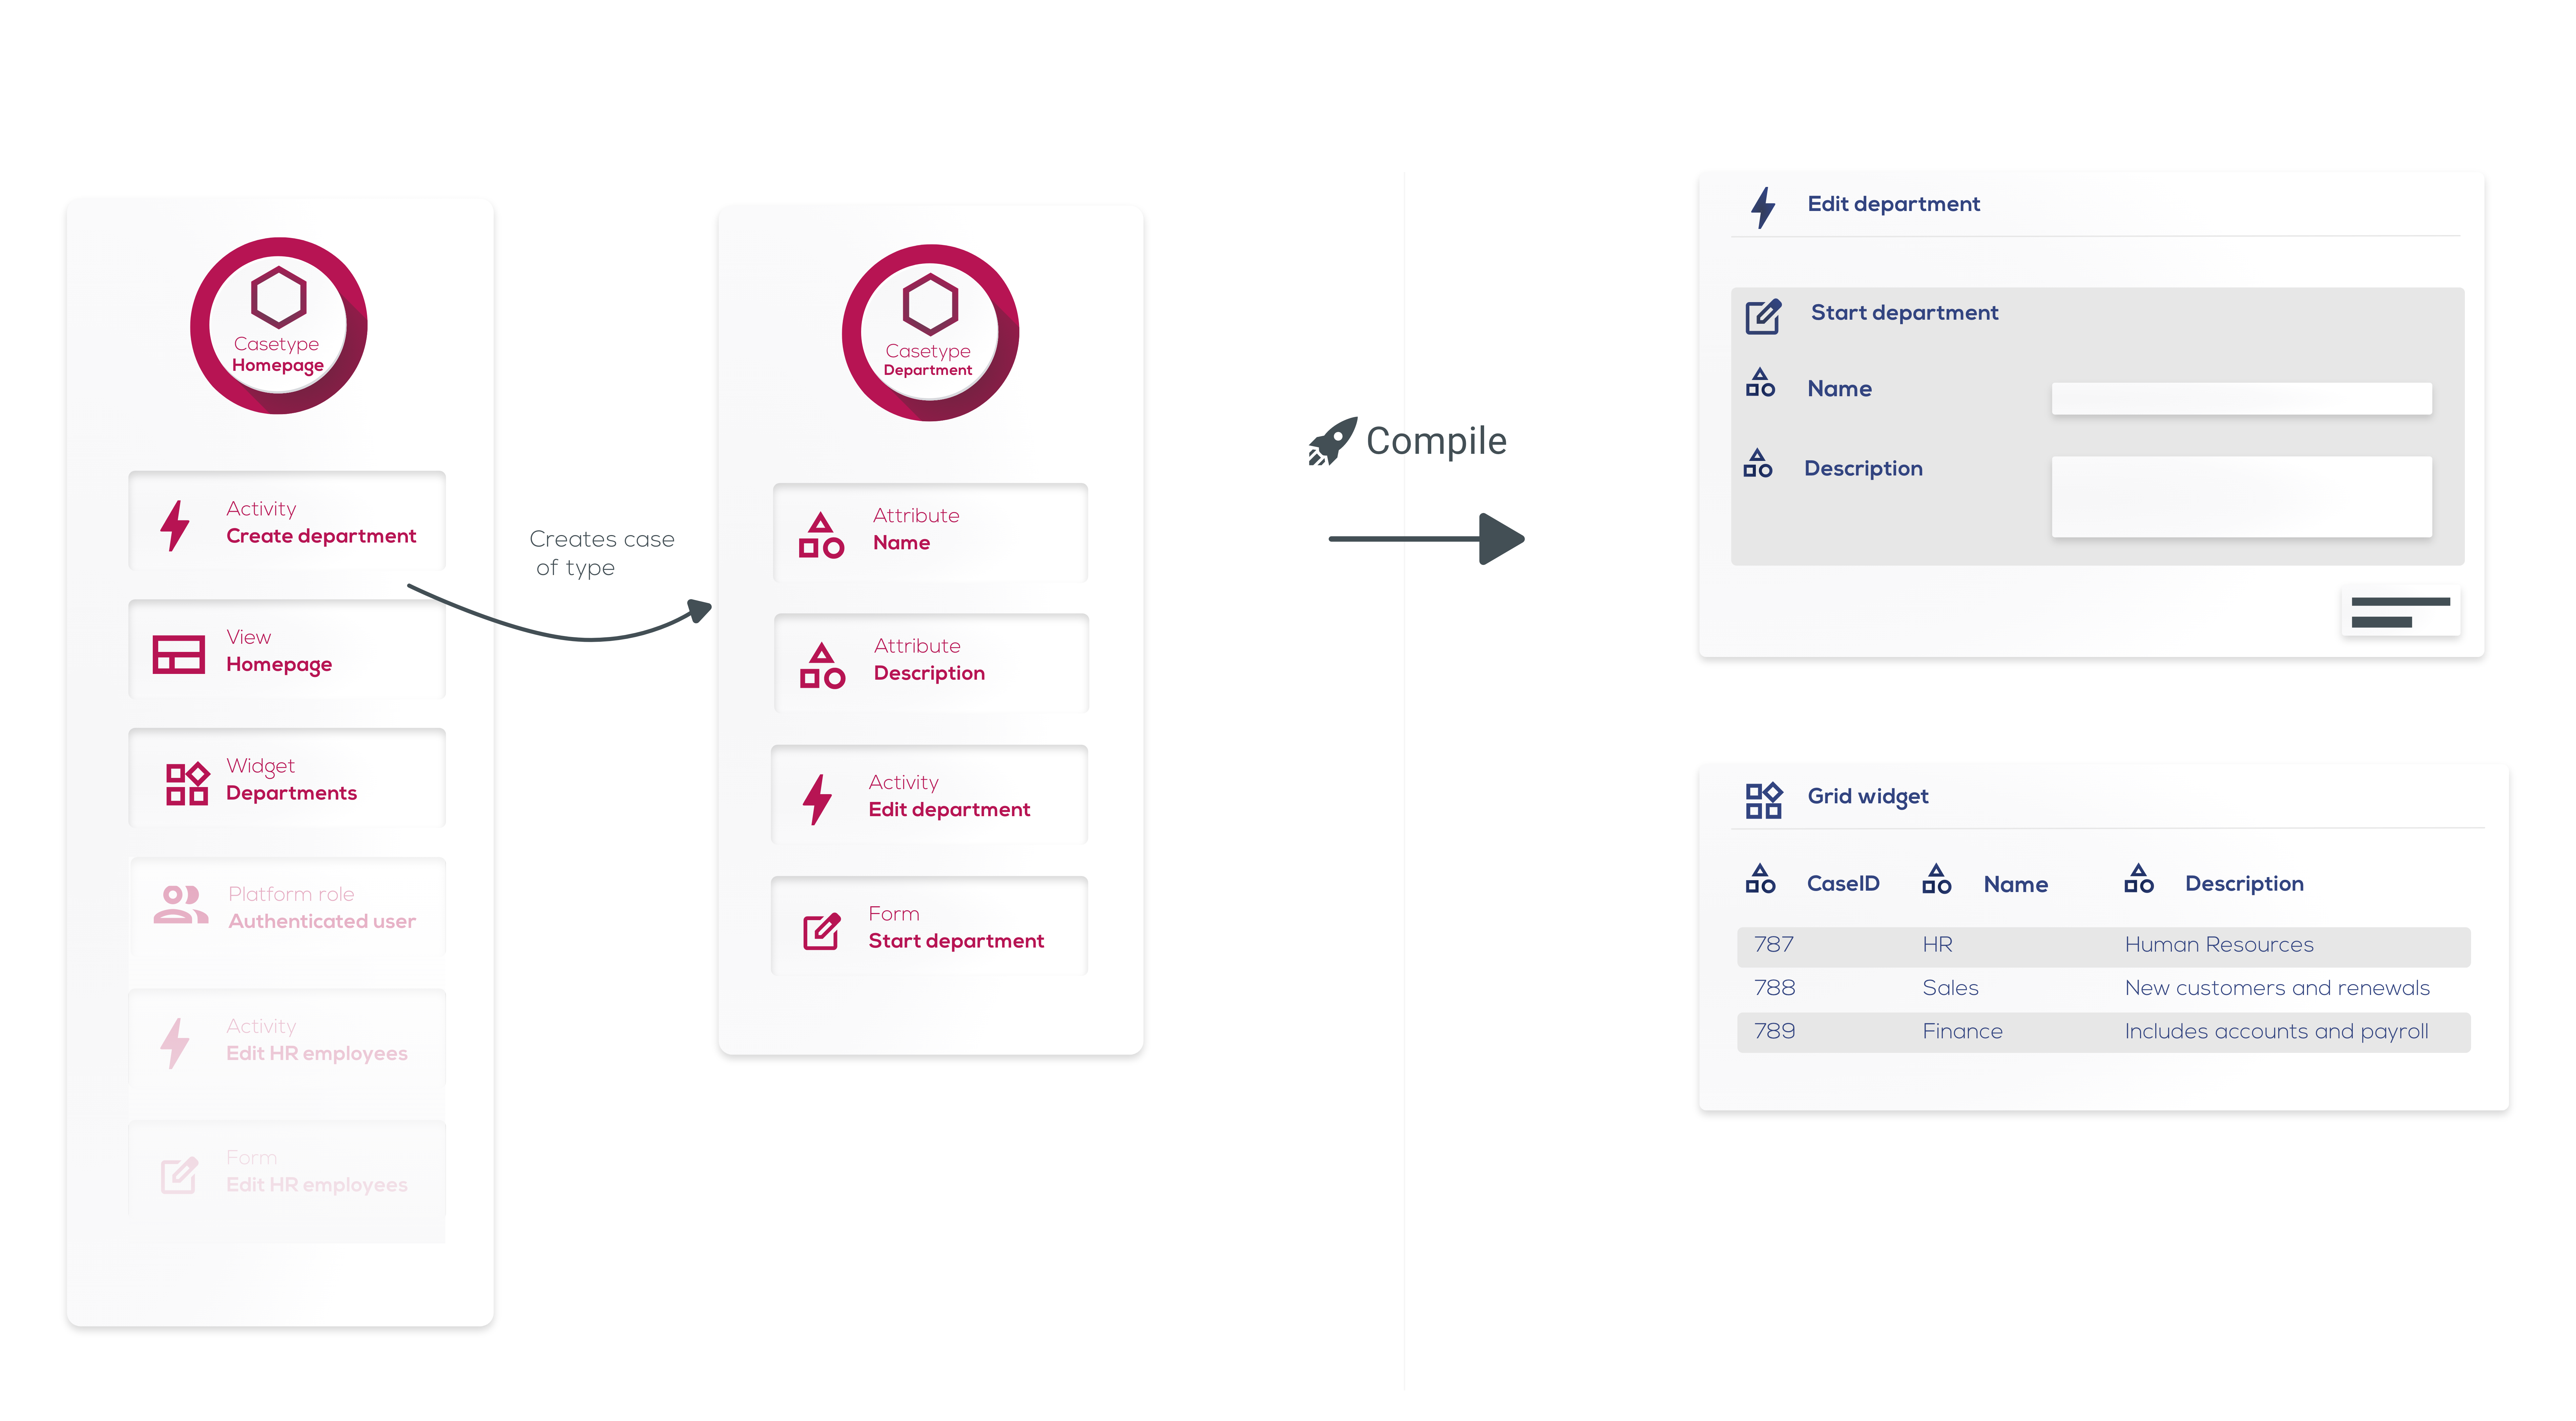
We define the Department casetype in the Studio, but we add the individual departments (cases) to the Development environment. If you deploy the HR application to another environment (such as Testing, Acceptance or Production), the Department casetype will exist but none of the department cases will be copied across. Instead, you need to create a new set of departments for use in each environment.
Lesson 6 - Picklists
Now that we have a way to record the organization's departments, we want to be able to record the department to which each employee belongs. As several employees will belong to the same department, we don't want to make this a free text attribute. Doing so could easily result in duplicate departments and would mean we cannot access other department details from an employee's case.
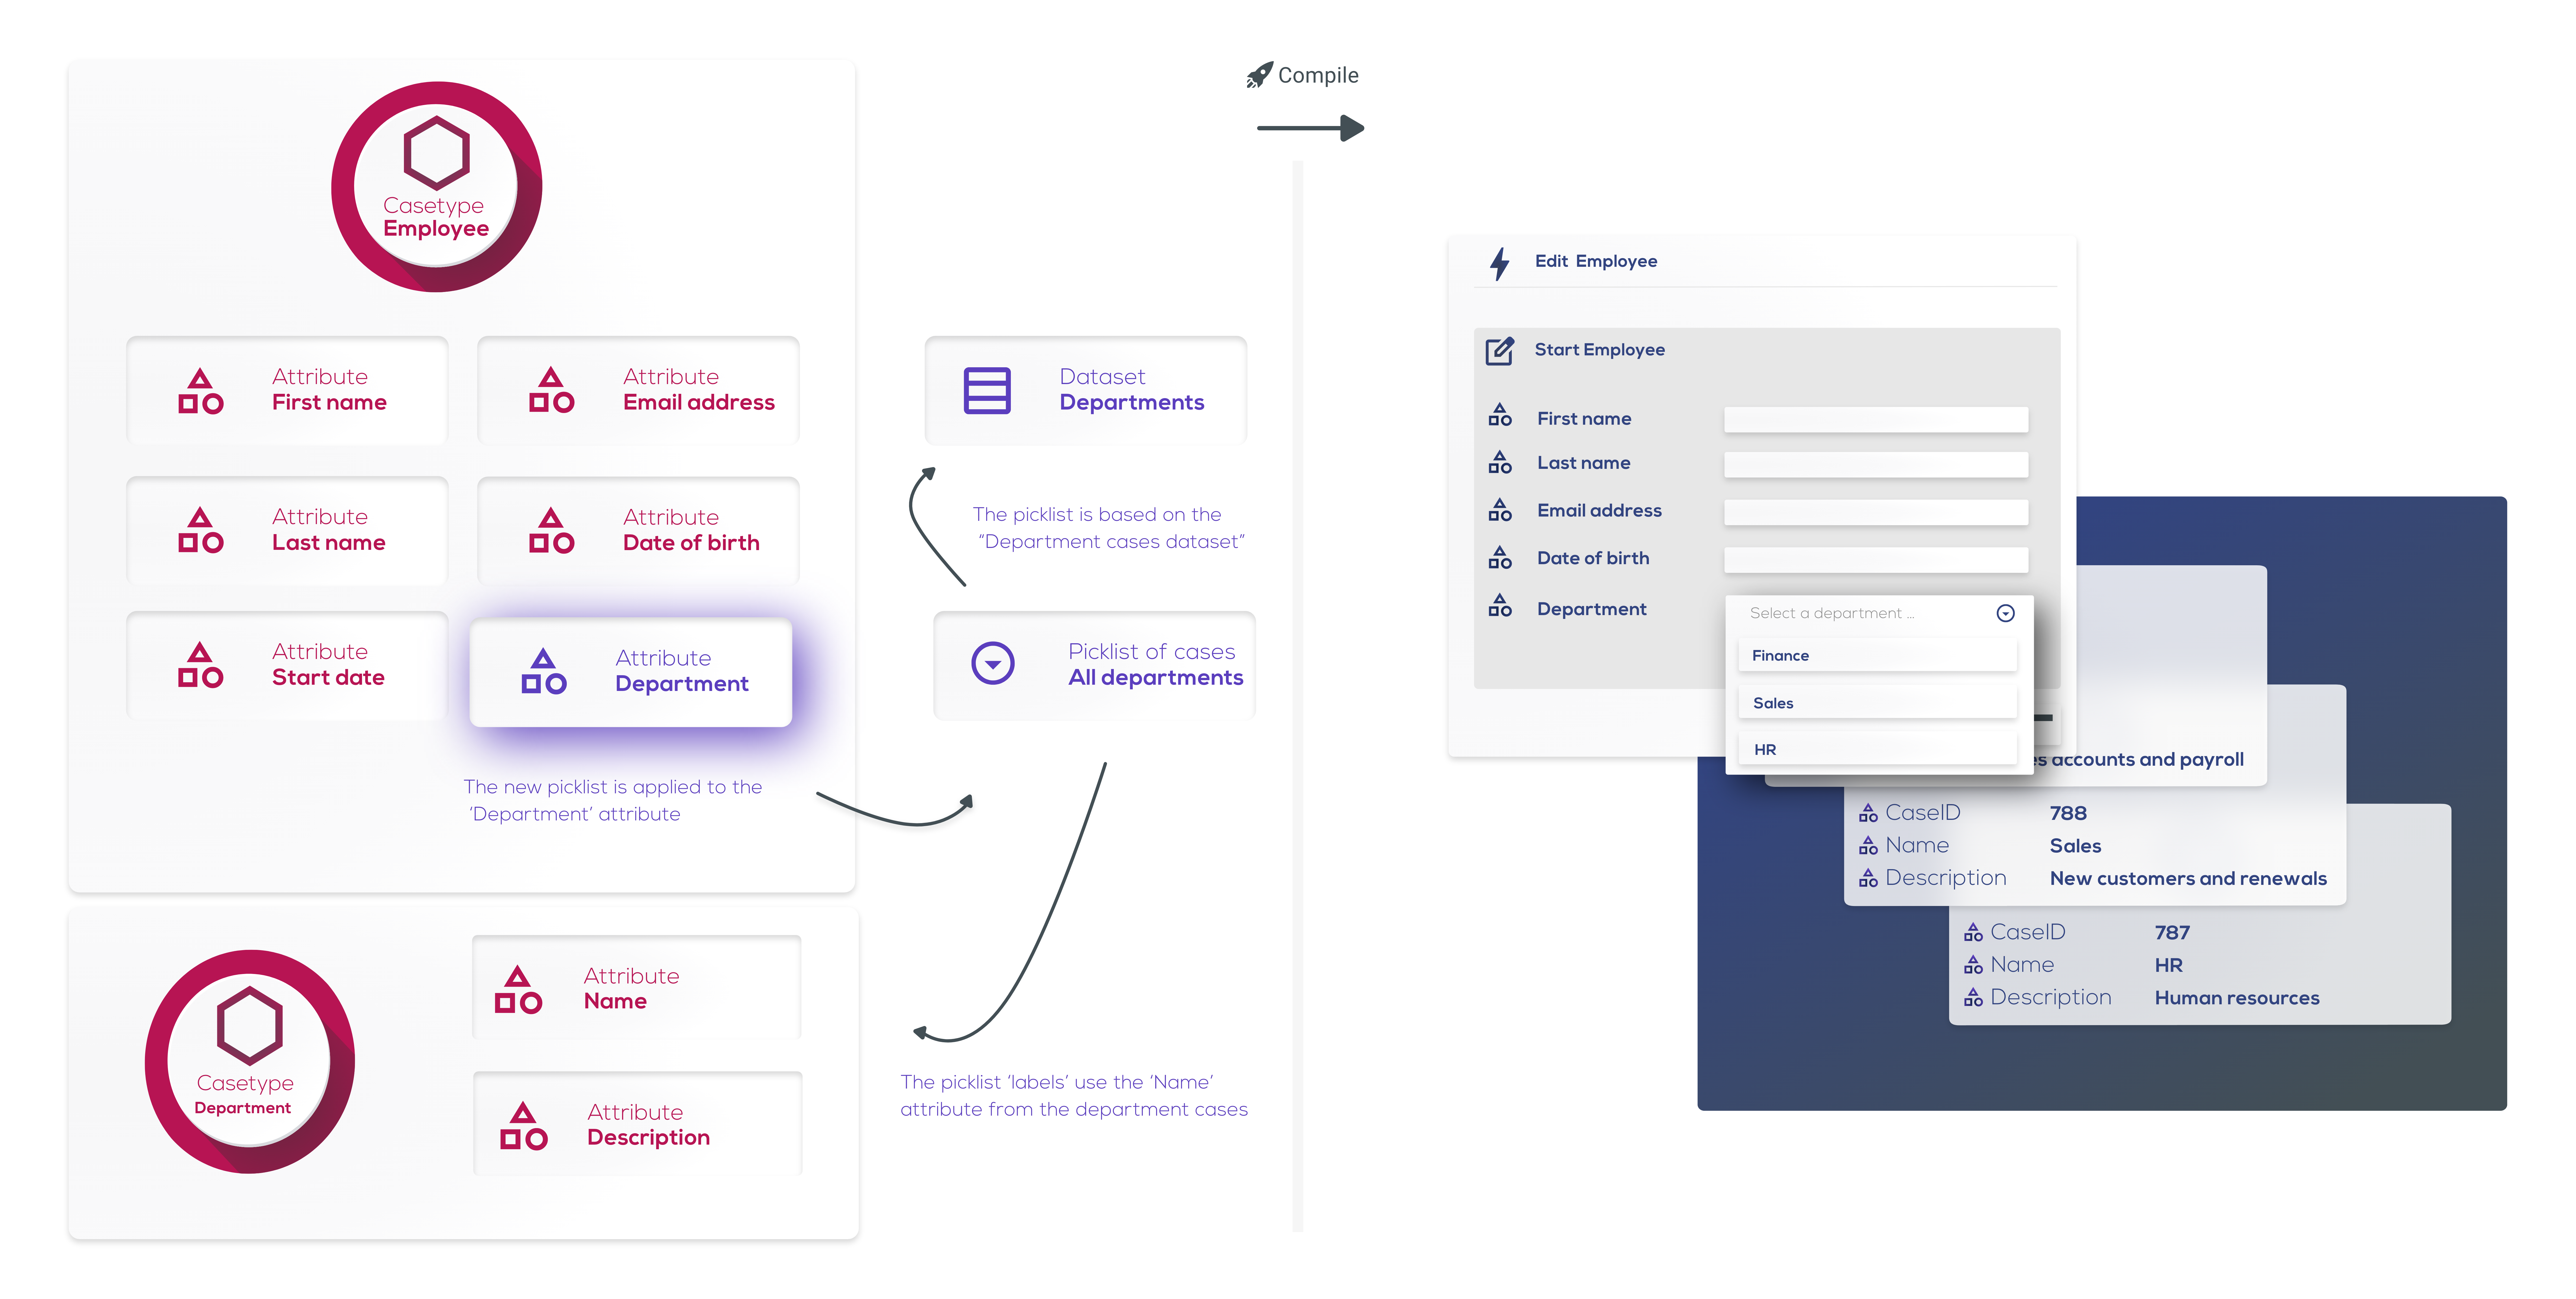
By creating a picklist of the department cases, we can ensure application users can only select from the existing list of departments, thereby avoiding duplication in the data. The actual list of departments will be populated in each environment as new departments are added.
The first step is to create a new picklist using the department cases as the dataset. We set the picklist label to the department name (i.e. the Name attribute of the Department casetype) to make it easy for application users to select the appropriate department.
Next we need to add an attribute to the Employee casetype so that we can record each employee's department. Because we want to use our existing department cases, we set the attribute type to Case ID and select the Department casetype and our new All departments picklist.
Finally, we need to add the new Department attribute on the Employee casetype to the Edit employee form so that application users can select an employee's department from the picklist.
Lesson 7 - Debugging
In the course of building your application, some things may not behave as you expect. Grexx Platform includes Developer Tools to help you understand why your application is behaving in a particular way.
To open the Developer Tools, go to your Development environment and press Ctrl+Alt+S or Win+Alt+S (where Win is the Windows key on a PC) or Command + Option + S or Control + Option + S on a Mac. By default, details of the current case are displayed. If you're currently on the application homepage, details of the homepage case are displayed.
Once you have opened the Developer Tools, you can navigate around your application as normal. The case details update according to the case you are currently viewing.
For more information about using Developer Tools, see Debug your application.
Lesson 8 - Adding relationships
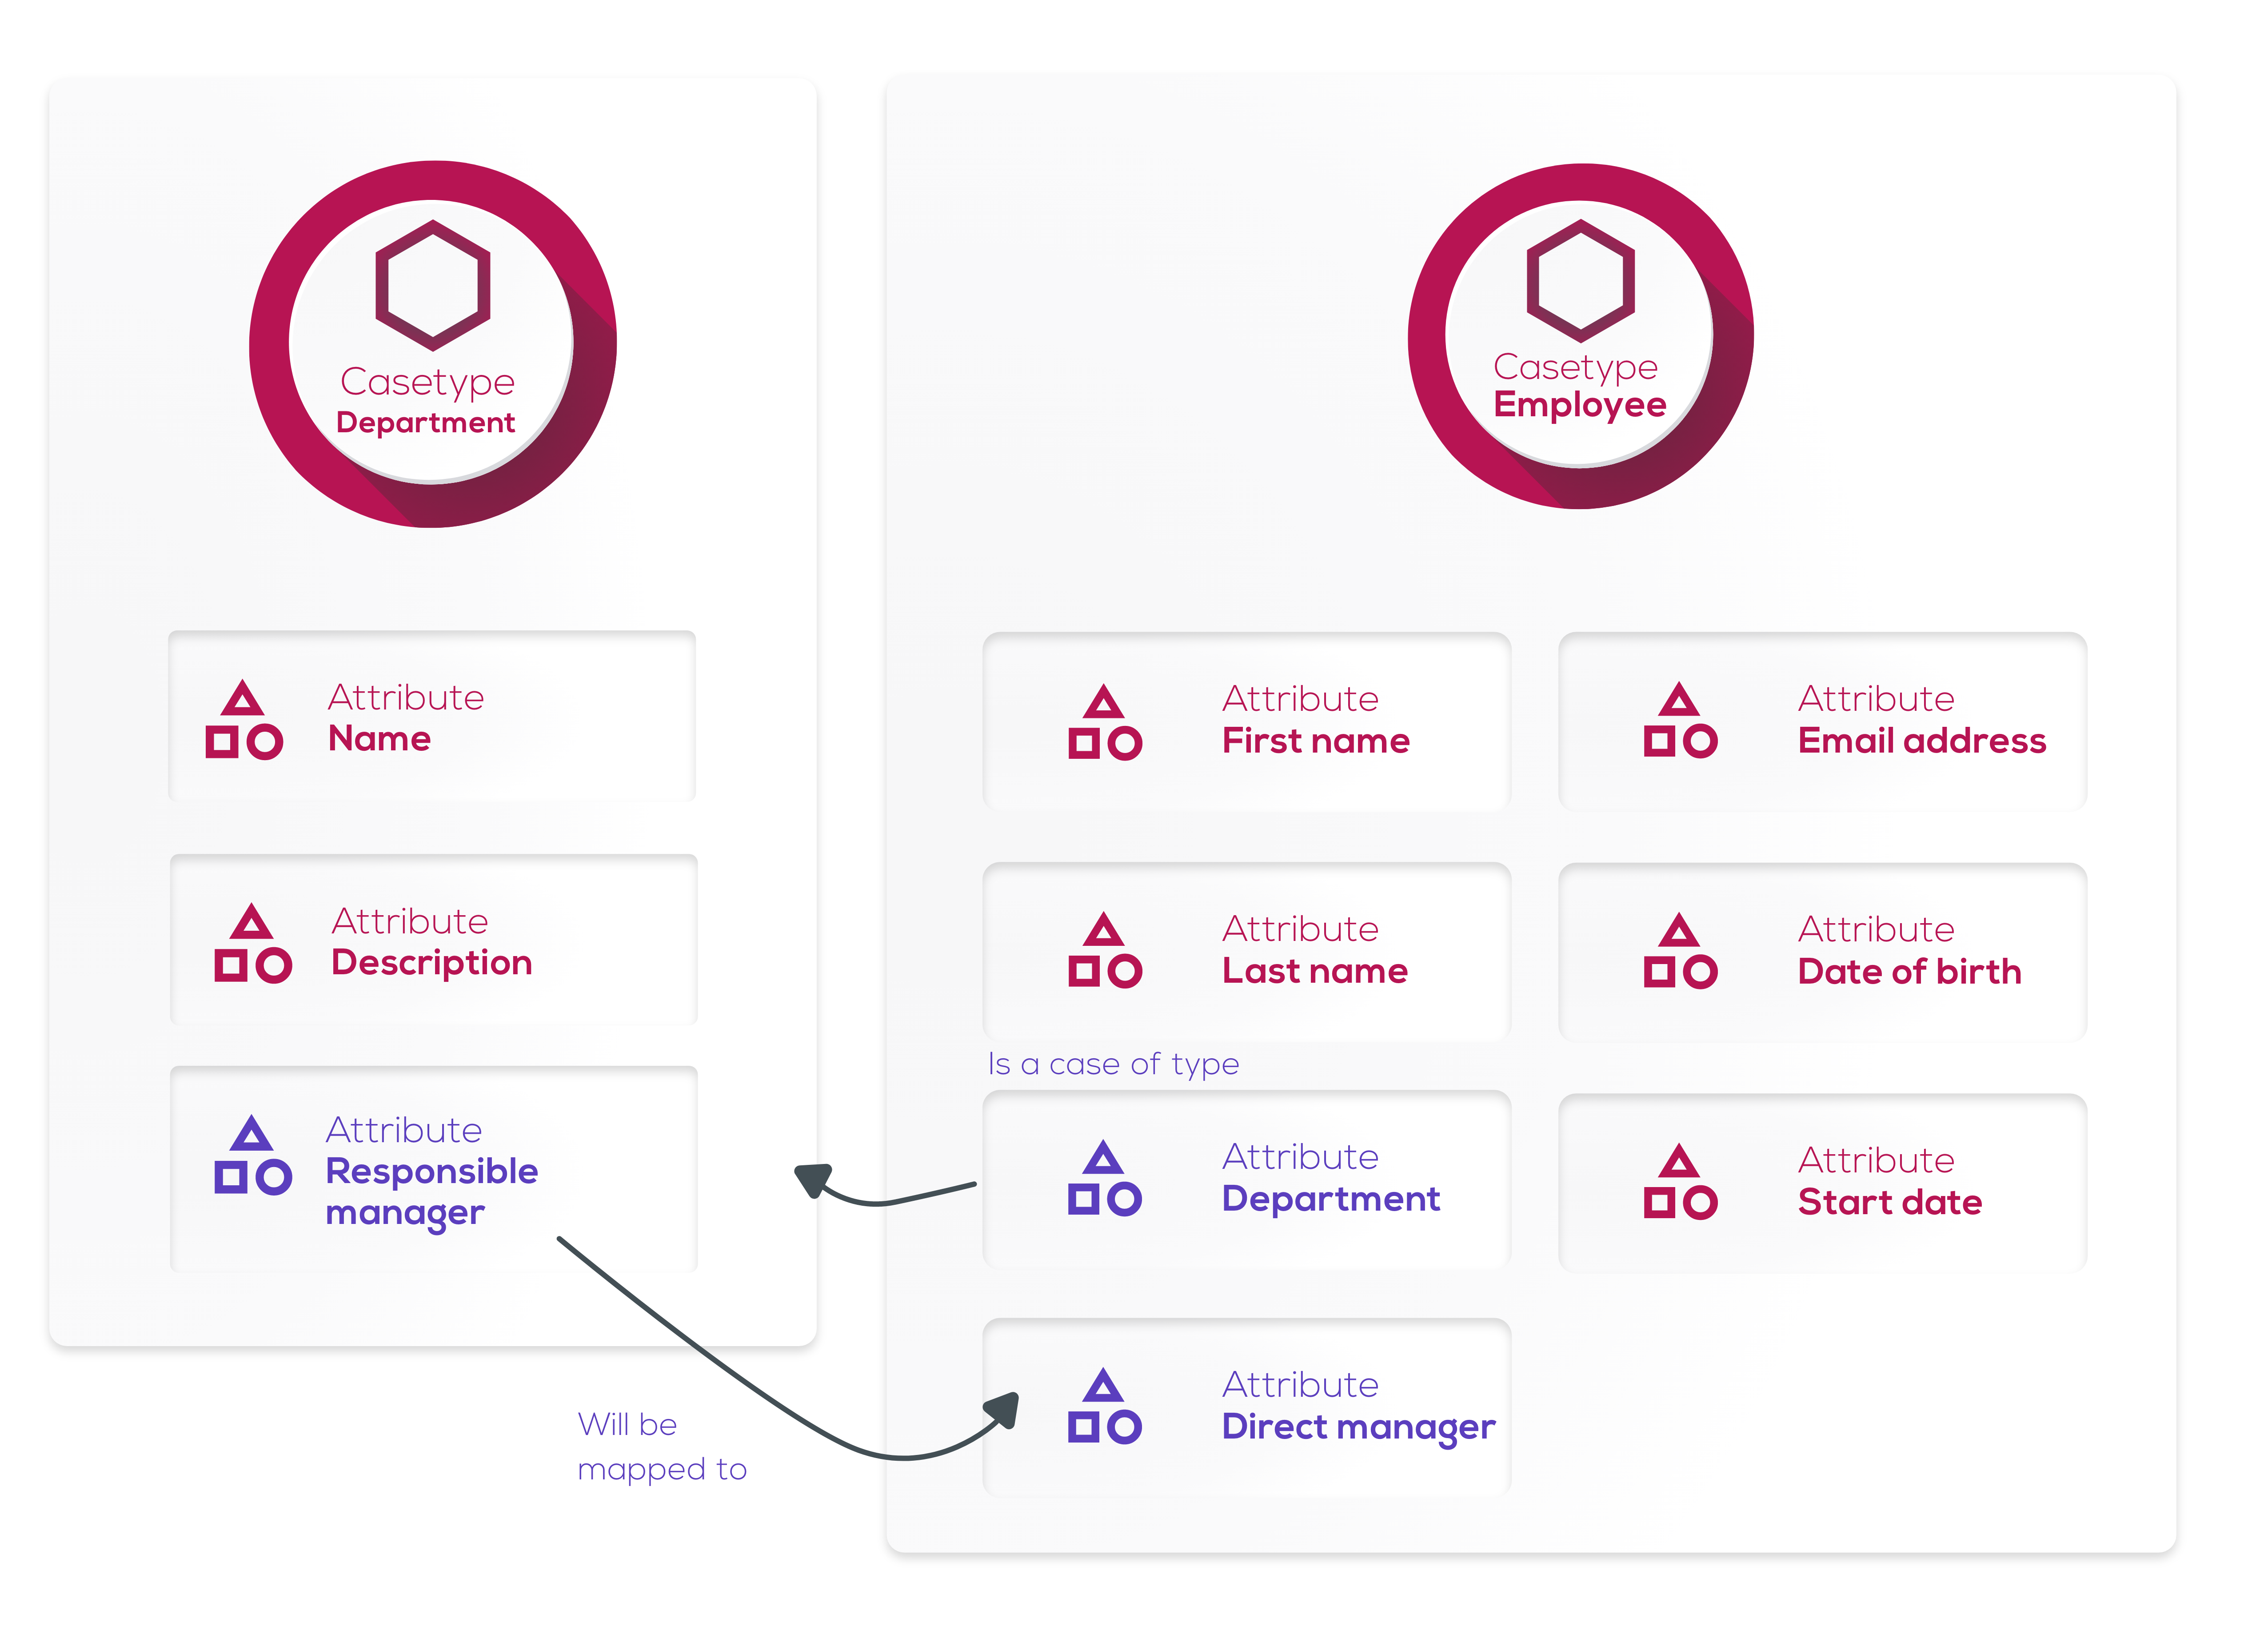
In our use case, each department has a responsible manager, who is also the direct manager for all employees in that department. Now that we have associated departments with employees, we can identify each employee's direct manager based on their department.
The first step is to add a new attribute to the Department casetype so we can record the name of the responsible manager. Because the responsible manager will always be a user in our HR system, we set the attribute type to Case ID and set the sub-type to the User casetype. We use the default All users picklist so that application users can simply select the responsible manager for each department from the list of application users. Then, we add the new attribute to the Start department form and make it a required field.
Once a responsible manager has been specified for a department, we want that information to appear on our employee records based on the employee's department. There should be no need to enter data twice!
Pulling data from one case to another (or from one field on a case to another field on the same case) is achieved by using mappings. Before we can add the mapping, we need to add a new Direct manager attribute to the Employee casetype.
As we want to populate the Direct manager attribute when the employee details are updated, we add some mapping logic to the Start employee activity that takes place when the activity is complete (When done).
To set up a mapping you need to specify:
- The field on the activity to be populated (
To attribute) - the newDirect managerattribute. - The operator - in this case
=. - The data to be pulled in (
From attribute) - theResponsible managerattribute from the employee's department. As we are pulling data from another case, we need to set up an inline template that tells the system to identify the employee's department based on theDepartmentattribute in theEmployeecasetype.
Finally, we need to add the new Direct manager attribute to the Edit employee form.
Lesson 9 - Computed attributes
As you develop applications with Grexx Platform, there will be occasions when you identify a better way to implement the same functionality. For example, you may want to restructure some existing logic so that you can more easily support new use cases in future. The process of replacing the underlying logic without changing the result is called "refactoring".
In this lesson, we refactor some of the work from the previous lesson to ensure that the employee's direct manager is always up to date. This will be useful if an employee moves to a different department.
We can achieve this by making the Direct manager attribute on the Employee casetype a computed attribute. This means the attribute value will be recalculated each time a user views or edits an employee. As in the previous lesson, we need to define a template that tells the system to use the Department field on the Employee casetype and link from that to the appropriate Department case and pull in the value from the Responsible manager field.
Lesson 10 - Inviting users
We want employees to be able to log in to the HR application so they can view and update their own data. We can use one of the built-in casetypes, Invite user to implement this feature with minimal effort.
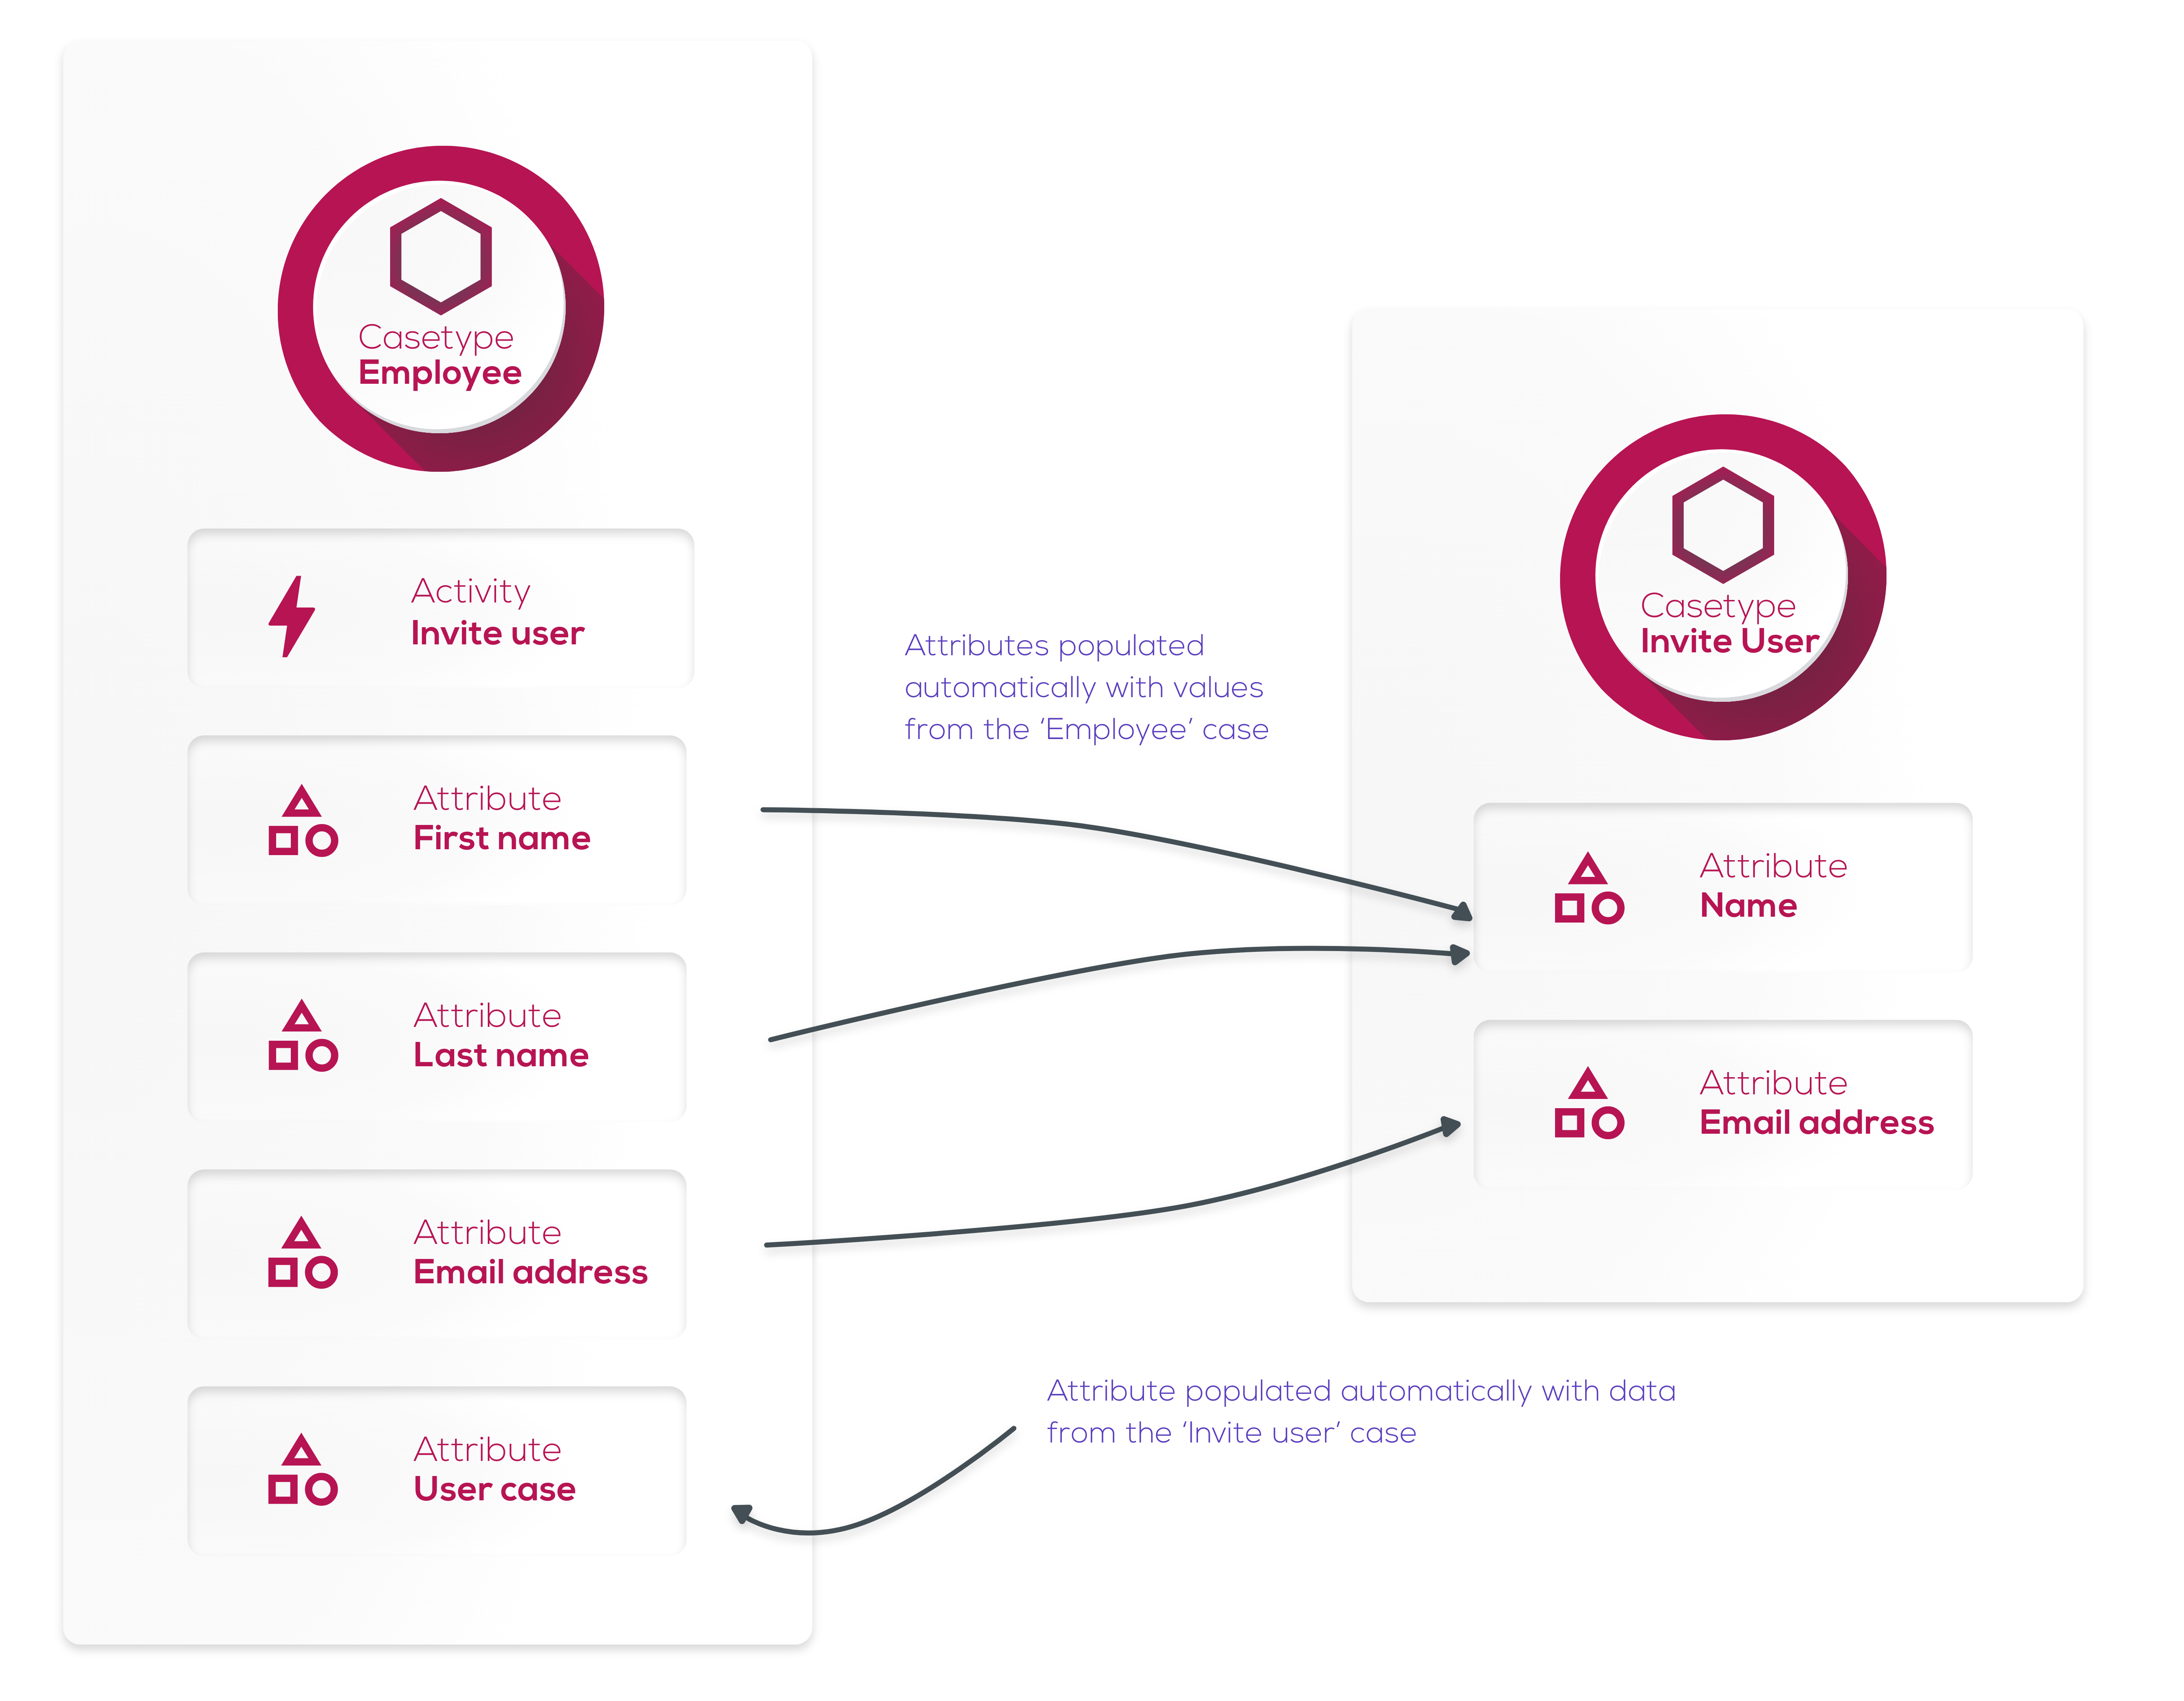
As our workflow involves HR staff adding employees to the system and then inviting those employees to log in and update their own data, we add a new Invite user casetype activity to the Employee casetype. The activity creates an Invite user case, using the default Invite user casetype.
The Invite user casetype is generic so that it can be used in many different contexts. We use the activity to customize the behavior to the situation. In this lesson, we apply mapping logic to the start of the activity (On start) to populate the Invite user case Name and Email address attributes from the relevant attributes on the Employee case.
We also want to store the newly created User case ID on the Employee case so that we can easily see which user is associated with which employee. To do this, we add a new User case attribute to the Employee casetype. We then create another mapping to populate the new User case attribute with the case ID from the User case when the Invite user activity is completed (When done).
Note that Users and Employees are two different casetypes, reflecting the fact that they are two different concepts. You could create an employee record without adding them as a user of the application, and you could have a user that is not an employee (such as an external auditor).
The next step is to give HR users permission to perform the Invite user activity. We then add a button to the employee grid on the homepage so that HR users can start the Invite user activity from there.
As per information security best practices, users are not granted access to any part of your application by default. This means you can control exactly what users can and cannot see and do in your application.
For this use case, we want employees that have been added as users to be able to view and update the data on their own Employee case. To achieve this, we add a direct role for employees to the Employee casetype and populate it from the User case attribute. This means that the application user associated with each employee case will be added to the Employee role on their own Employee case only. We then add the Employee role to the Edit employee activity and to the widgets on the Employee view so that each user can view and make changes to their Employee case data.
Lesson 11 - Uploading files
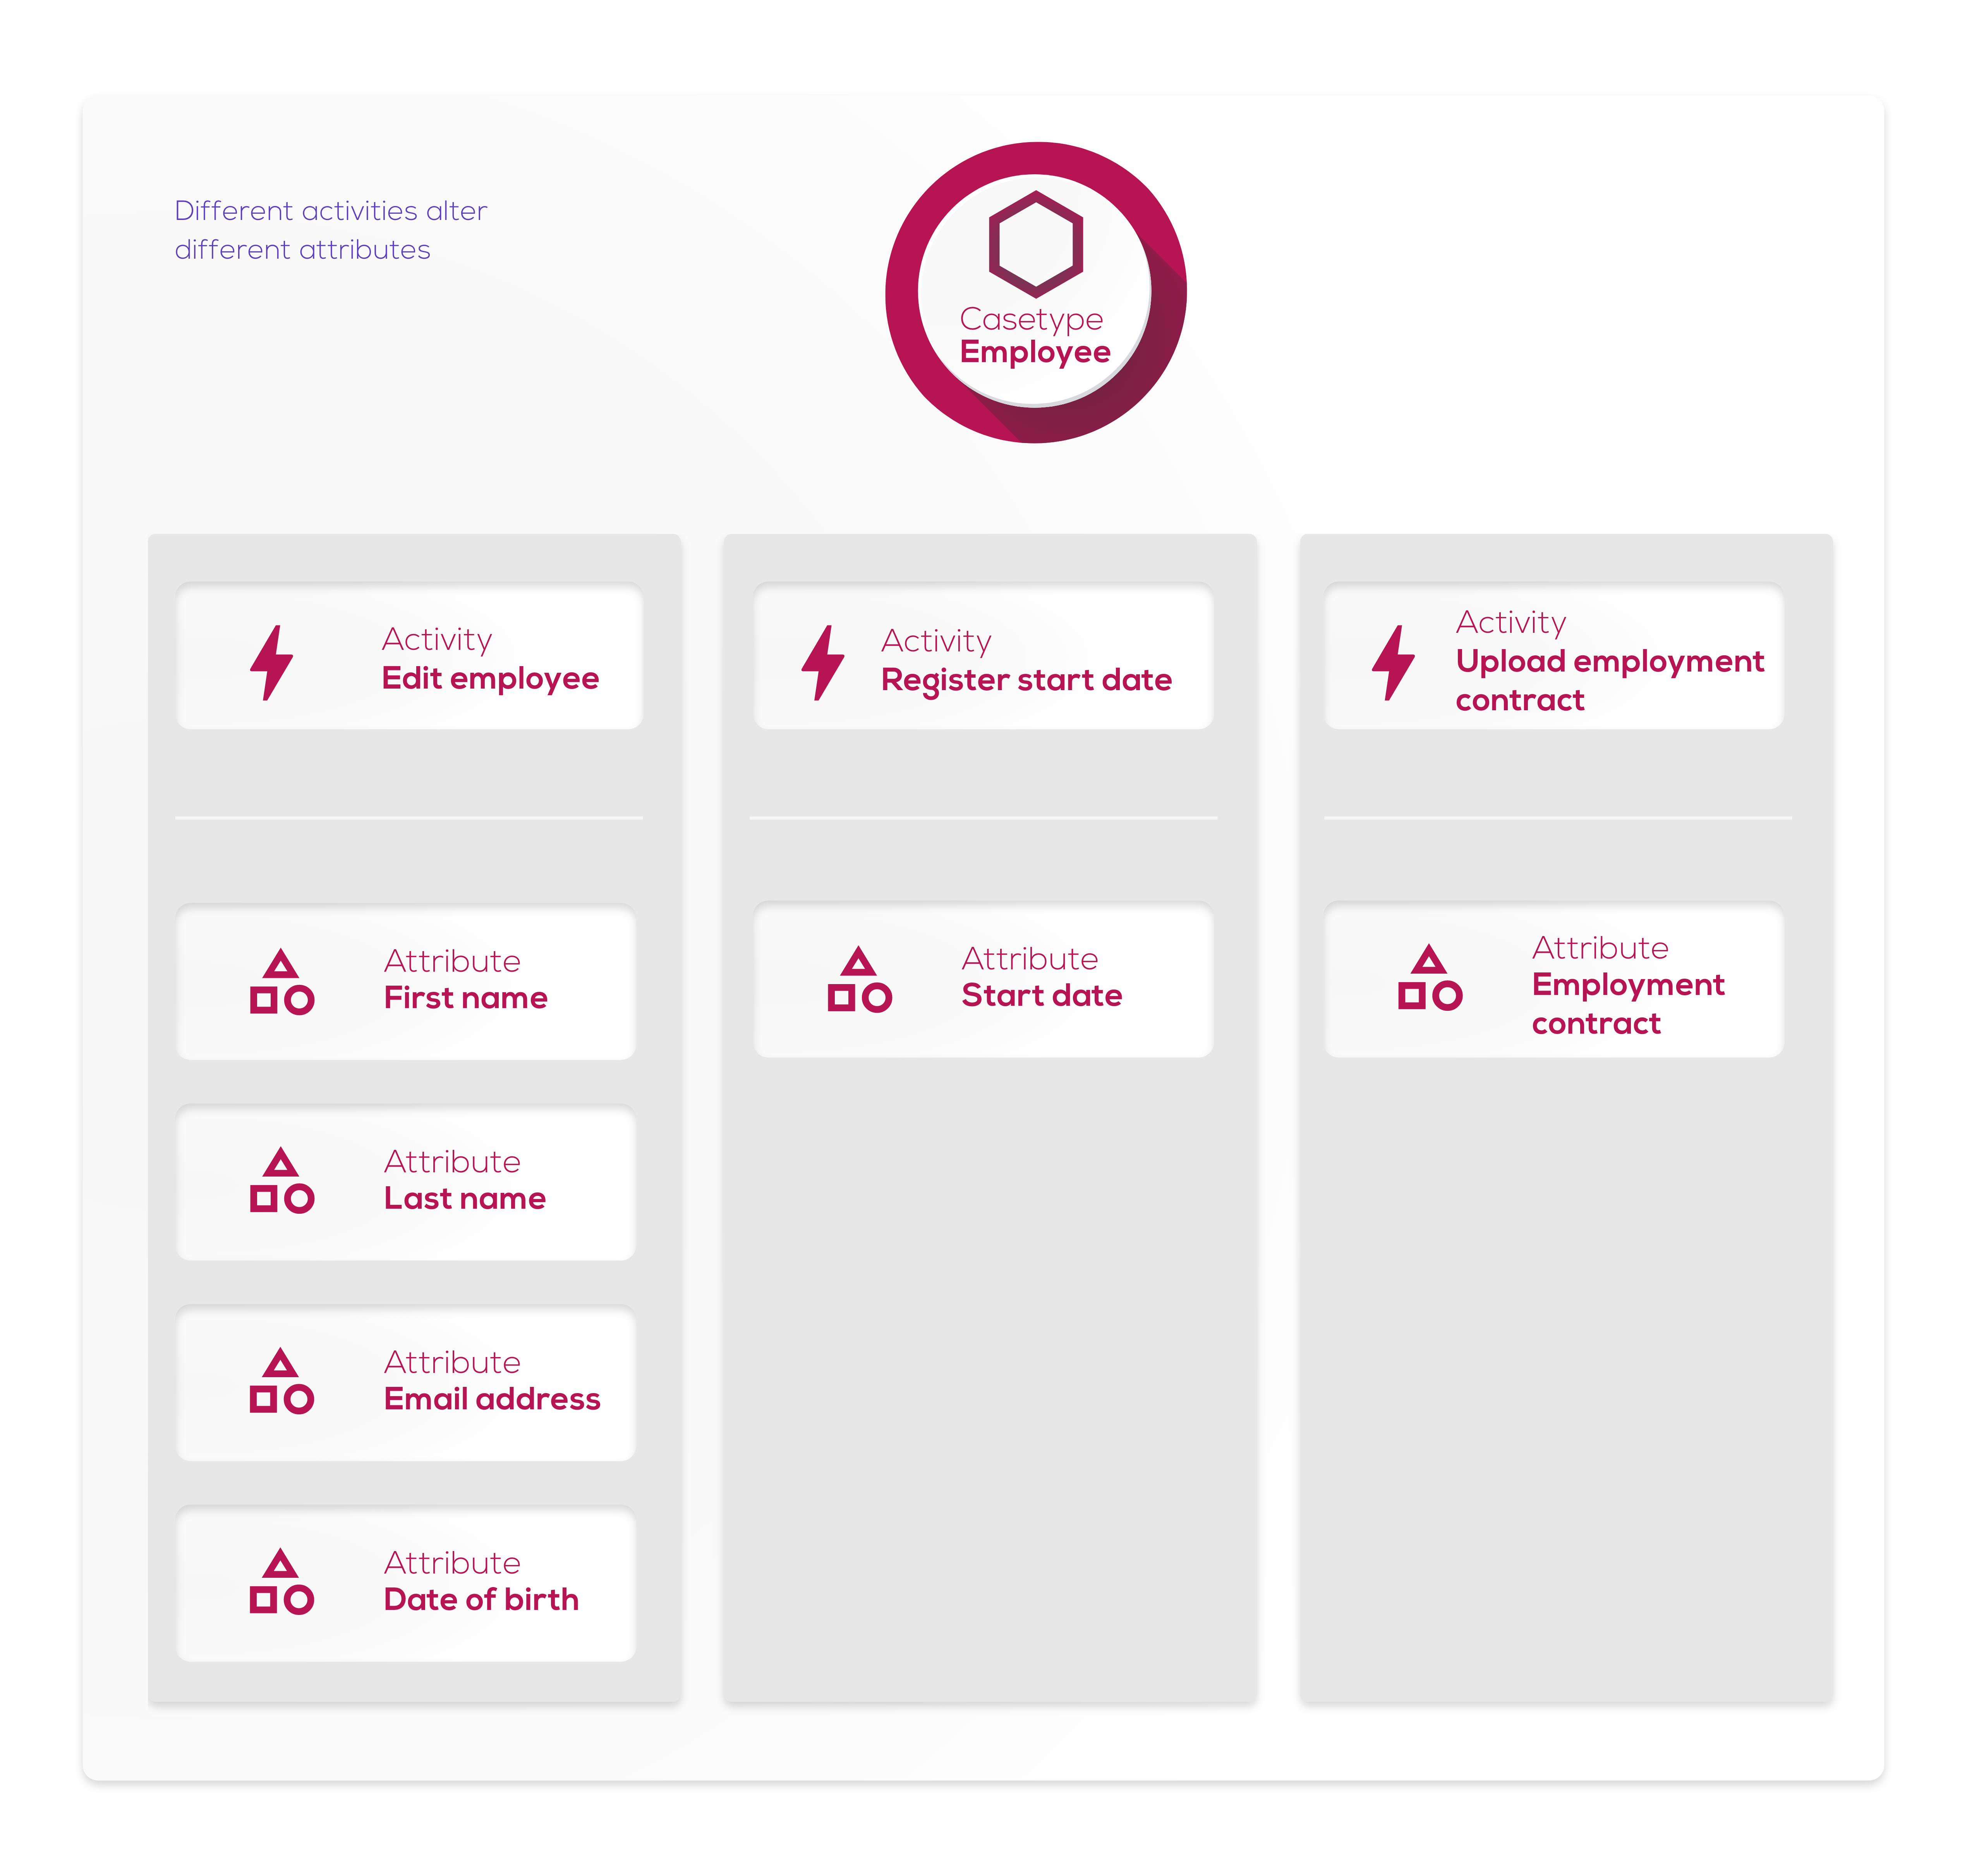
We want employees to upload their signed employment contract to the system for archiving. As we are not planning to use the uploaded files for any other purpose, there's no need to create a dedicated casetype. Instead, we simply add a new attribute to the Employee casetype.
Next, we create an activity so we can upload a file to the new attribute. Setting the activity Type to Form and leaving the Form field blank automatically creates a new form with the same name as the activity.
To ensure a contract is uploaded for each new employee, we make the form field mandatory, add the Execute right to users in the HR Employee role, and trigger the activity automatically when a new Employee case is created.
Finally, we add the field to the form included on the Employee view so that users can upload a contract to each employee.
Lesson 12 - Working with deadlines
To ensure employment contracts are uploaded for new employees in a timely manner, we want to set a deadline of a few days after the employee's start date with an automatic email reminder if the contract has not been uploaded by that date.
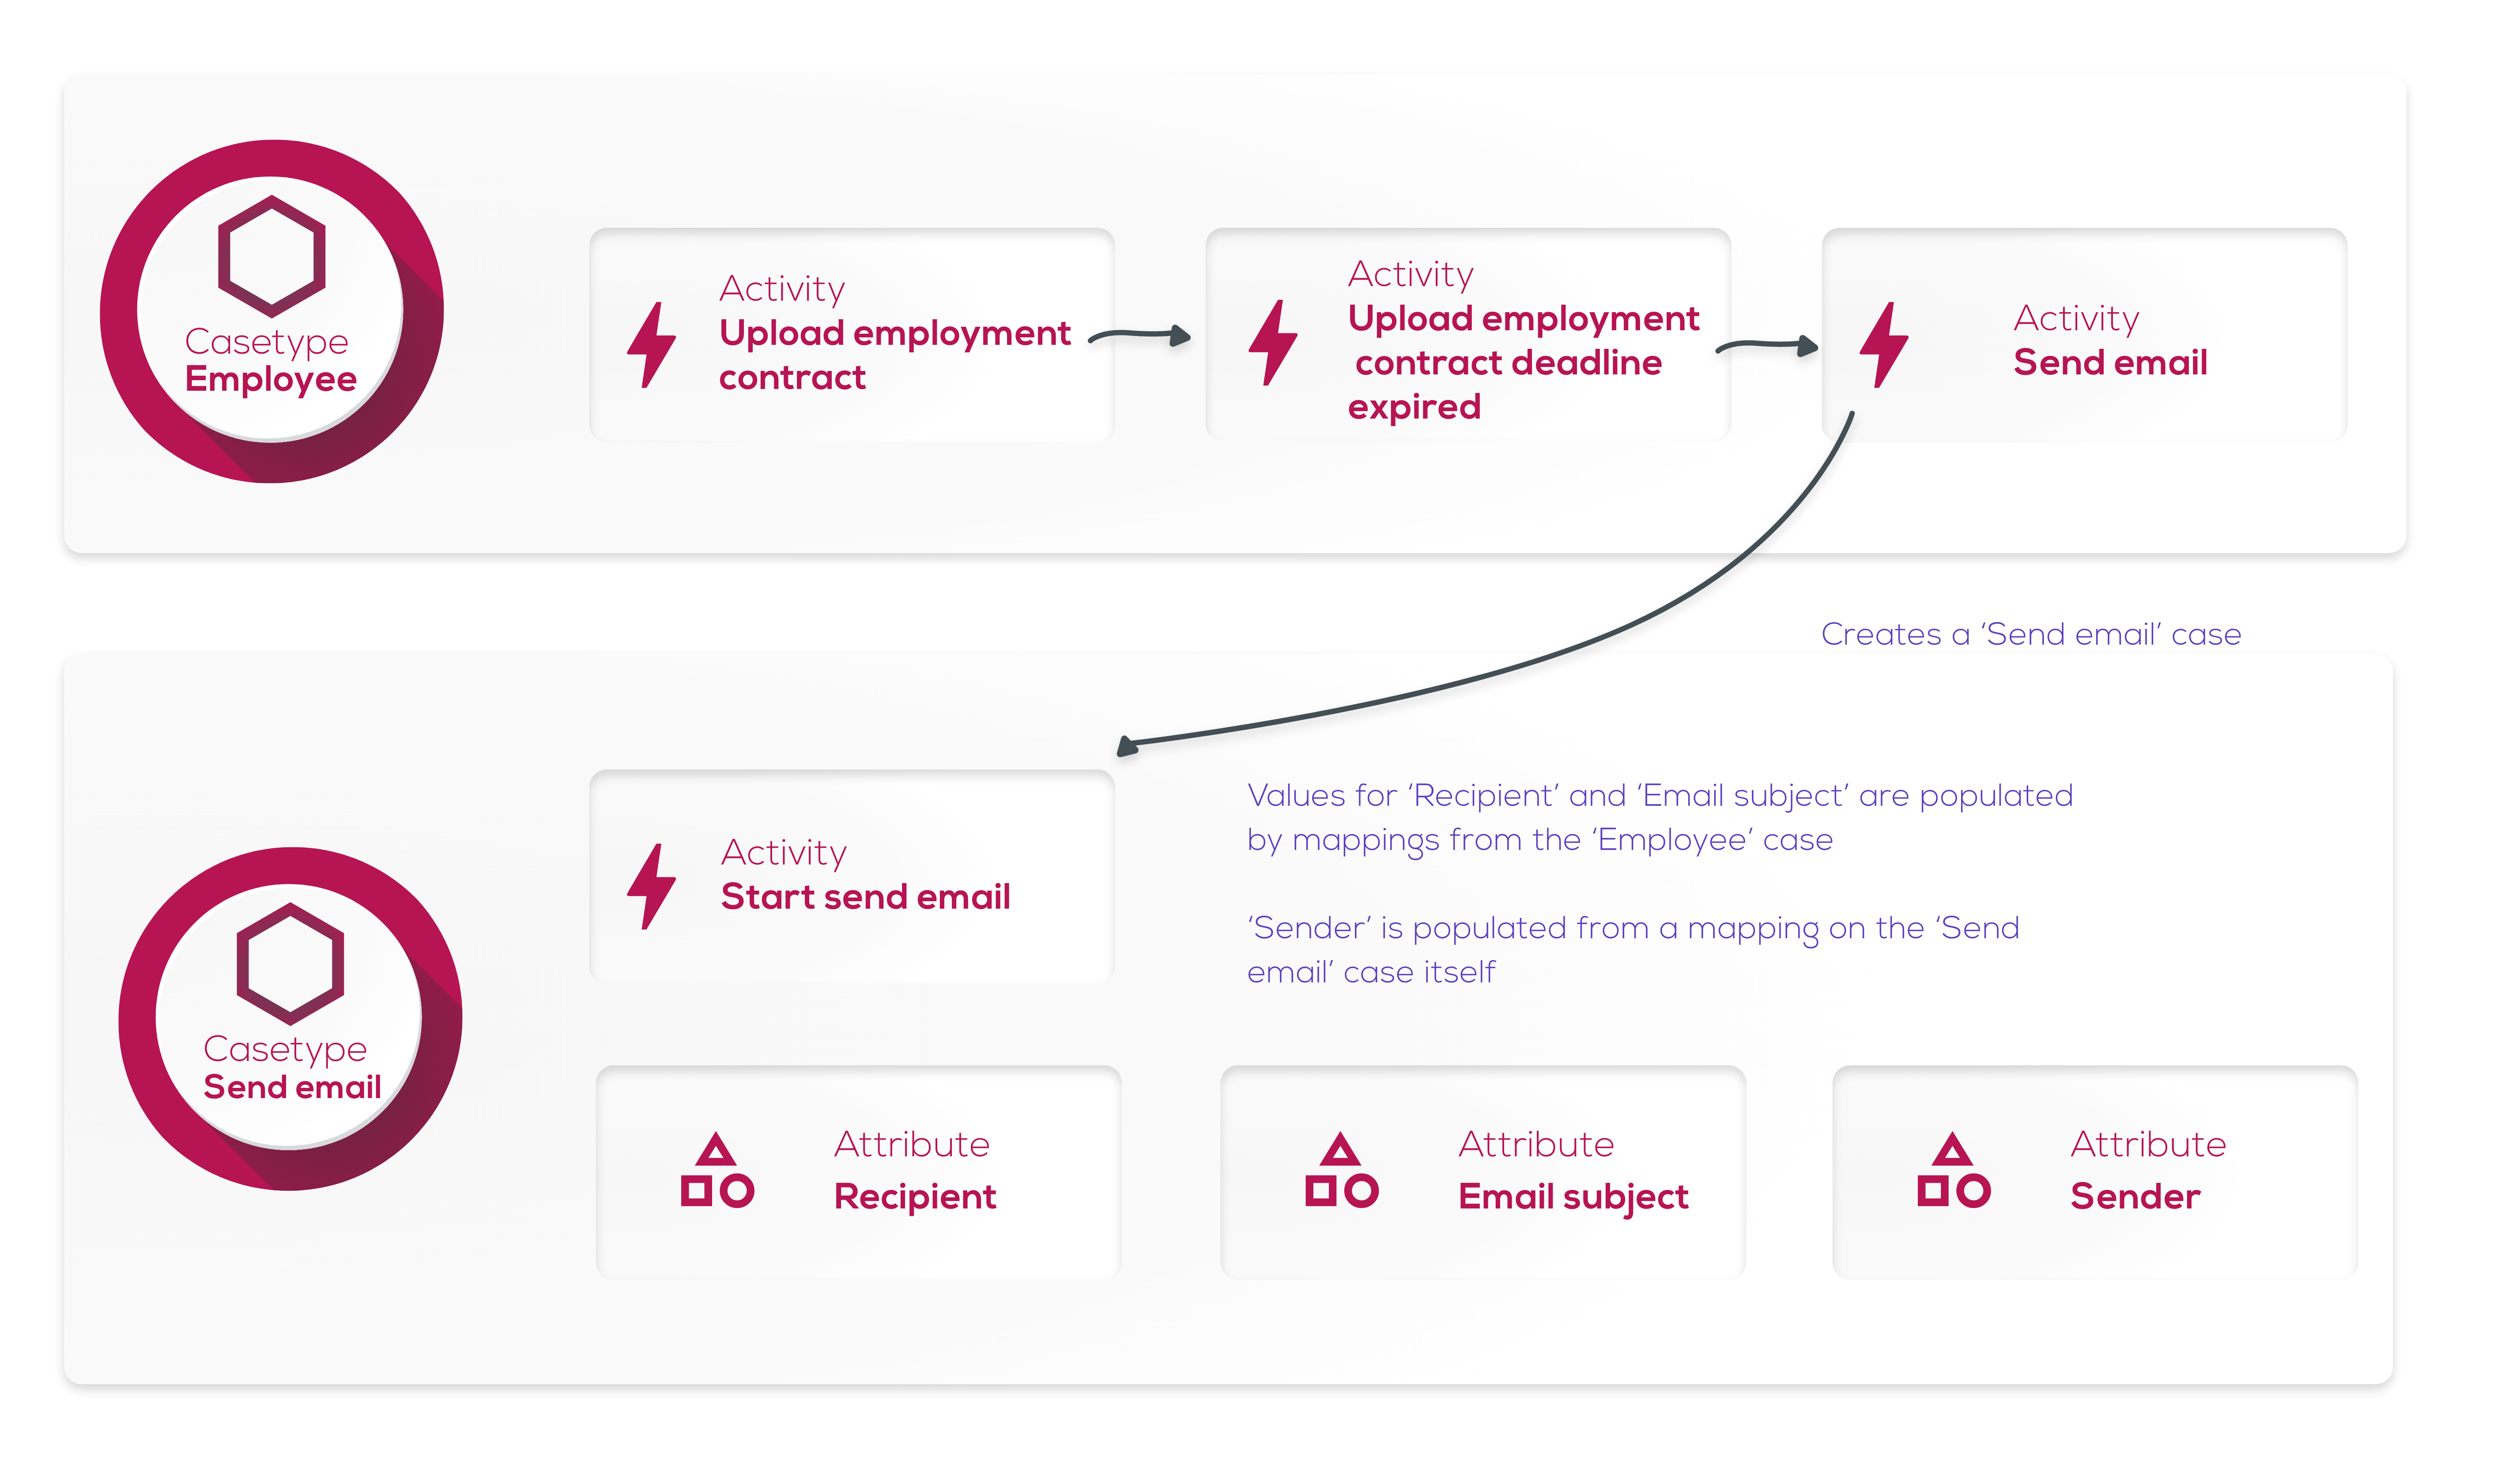
To begin with, we add a deadline to the Upload employment contract activity. We then configure a chain of activities so that the system sends an email if the deadline passes and a file has not been uploaded:
- The
Upload employment contractactivity triggers aDeadlineevent (Upload employment contract deadline expired). - The
Upload employment contract deadline expiredthen triggers aSend emailcasetype activity. - The
Send emailactivity creates a newSend emailcase, and uses mappings to populate the attributes, including the email recipient and sender.
The trigger logic is always added to the previous activity in the chain, rather than the activity being triggered.
Lesson 13 - Assigning devices to employees
The next feature is to add a way to keep track of the devices that have been assigned to employees so they can do their work.
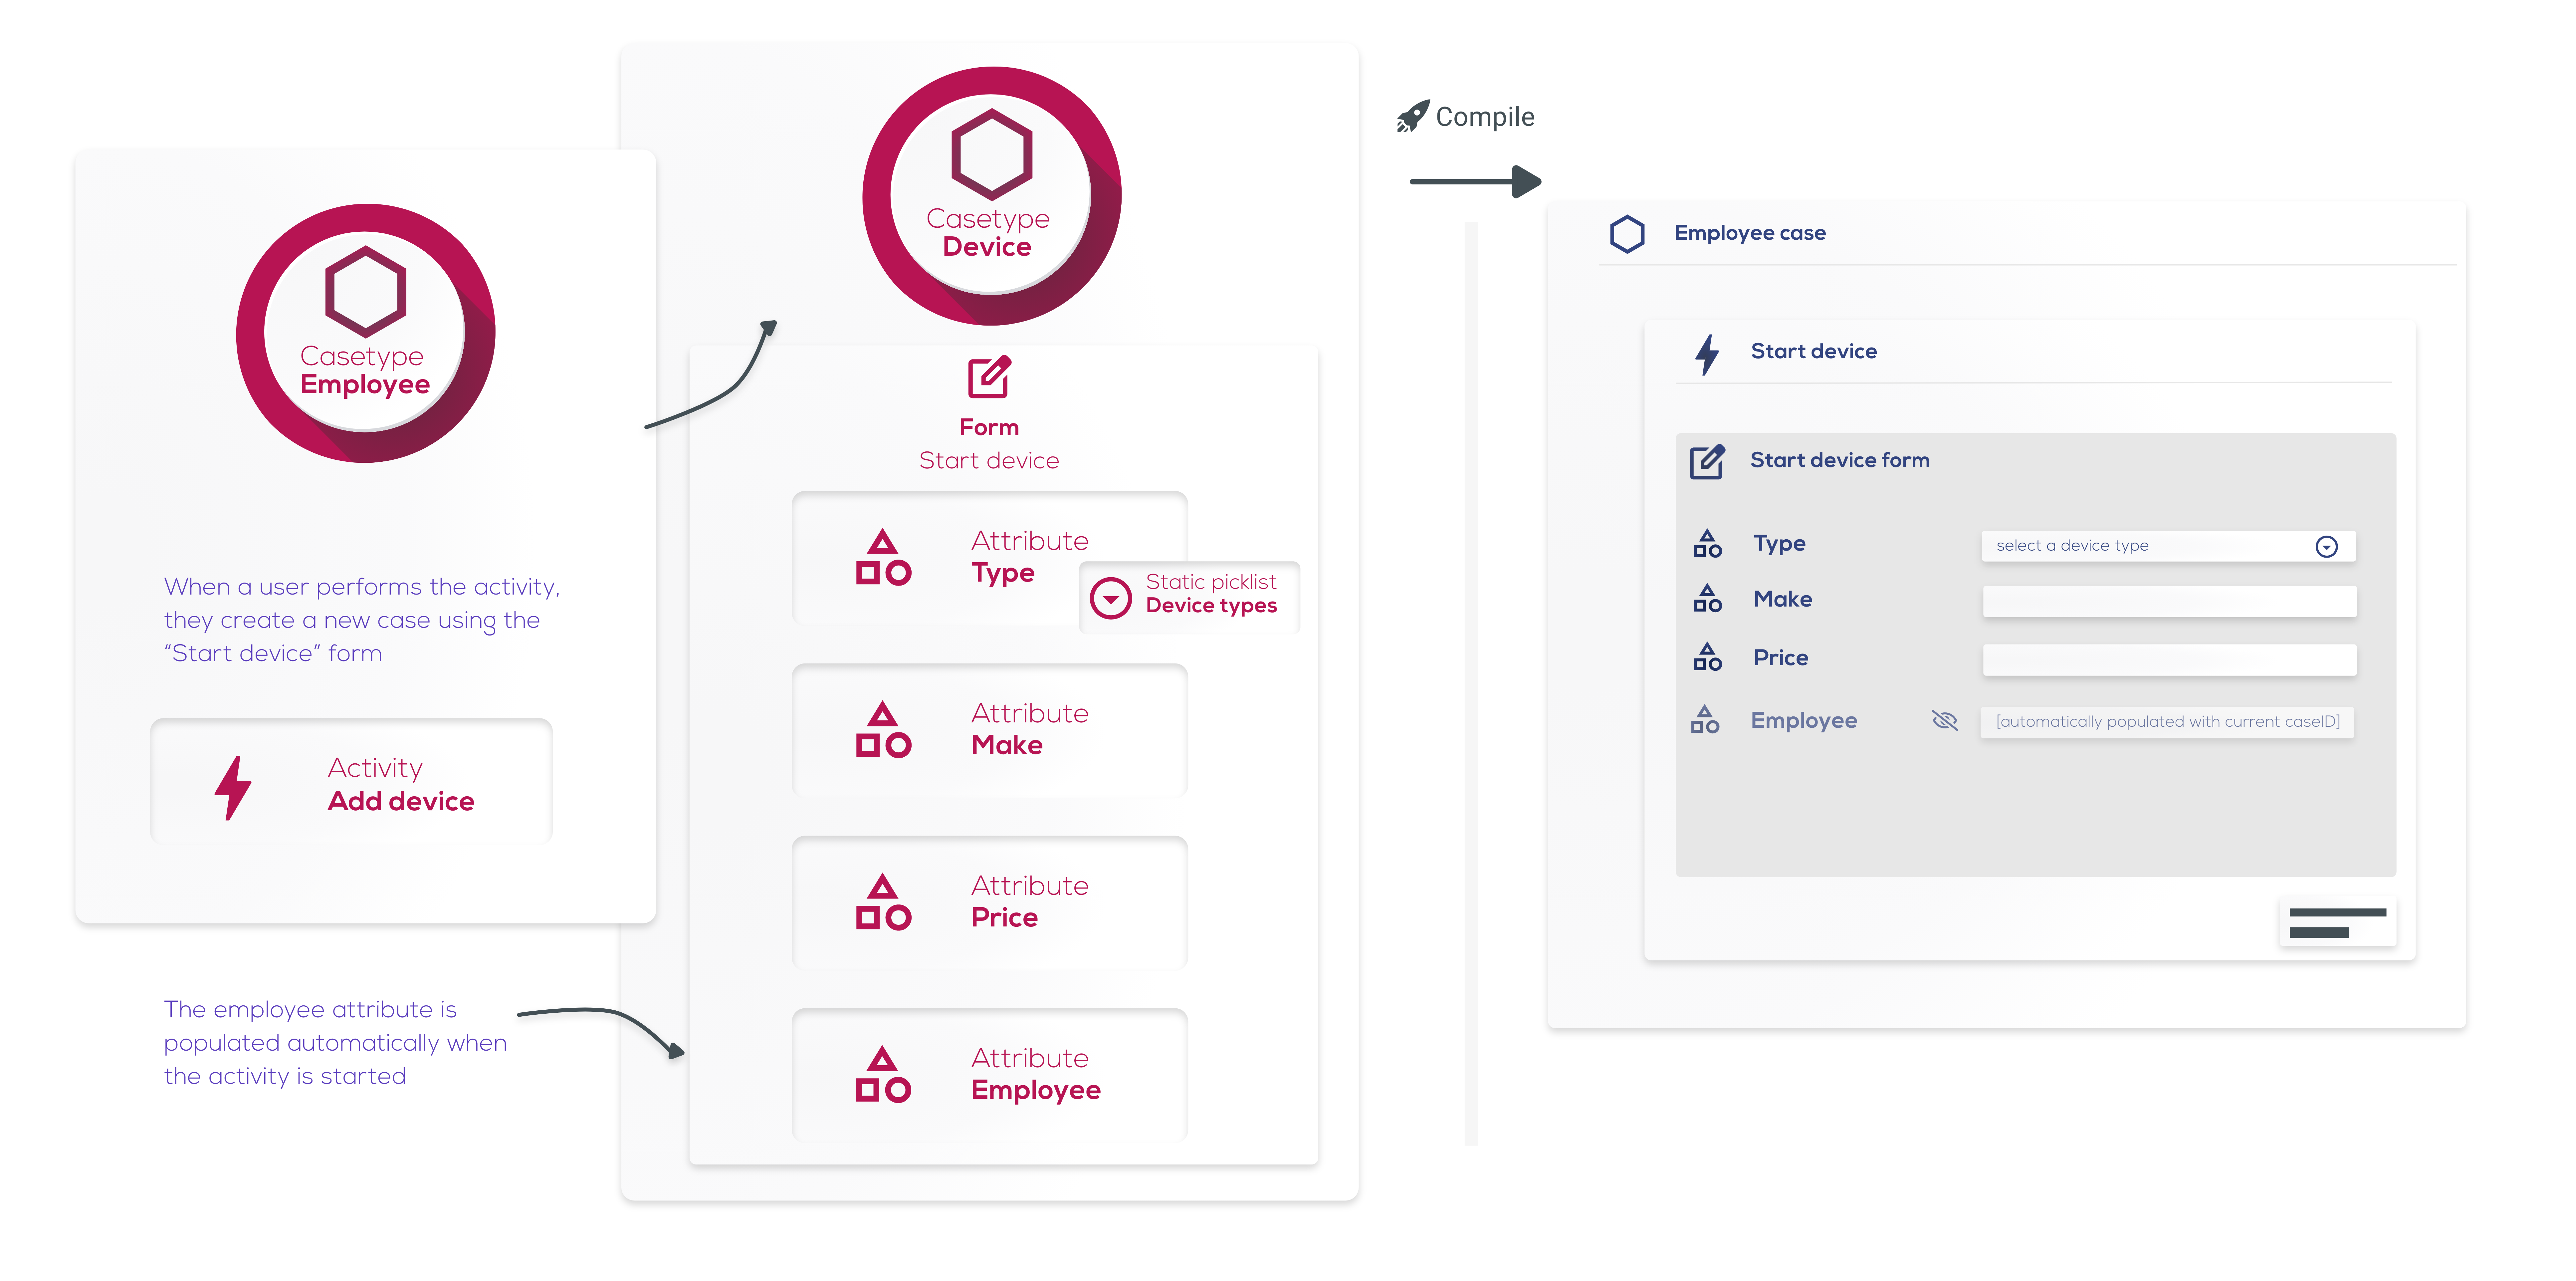
As we will probably want to use devices in several different ways, we create a dedicated casetype for devices. While each individual device will have its own attributes (such as make, model, purchase date, price and serial number) we expect all devices to be one of a short list of types (such as phone, tablet and laptop). Therefore, the first step is to create a static picklist of device types.
We then set up the Devices casetype with relevant attributes, and link the Type attribute to the new Device type picklist.
Next, we set up the Start device form with the attributes that will need to be filled in manually. We hide the Employee attribute as this will be populated automatically by the new Add device activity.
Devices are added to employees, so we add a new Add device casetype activity to the Employee casetype and give users in the HR employee role request rights so they can perform the activity.
To populate the device's Employee attribute automatically, we add a mapping to the start of the activity (On start). When a user starts the activity, the case ID of the current employee will be added to the new Device case automatically. The field will not be visible to the user, but you can confirm the behavior from the debug console.
Because we have used a static picklist, the values will be the same in all environments (Development, Testing, Acceptance and Production). By contrast, when we set up the Departments feature, we used a dynamic picklist that was populated from the Department casetype. This means departments must be added to each environment before they can be selected from the picklist.
Lesson 14 - Filtering datasets
We want to display a list of all devices with the option to filter the list to view devices assigned to a particular employee. This is simple because devices are their own casetype.
Every casetype has an associated dataset containing all the cases of that type. We can add a grid widget to the homepage that lists the contents of a dataset and make the grid visible to users in the HR employee role.
In addition, we want to add a list of each employee's devices to the employee's page in the application. To do this, we create a filtered dataset based on the parent Devices dataset. The filtered dataset includes a condition that filters the list by the Employee attribute using the current case. When we add the filtered dataset to the Employee view, the case ID of the current employee is used to filter the dataset. We set the rights so that users in the Employee role can view their own data, while users in the HR employees role can view all data.
Lesson 15 - Timed events
The next feature we want to add is a way of tracking whether onboarding activities have been completed for new employees, specifically whether an introductory meeting has been set up and devices have been issued.
As we just want to record a "true" or "false", we add these as boolean attributes on the Employee casetype. So that users can set these values, we add corresponding activities to the Employee casetype and give the HR employee role Execute permissions.
We also want to prompt users in the HR employee role to carry out these activities on a new employee's start date. We implement this by adding a timed event activity, Start date reached, to the Employee casetype. A timed event is an activity that is executed when the specified date and time is reached.
We specify what happens on the timed event by adding logic to trigger the two onboarding activities, Introductory meeting and Issuing devices. Finally we make the activity mandatory by giving the HR employee role Execute rights.
Setting a timed event to a date in the past means that the event is executed as soon as it is triggered. This is useful for testing activity logic.
Lesson 16 - Creating entries
In this lesson we want to provide a way for both HR staff and employees to be able to record notes from discussions with each employee's direct manager. To keep it simple, we just want to be able to add text to a file and record the date the text was entered.
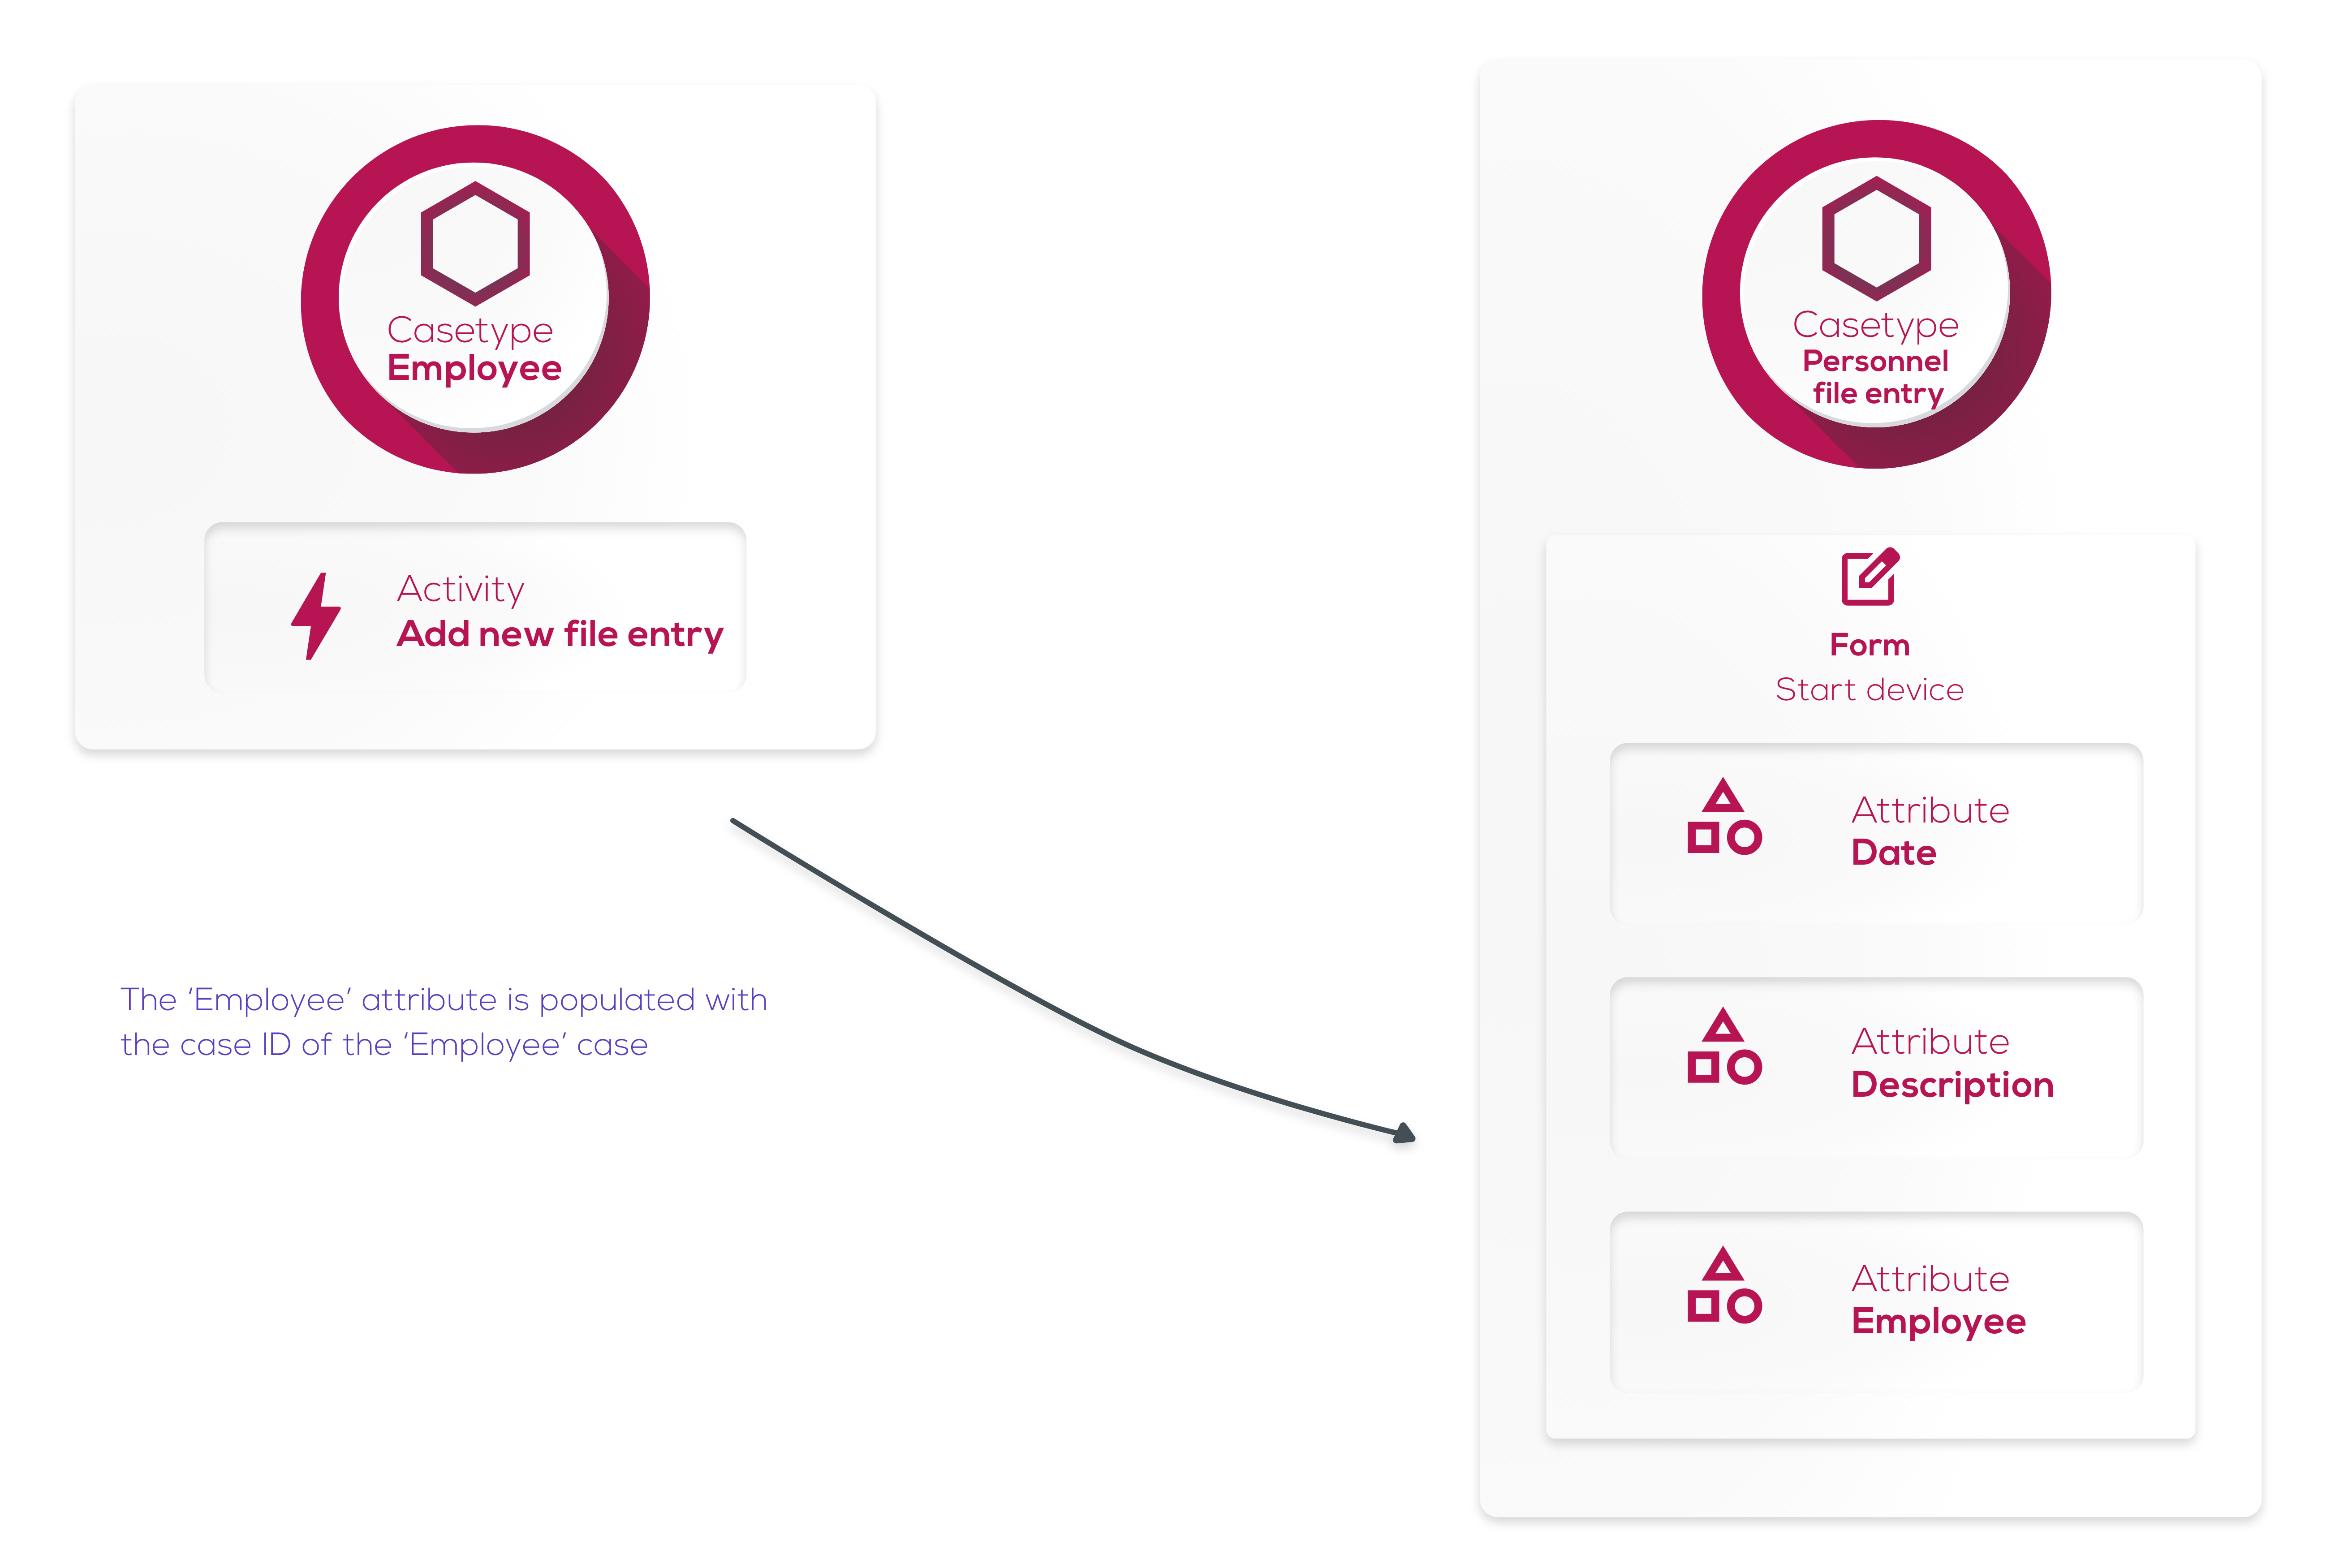
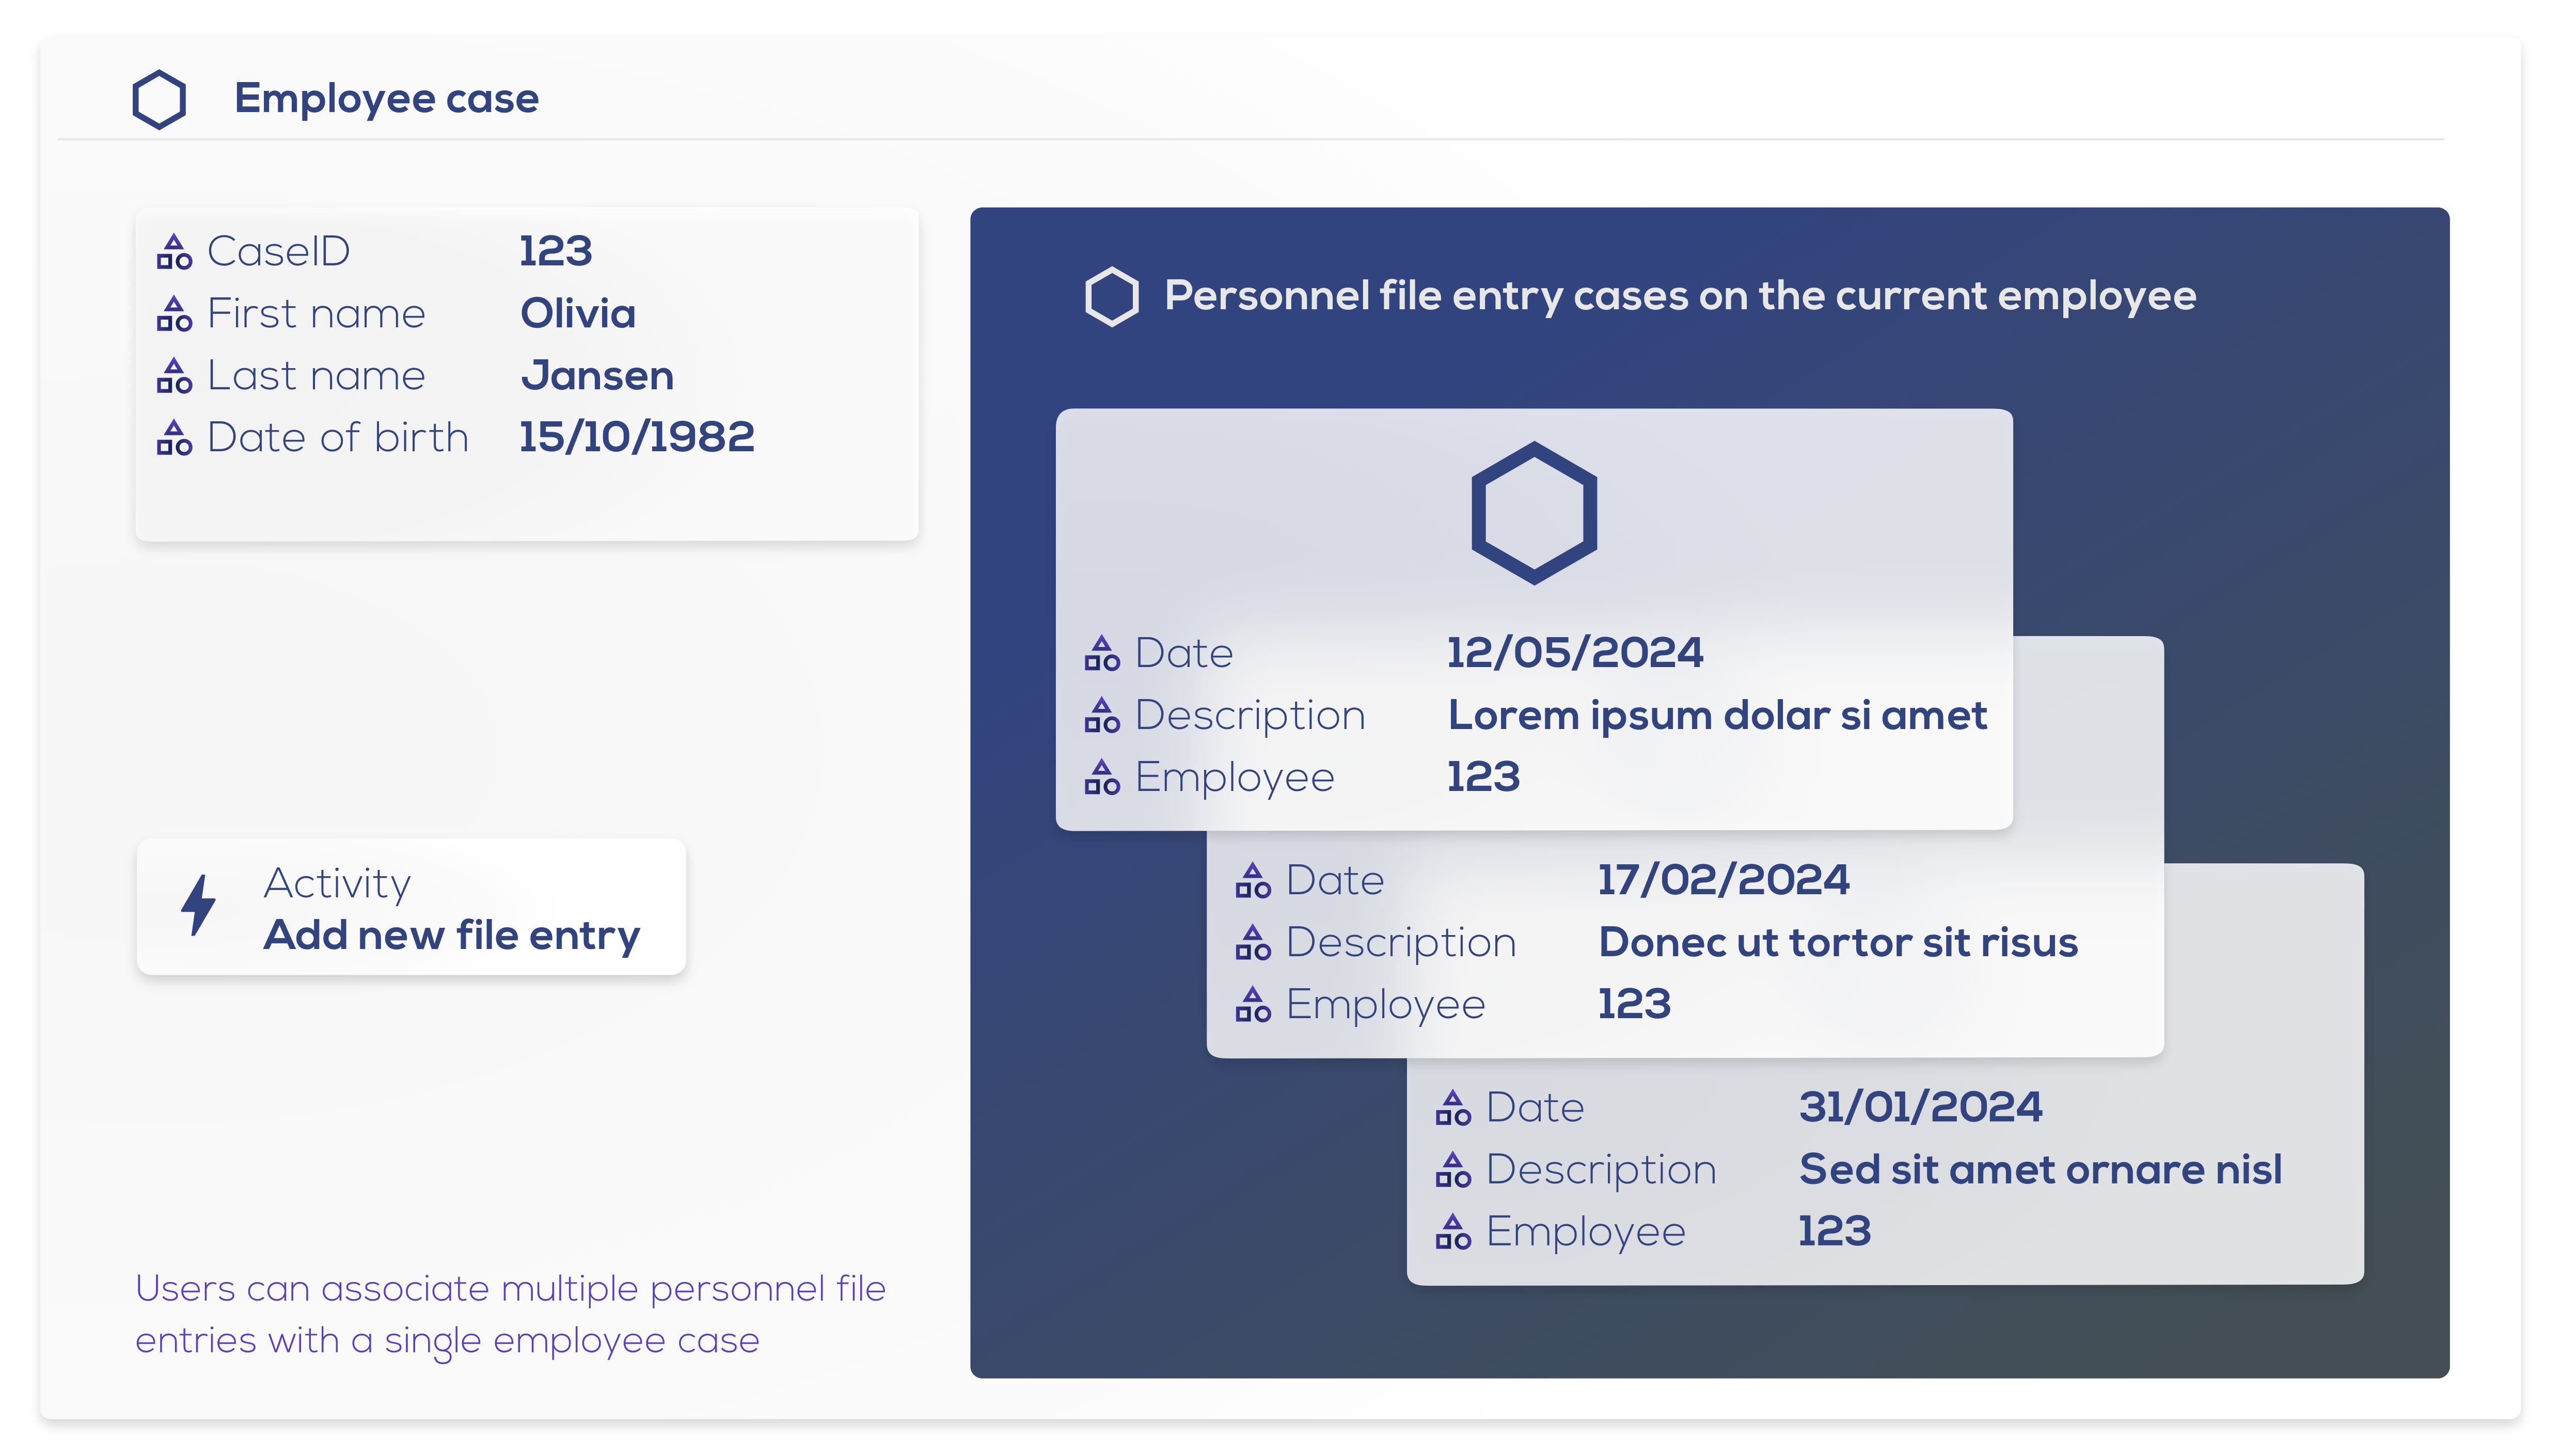
As users will be adding more entries over time, it makes sense to set this up as a new casetype: Personnel file entry. Each new entry in the personnel file will be a new case, with attributes to identify the employee that it applies to, the date it was created, and the notes themselves. After creating the casetype, we edit the Start Personnel file entry form to hide the Employee attribute.
So that users can add a new entry to their personnel file, we add a casetype activity to the Employee casetype and configure mappings to populate the employee and date automatically when the activity is started. We give the HR employees role Request rights on the activity.
Lesson 17 - A personal to-do list
We want to give our application users a convenient way to see all the mandatory tasks that are currently assigned to them. We can do this by creating a dataset containing all required (i.e. mandatory) tasks on the platform.
To make it easy for application users to identify the employee or device that each task relates to, we define a reference for these casetypes using a template. We then add the reference to the dataset and then display the dataset on the homepage using a grid widget.
Lesson 18 - Aggregating datasets
We want our application users to be able to see the number of employees in each department. We can derive this information by looking at each employee's department, but we don't want to work this out manually. Instead, we can provide this information automatically by using an aggregated dataset.
We start by adding a normal dataset that lists employees and their departments. We then create an aggregation dataset that pulls data from our new Employees and their department dataset and groups the rows from that dataset by the Department column. Our aggregated dataset now has one row for each department listed in the Employees and their department dataset. We then add another column to count the number of times a department is listed in the Employees and their department dataset. This tells us how many employees there are in each department. The dataset is updated automatically as new employees are added and as employees change departments.
Next steps
Congratulations on completing the Grexx tutorial!
You are now ready to start designing and building your own applications with Grexx Platform. If you have not done so already, please contact us to request a dedicated environment for your project. You will still have access to your learning environment, so you can revisit the tutorial at any time.
Before you start building your application, we recommend taking the time to consider the functionality you need and how that should translate into casetypes. For more information, see Design your application. If you have any questions, please feel free to join the weekly Q&A sessions or request 1:1 support from your Grexx coach.