Configure datasets
By default, a dataset is created for each of your standard casetypes. For example, if you have created casetypes named Customer, Order, and User, a default dataset is created for each with columns for the casetype attributes and some of the case metadata. If you add more attributes to a casetype, the default dataset is updated automatically. Your Studio also contains a number of default datasets for optional and mandatory tasks.
You can use these default datasets as they are (for example, to display data or populate picklists) or you can use them to create new datasets that filter or aggregate that data. You can also create completely new datasets. This is useful if you want to combine multiple casetypes in a single dataset, import data from outside your application, or access the performance or error logs generated by your application.
Create a new dataset
You can view and update your existing datasets and create new datasets from the Datasets page in your Studio.
To create a new dataset:
- From your Studio, open the Datasets page and click Create dataset.
- Enter a name for the dataset.
- From the Type list, select the type of dataset you want to create. Once you have created a dataset, you cannot change the type.
- Based on multivalue attribute: Identify cases using a multivalue attribute on a case. For example, you can use this to identify all users that have been added to a platform role (using a multivalue attribute on a page casetype).
- Cases: Identify cases from one or more casetypes. You can then apply filters to restrict the dataset to a subset of cases.
When combining multiple casetypes in a dataset, ensure there is a common attribute that you can use to filter the list of cases. - Filter: Identify a subset of items from an existing dataset. You can use this option to create a filtered dataset based on a default casetype dataset. As default datasets are updated automatically when you add new attributes to a casetype, this ensures any new attributes are always available to use in the filtered dataset. For more information, see Use conditions to filter a dataset below.
- Aggregation: Return a count of items in an existing dataset or perform calculations on numerical data in an existing dataset and return the results of those calculations. For more information, see Create an aggregated dataset.
- Tasks: Create datasets containing details of tasks that have been added to your application. Mandatory tasks are created when activities with
Executerights are triggered. Optional tasks are created when activities withRequestrights are enabled. - JSON array of JSON objects: Create a dataset from an array of JSON objects provided as part of the dataset configuration. For more information, see Provide data from an external source below.
- External URL: Import data into a dataset from an API. For more information, see Provide data from an external source below.
- Casedata history: List the changes that have been made to one or more cases. Each row in the dataset represents a change to a case attribute or a case being created or deleted. To restrict the dataset to a particular case or cases, enter a case ID or an inline template in the Case pointer field.
- Logs: Fetch error or performance logs generated by your application. This information is also available from Developer Tools. Note that you cannot create aggregations based on log datasets.
- To restrict the list of attributes available in the dataset designer to a particular casetype, select the relevant casetype(s) from the Will be executed on casetypes list. If you do not select a casetype, attributes from all casetypes are listed in the designer.
- For datasets containing either cases or case IDs from a multivalue attribute, specify whether open and/or closed (finished) cases should be included. By default, only open cases are included. You can change these settings later by editing the dataset properties.
- To make it possible to query the dataset via Grexx Connect, grant View rights to the role that will be used by the API. You can also change this setting later from the Rights tab. Note that you control which users can see the contents of a dataset by granting rights to the widget or activity that uses the dataset.
- To add columns for case metadata to the dataset automatically, select the metadata you want to include. You can also add (or remove) these columns manually once the dataset has been created using the dataset designer.
- When you are ready, click Create dataset. The dataset designer is displayed.
Once you have created a dataset, the next step is to configure the columns that you want to include.
Configure dataset columns
The dataset columns control the data that is included in the dataset. By adding columns you can include case metadata (such as the case ID), case attributes, task details, and other information as per the dataset type.
To configure the columns in a dataset:
- From the Datasets page, open the dataset and select the Designer tab.
- Either select an existing column or click the column icon to add a new column and then select it to display the column properties.
- Enter a title for the column. The column title is displayed in grid widgets by default.
- Select the Field type according to the source of the data (such as case data, case metadata, or activity metadata). Then select the specific attribute or value that you want to include as appropriate. Note that:
- Selecting Platform attribute is useful if the dataset contains multiple casetypes, all of which use the same platform attribute.
- You can use Activity metadata to include details such as the activity name and ID. These values will be the same for all tasks belonging to that activity.
- You can use Task metadata to include details about the individual task, such as the due date or the date the task was submitted.
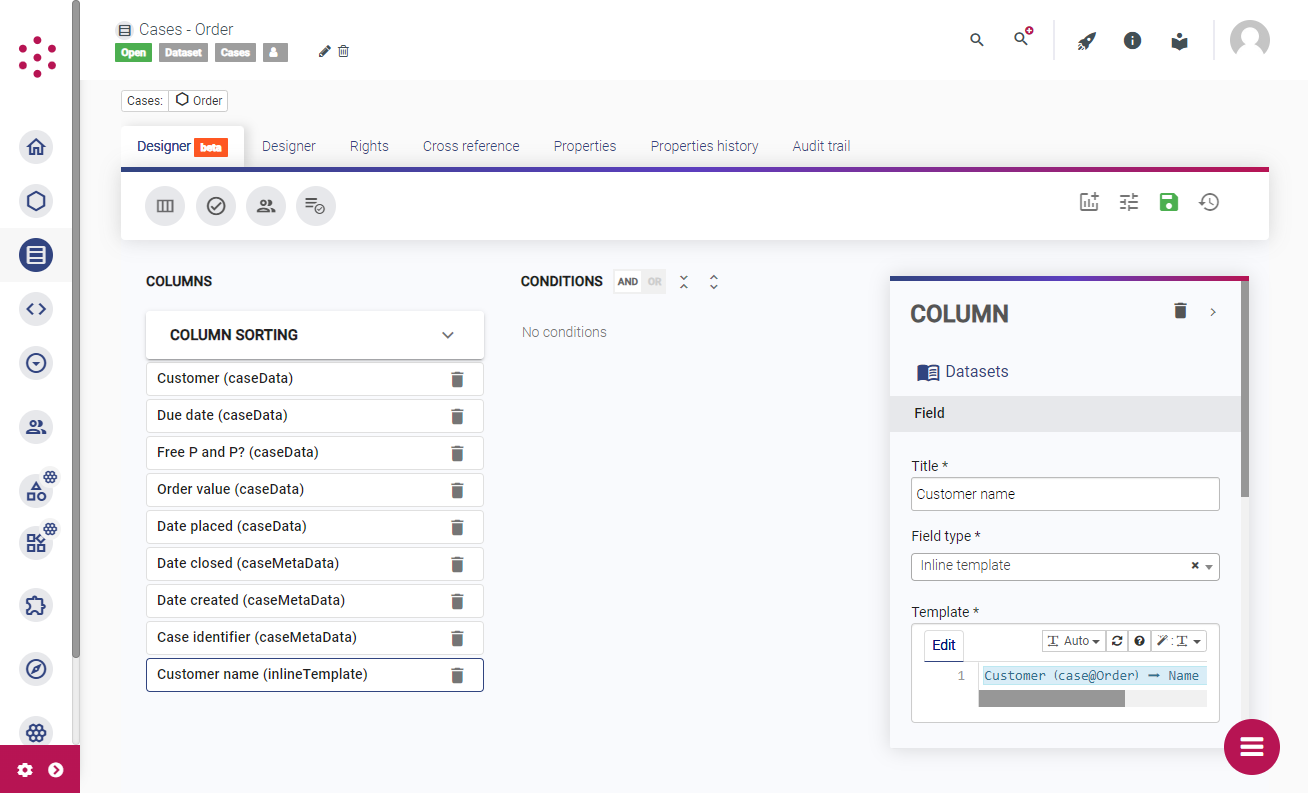
- An Inline template allows you to import details from another case that is related to the listed case. For example, in a dataset containing
Ordercases you might want to include columns containing details from the relatedCustomercase, such as the customer's name or location. By using an inline template you can select an attribute on theOrdercase that contains the case ID for the relatedCustomercase. You can then use that to link to another attribute on theCustomercase, and pull that data into the dataset. - You can also use an Inline template to include the label for attribute values selected from a picklist, instead of the stored value. This can be useful if you want to sort or filter the dataset using the label rather than the value. For static picklist items, you specify both the label and the value to store when you configure the item. For picklists based on a dataset, the label is usually made up of one or more attribute values, while the value is the case or task ID. Use the template to select the case attribute, and then click the blue text and enable Use picklist label.
- You can specify an external reference so that you can query the values in a dataset using an API, plugin, or the Dataset to JSON or Dataset to Excel system services. For columns that contain attributes, any external reference that you have specified on the attribute is inherited by default. You can override the default value by entering a different value in the External reference field, or enable Override External reference with empty to replace the default value with no value.

If you have created a filtered dataset, the columns are defined by the parent dataset. For information about adding columns to aggregation datasets, see Create an aggregated dataset.
Combine multiple casetypes in a dataset
When you create a new dataset and set the type to Cases, you can select more than one casetype. This is useful if your application contains several related casetypes with some common attributes.
For example, in an HR application you might have different casetypes for Employee and Contractor (perhaps because the activities relating to each are different). In that situation, you may want to include both Employee and Contractor cases in a single list so that users can search across all staff members. You can do this by creating a dataset that contains both casetypes.
When you combine multiple casetypes in a dataset, you can include columns to display attributes from each casetype (as well as case metadata that is common to all casetypes). By default, attribute columns only contain data for the casetypes to which they belong. For example, if you have added a Last name attribute to both the Employee and Contractor casetypes, the column for the attribute on the Employee casetype will only contain data for Employee cases. To display the Last name data for Contractor cases, you would need to add the attribute for that casetype as a separate column.
However, if you have used platform attributes for attributes that are common to multiple casetypes, you can use these to include details from different casetypes in the same column. For example, if you have configured Last name as a platform attribute and applied this to both the Employee and Contractor casetypes, you can add a single Last name column to the dataset in order to display details for cases of either type.
You can also use platform attributes to filter the cases included in the dataset. For example, if you have added a Start date platform attribute to both the Employee and Contractor casetypes, you could filter the dataset to include only employees and contractors with a start date before 1 January 2024.
Use conditions to filter a dataset
You can use conditions to control the items that are included in a dataset. For example, you might want to display only orders created in the last 12 months on the homepage. Similarly, you might want to list only the orders created by the current customer on a Customer view.
You can add conditions to a dataset containing cases, tasks, or logs. You can also add conditions to a Filter dataset that is based on an existing dataset.
The conditions that you apply to the dataset control what is included in the dataset. Only items that match the filters are made available to any widgets, picklists, or activities that use the dataset. You can allow users to apply further filters to the data that is displayed by adding filter options to grid, tile, and template widgets.
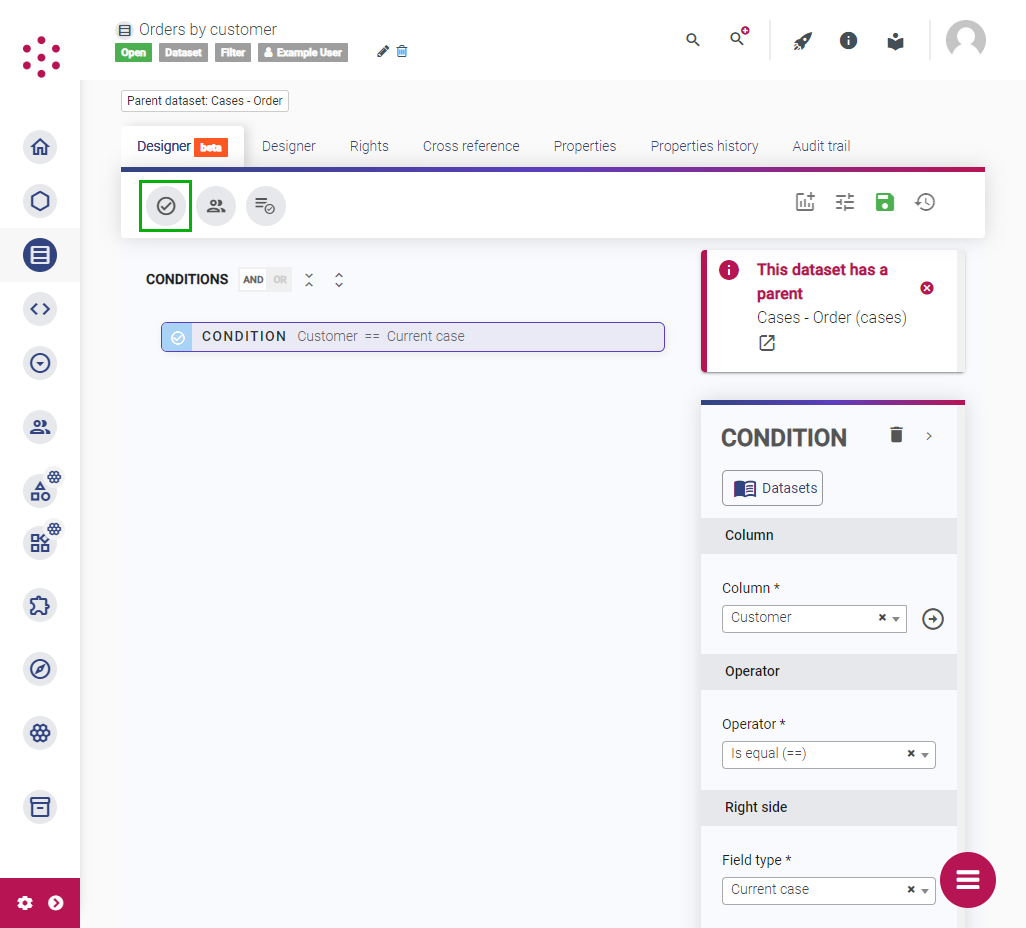
To add a condition, open the Designer tab, click the condition icon on the toolbar and then select the condition to configure it.

When you add conditions, you can compare a value from a column (containing metadata, case data, or other details) to:
- Column: The value of another column in the dataset. For example, you might only want to include tasks that were submitted after the task due date.
- Current case: The case ID of the current case. This is useful if you want to display a dataset in a view of a standard casetype (such as a
CustomerorEmployeeview) and display only items that relate to the case being viewed. For example, in a dataset containingOrdercases, you might compare a column containing the case ID of the relatedCustomercase to the current case. If you then use the dataset to populate a grid widget on theCustomerview, the dataset will only return theOrdercases with aCustomervalue that matches the case ID of the customer currently being viewed.
You can also use this option to restrict the items in a picklist based on the case being edited (using a form activity) or the parent case of the case being created (using a casetype activity). - Current case casedata/metadata: An attribute or piece of metadata that is not included in the dataset. This is useful if you do not want to add the column that contains the data to the dataset.
- Inline template: A value from a related case, a date, the user's session, or some other value from the application identified using an inline template.
- Value: A fixed value, such as a number or piece of text. For example, you might only want to include orders with a cost over a certain value.
The Operator field defines how the values are compared. For example, to check whether the two values being compared are the same as each other, select is equal. To check whether the value contained in the selected column includes at least some of the same data, select Contains. Some operators, such as Greater than and Less than are only valid when comparing numerical data.
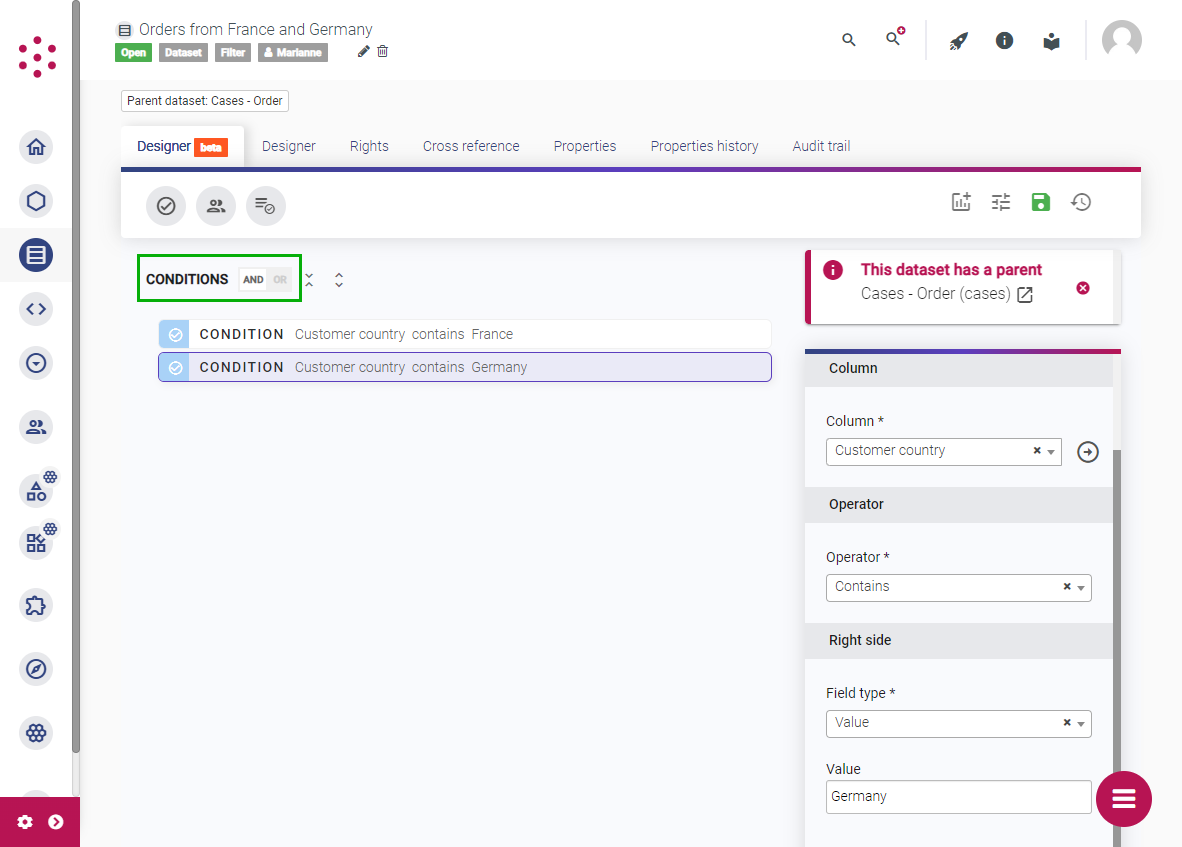
By default, all conditions must be met for a case, task, or log to be included in a dataset. To require only one of several conditions to be satisfied for an item to be included in the dataset, change the Condition toggle from And to Or.

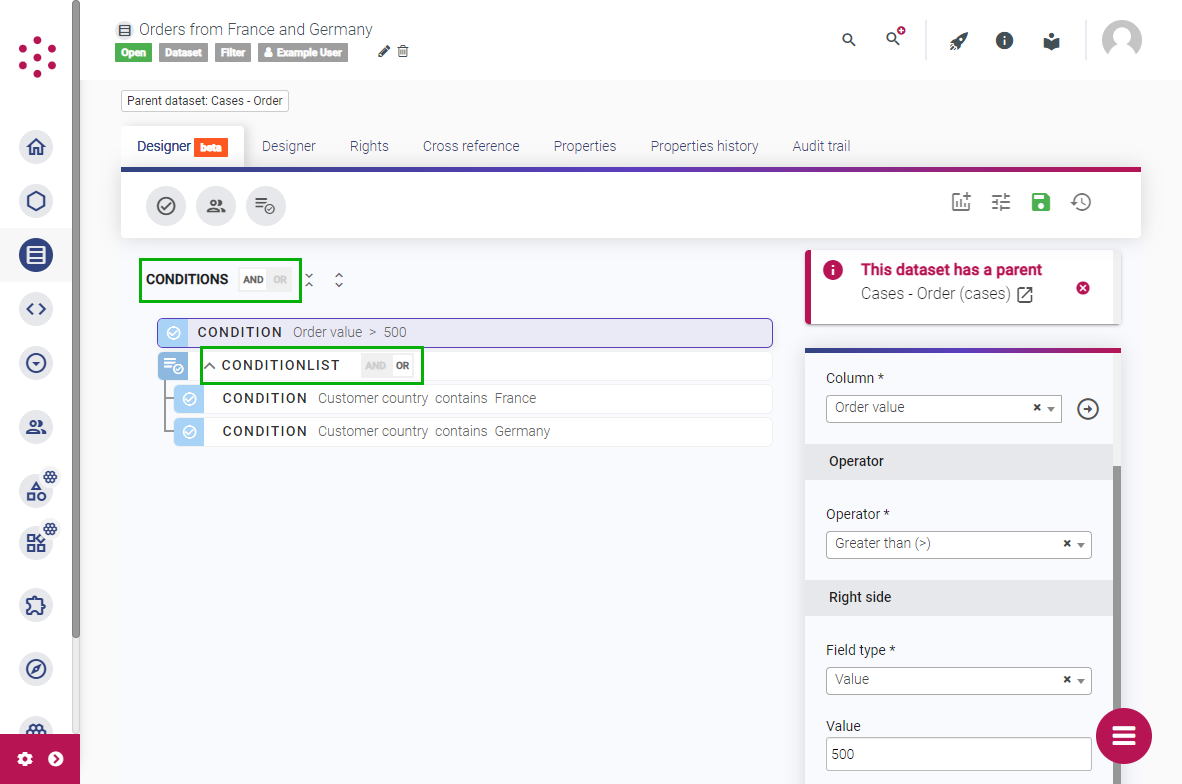
You can create more complex filters by grouping conditions in condition lists. For example, you might want to include only Customer cases where the Country attribute is Germany or France and where the most recent order value is 500 euros or more. You can achieve this by grouping the two country conditions in a condition list set to Or and then applying the list and value condition with an And.

For more information about using conditions and the available operators, see Operators and conditions.
Provide data from an external source
You can create datasets containing data from an external source. This is useful if you want to import data from another system and use it to populate a picklist or display the data in a page or view.
Data from an external source must be supplied in JSON format. You can either add the JSON to the dataset properties, or fetch data in JSON format from an external API. Adding the JSON directly is useful for static data and for testing the format of data supplied by an API.
The JSON should be in one of the following formats:
- Multivalue JSON. For example
{"id":44,"name":"Jamie"}and{"id":45,"name":"Charlie"}as separate items in the multivalue. You can use an inline template to fetch JSON from multivalue casetype attributes. This format cannot be used when fetching data from an external URL. - A JSON array of JSON objects. For example
[{"id":44,"name":"Jamie"}, {"id":45,"name":"Charlie"}] - A JSON object with a key labelled
"results"that contains a JSON array. For example,{"results": [{"id":44,"name":"Jamie"}, {"id":45,"name":"Charlie"}]}
To add columns to a dataset containing data from an external source, set the column Field type to External and enter the JSON key in the External reference field.
Once you have added columns, you can add conditions to filter the data as normal. You can also create aggregate datasets based on the dataset of external data.
Datasets of application logs
You can create datasets containing logs that are generated automatically by Grexx Platform:
- Performance logs: The time taken to respond to each request made in the application. You can also view this data using Developer tools in your DTAP environments: press
CTRL + ALT + Sto open Developer tools and then select Platform > Performance. - Grexx Connect message logs: The time taken to respond to Grexx Connect messages.
- Error logs: Any error messages that have been raised in the application. You can also view this data using Developer tools in your DTAP environments: press
CTRL + ALT + Sto open Developer tools and then select Platform > Errors.
You can use a grid widget to display the dataset of logs on a view of a page casetype, such as a Debug or Maintenance page. For more information about setting up a page, see Configure pages and views.
You cannot create aggregation datasets based on a dataset containing logs.
Next steps
Once you have configured a dataset, you can use it to display data, populate a picklist, or identify cases for an activity. For more information, see Use datasets in your application.