Apply conditional logic to forms
You can apply conditional logic to a form to control when individual fields become visible or hidden, read-only or editable, mandatory or optional, and change other settings. For example, you could use conditional logic to control whether Billing address fields are displayed on an order form or whether evidence must be attached to an expense claim form.
You can also use conditional logic to control whether a field is mandatory or hidden based on values that are mapped into fields each time the form is opened.
In addition, you can add custom buttons to forms so that users can perform certain actions on demand.
If you are familiar with conditional logic in activities you will find that conditional logic in forms works in a similar way.
Logic options
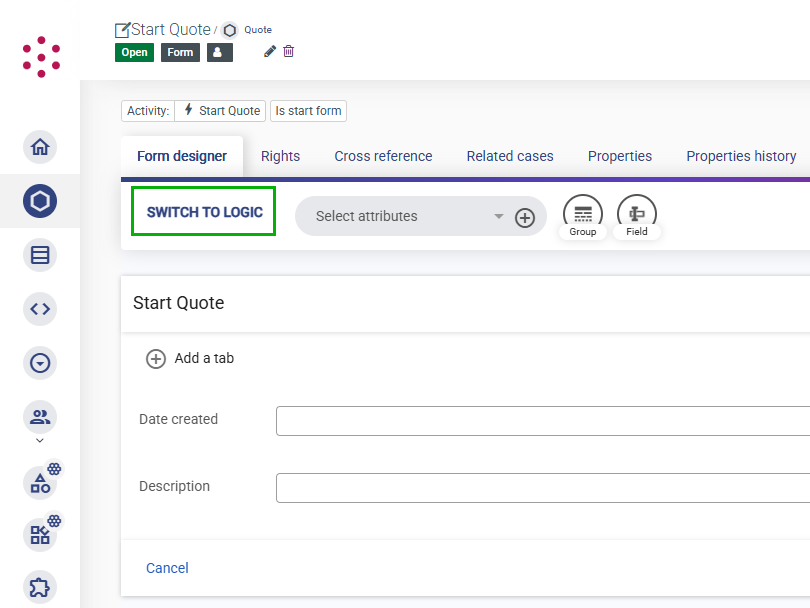
To add logic to a form, open the Form designer tab and on the designer toolbar click Switch to logic.
Select the relevant tab:
- Select the On start tab to apply the logic when a user opens the form. This is useful when you want to control the behavior of fields based on values that were populated automatically using activity mappings. Note that the logic is only applied once; if a user changes a mapped value, this will not cause the logic to be reapplied.
- Select the On change tab to apply the logic each time a user updates a field on the form. This is useful when you want to control the behavior of fields based on user inputs. For example, if you want to control the visibility of
Billing addressfields based on a checkbox, the visibility should update each time a user selects or clears the checkbox. - Select the On click tab to specify what happens when a user clicks a custom button on the form. This is useful when you want to give users the option to perform an action on demand, such as clearing all the fields (with a
Set emptyaction) or using AI to generate values (with anAI action). This tab is only displayed if a custom button has been added to the form designer.
On start and On change logic
To apply conditional logic when the form loads (On start) or when a value is changed (On change), add items from the toolbar as follows:
- You can either use an
If then elsestatement on its own, or nest one or moreIf then elsestatements within anOn field changecondition.- Use an
If then elsestatement on its own to use conditions to specify when actions should be performed. For example, you might want to show aBilling addressfield and make it mandatory based on the value entered in another field. - Use
On field changeto evaluate theIfstatement each time the user makes a change to one or more specific fields. This is useful if you only want theIfconditions to be evaluated when a particular field has been edited, or if you want to nest anIf then elsewithin anotherIf then else. In the latter case, you can use theOn field changestatement to identify the fields from theIfstatement conditions so that if any of those fields are modified, the conditions are re-evaluated.
Note that if you add multiple fields to anOn field changerule, the logic is applied if any of the fields change.
- Use an
- Add conditions to the
Ifstatement to define when the actions should be performed. You can use conditions to compare the value in a field to the value in another field, or to a value specified using an inline template. For example, you might use a condition to check if a date entered in a form field is later than the current date (using thedate.template function) or the same as the date currently stored in a case attribute (using thecase.template function).
Note that if you add multiple conditions, all conditions must be satisfied. To require only one of several conditions to be satisfied, add the conditions to aCondition listand switch the list toggle toOr. For more information, see Operators and conditions. - Add the action(s) to be performed if the conditions are satisfied to the
Thenstatement. For example, you might want to make a field mandatory and display a message to explain why the field is required. For a full list of actions, see below. - Add any action(s) to be performed if the conditions are not satisfied to the
Elsestatement. This might be the opposite of the actions in theThenstatement (such as making a field optional) or a different action.
If you do not want to perform any actions when the conditions are not satisfied, do not add anElsestatement.
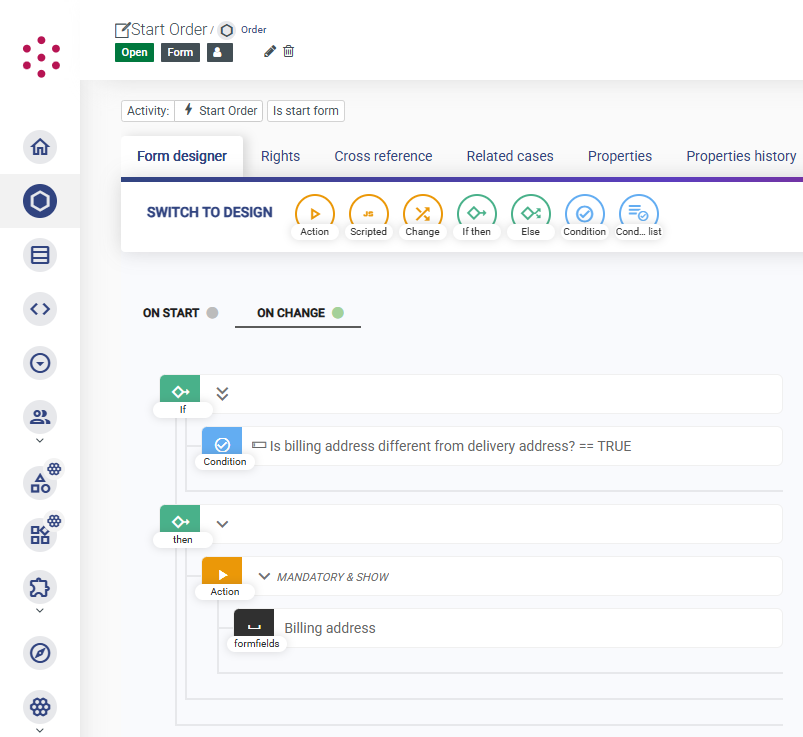
For example, to control whether the Billing address fields are displayed in an order form, you could add a bare checkbox field labelled Is the billing address different from the delivery address?. You would then disable and hide the Billing address fields by default (or hide the group containing those fields) as part of the form design. Then, you would add an If then block with a condition that checks the value of the checkbox field. Finally, you would need to add an action to show the Billing address field (and make it mandatory) when the condition is satisfied.
You can apply conditional logic to forms that have been divided into multiple tabs or steps. As tabs allow the user to complete the form in any order, we recommend restricting any logic to operate within a single tab. If you are using steps, you can use conditional logic in an earlier step to make changes to later steps.
On click logic
If you have added custom buttons to a form, you specify the behavior of each button from the On click tab. Click an item on the toolbar and drag it below the relevant button. The action is only applied if the user clicks the button. To apply the action only if a user clicks a button and a condition is met, add an If then else rule to the button and then add conditions and actions as described above.
If you have divided a form into tabs or steps, you can add custom buttons to allow users to navigate to the next or previous step. If you have added custom buttons to perform the Submit and/or Cancel actions, use the activity properties to hide the form's default Submit and/or Cancel buttons.
Custom buttons are only displayed on activity forms, in the activity widget, and in the search form widget. When displaying a form in a casedata widget, no form buttons are displayed.
Form actions
The following actions are available to change the behavior of form fields and buttons. Actions should be added to Then or Else statements or to custom buttons. For some actions you must specify the form field(s) that you want to apply the action to. You can apply multiple actions to the same field.
- AI action - Use AI to set the value of a form field. For more information, see Add AI actions.
- Enable/Disable - Make a field editable or read-only, or enable or disable a button.
- Show/Hide - Make a field/button visible or hide it.
- Show group/Hide group - Make the group of elements visible but not editable, or hide the group.
- Mandatory/Optional - Make the specified field(s) mandatory or optional. If a field is mandatory, the user cannot submit the form (or proceed to the next step) unless they have entered a valid value.
- Require any - Make at least one of the specified fields mandatory. All selected fields are mandatory to begin with. Once a value is provided for one of the fields, the remaining fields become optional.
- Require none - Make all the specified fields optional.
- Message - Display text below the specified form field. This is useful if you want to display help text, such as explaining why a field has become mandatory.
- Next step/Previous step - Navigate to the next or previous step or tab in the form.
- Set empty/Set value - Remove the current value from a field or populate a field with the specified value.
- Set label - Change the label of the specified field. For example, you can use this to make the label more context-specific based on other data that has been entered.
- Submit/Cancel - Submit the form (thereby performing the activity) or cancel (and exit the form without submitting). These actions should not be used in forms designed for use with the casedata or form search widgets.
- Switch picklist - Change the picklist associated with the specified field.
- Switch type - Change the type of data that can be entered in a form field. You can use this to change the data type (for example, from
integertostring) and/or change whether only a single value or multiple values may be entered.
To apply a condition, select Custom and use theIftemplate function to define a condition and then specify the data type or multivalue type to switch to. To reference another field in a condition, use theformfield.template function.
A number of combination actions are also provided for convenience.
When setting a value, label, or message, you can enter static text and/or use template functions to define the value dynamically. For example, to enter the date five days after the current date, use the date. template part with Add days or Add business days. For more information about using inline templates, see Templates.
Scripted actions
In some situations you may want to perform more complex actions than can be achieved with the form field actions described above. For example, you may want to reformat phone numbers, remove spaces from postal codes, or validate data against an external source. You can achieve this by writing some custom JavaScript and applying it to the form using either a scripted action or a form action plugin.
- Scripted action: This option allows you to add JavaScript directly to the form designer. This is useful when you do not need to reuse the code in multiple places and you don't want to share the code on Grexx Marketplace.
- Form action plugin: This option allows you to create a reusable JavaScript component that you can share on Grexx Marketplace. You can create a new plugin from the Plugins page in your Studio.
To add a custom JavaScript action to form logic:
- From the form logic designer, select the relevant
ThenorElseblock. - From the toolbar, either select Scripted or select an existing form action plugin from the picklist.
- If you have added a scripted action, select it to open the properties pane and then add the JavaScript to the Code block field. To expand the properties pane, click the "full screen" icon.
Both scripted actions and form action plugins allow you to reference form fields and groups. For details of supported methods, refer to the Grexx Platform JavaScript Library documentation available at https://your-site-url/docs/api/js/modules.html. For more information and examples of how to use JavaScript for form actions, see the Form action plugin reference.