Apply conditional logic to activities
Sometimes you may only want to trigger a child activity or use a mapping to populate values automatically in particular circumstances. For example, you may only want to trigger a casetype activity to create a new Customer case if the user selected a "Create account" option on an order form. You may also want to apply conditional logic to mappings, such as only populating certain fields on an order form if the total cost is above or below a specified value.
Using the activity designer, you can add conditional logic to control when a trigger fires or when a mapping populates form fields or case attributes.
To reduce the spacing in the activity designer so that you can view more rules without scrolling, turn "Compact mode" on from the toolbar.
Conditions
Both If then else rules and While loops use conditions to control the behavior of an activity. Conditions can be used to compare two values or check whether a user has a particular role. When an activity is performed, any conditions are evaluated to determine whether they are true (i.e. the condition has been satisfied) or false (i.e. the condition has not been satisfied).
-
A standard
Conditioncompares two values, specified in the "left field" and "right field". The values can be from:- Casedata: The value of an attribute from the current case.
- Inline template: A value identified using a template, such as a value from a related case, the current date, or a date relative to the current date.
- Task in: The value entered in a form field when the activity is started.
- Task out: The value entered in a form field when the activity is submitted.
- Value: A fixed value.
- Value of static picklist item: Use the other field to select a picklist and then use this option to select an item from that picklist.
For example, you might use a condition to check whether the value of an order is above a specified threshold (using a fixed value or a value stored in an attribute).
-
A
Has rolecondition checks whether the currently logged in user has the selected role on the current case. If the user has the role, the condition is true. To check whether the user does not have a particular role, enable User does not have role.
Note that you should not use aHas rolecondition to manage access to perform activities (or view widgets). Instead, grant permissions to roles and add users to those roles. -
A
Condition listallows you to evaluate multiple conditions (both comparing values and checking the user's role) and specify the behavior:- Select
And conditionto require all conditions to be satisfied in order to returntrue. This means that if any of the conditions is not satisfied, the result isfalse. - Select
Or conditionto require only one of the conditions to be satisfied in order to returntrue.
- Select
For more information about using conditions and the available operators, see Operators and conditions.
If then else
With If then rules you can specify one or more conditions that must be satisfied for a trigger (or mapping) to be applied. You can optionally add an Else statement to specify what should happen if the condition is not satisfied.
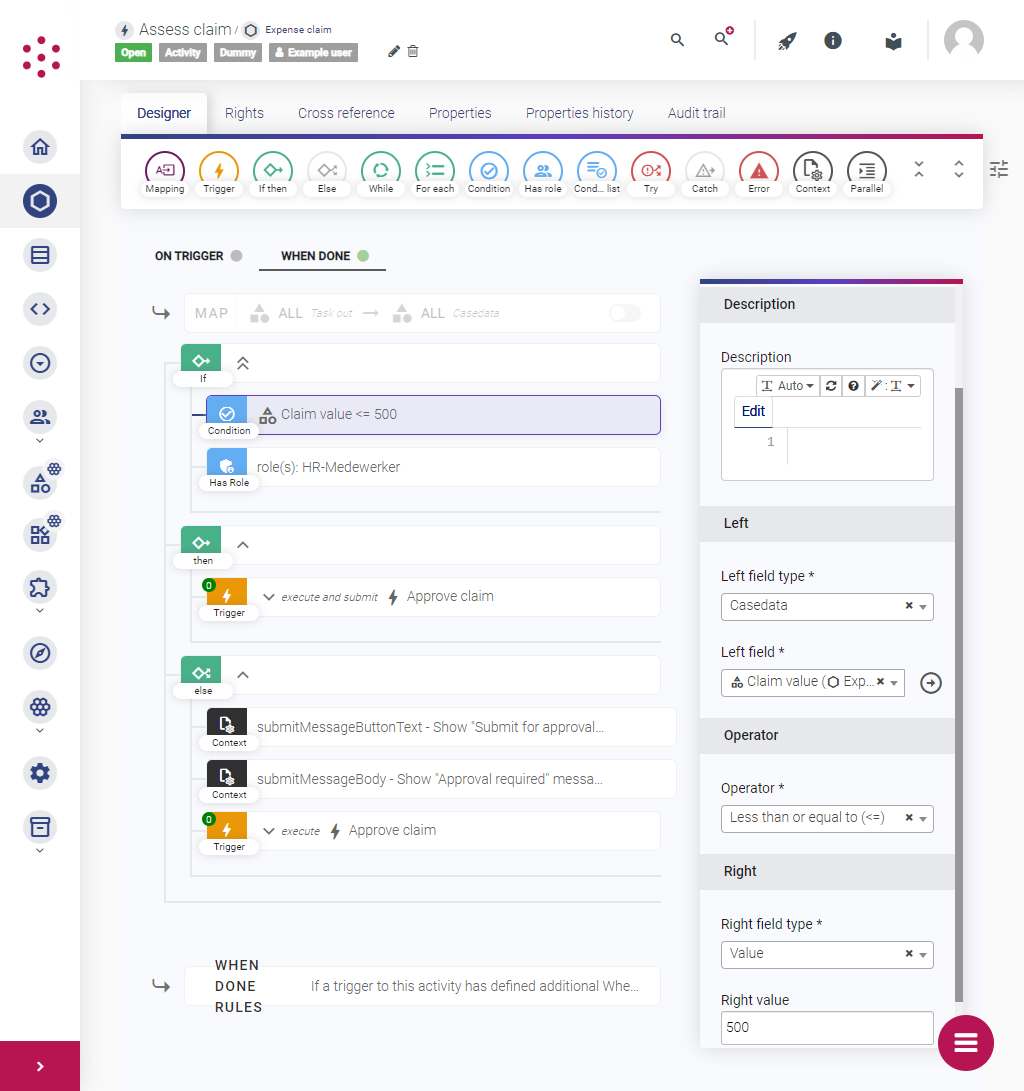
For example, in an expense claim management system, you might want to approve claims automatically if they are below a certain value and submitted by a manager, while sending all other claims (any claims over the limit and/or submitted by a more junior member of staff) for manual review.
To achieve this, you might set up a chain of activities that starts with a Create new claim casetype activity and triggers an Assess claim dummy process block activity. (Using a process block activity helps to keep the application logic modular so that you can make changes more easily in future.)
You can then use the process block activity to configure your activity logic and trigger further activities depending on the outcome, as follows:
- Add two conditions to the
Ifstatement:- A condition that compares the amount entered into the form field (using
Casedata) to a fixed value. - A role condition that identifies users with the
ManagerorSenior managerrole.
- A condition that compares the amount entered into the form field (using
- Add a trigger to the
Thenstatement to perform theApprove claimactivity automatically (using anExecute and submittrigger). - Add a trigger to the
Elsestatement to initiate theApprove claimactivity (using anExecutetrigger) so that it is listed as a mandatory task in the application and must be reviewed by a user before it can be submitted. - When the user submits the activity the text specified in the activity properties (or form properties for activities with forms) is displayed. To change the text depending on the path that the activity has followed, add a
Contextblock to either theThenorElsestatement. Set the Context type to Request context and select Body submit message and/or Button text submit message. For example, you can add aContextblock to theElsestatement to inform the user that the claim will be submitted for manual approval. You can also use aContextblock to redirect the user to a different URL after they submit the activity.

By default, all the conditions in the If statement must be satisfied for the Then rule to apply. If you only need one of several conditions to be satisfied, nest the conditions inside a Condition list and set the type to Or condition. If you do not add any conditions (or you add an empty condition list), the Then is always applied.
While loops
By using a While rule you can specify one or more conditions that must be satisfied for another trigger, mapping, or logic rule to be applied. While loops repeat until the condition is no longer satisfied. The trigger, mapping or logic rule that is applied on each iteration should make a change that will eventually result in the condition(s) no longer being satisfied. Once this point is reached, the loop terminates and any subsequent rules are applied (if applicable) or the activity progresses to the next stage of the lifecycle.
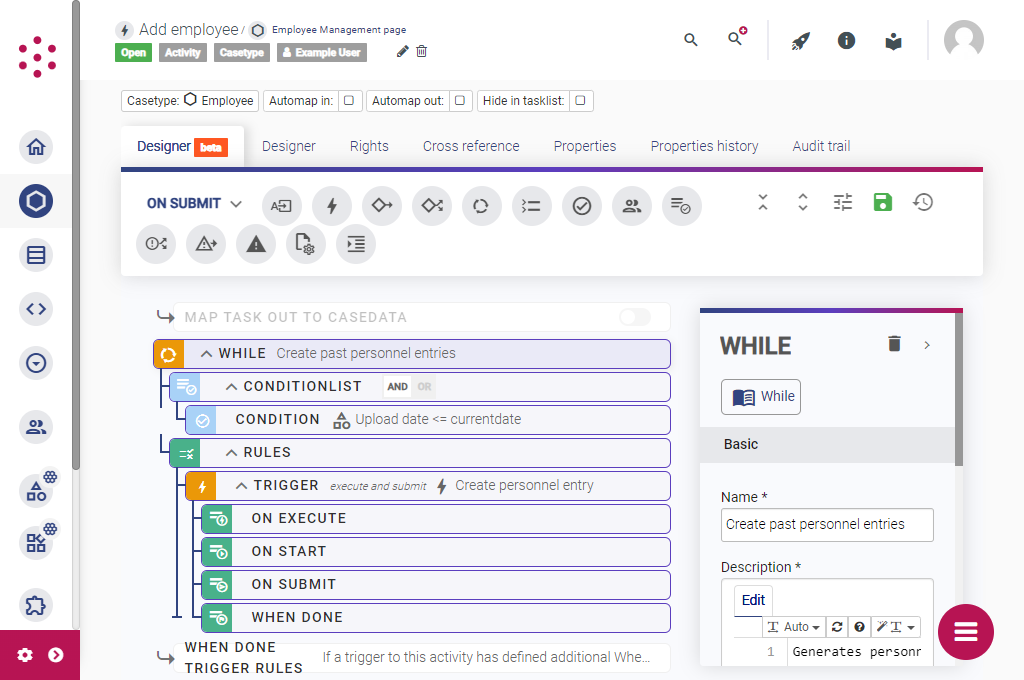
While loops are useful if you want to evaluate conditions multiple times but you do not know in advance how many iterations will be required. For example, when configuring a new HR application, you might want to generate historic entries for each employee's personnel file so that the details can be added later. Each entry is a case with From date and To date attributes that identify the time period to which that entry relates. The number of cases required per employee depends on the individual's start date.
In this situation, you might use a While loop to generate a new Personnel file entry case as long as the To date of the latest entry is still in the past. By doing so, each time a new employee is added to the system, the correct number of historic personnel file entries is created automatically. (You might then generate mandatory tasks to add details to each entry and set a deadline for doing so.)

By default, a While rule is evaluated up to a maximum of 100 times. This is to prevent infinite loops. You can override this default by entering a different value in the Limit field. If you do not add any conditions (or you add an empty condition list) the loop iterates until the limit is reached.
For each loops
With a For each rule, you can iterate over the cases in a particular dataset (or identified via a multivalue attribute on the current case). You can then apply a mapping to add the case IDs to a multivalue attribute on the current case or to a form field.
For example, in an order management system, you might want to iterate through the open orders for a customer in order to fetch the IDs for each Order case and then store these in an attribute on the Customer case.
To iterate through cases in a dataset and write the case IDs to a multivalue attribute on the current case:
- Select the relevant stage of the activity lifecycle and then drag and drop a
For eachonto the canvas. - Select the
For eachand use the Iterable type dropdown to identify the dataset containing the cases you want to iterate through. - With the
For eachselected, add a mapping to the designer canvas. - Select the mapping and use the To options to select the multivalue attribute or form field to which you want to add the case IDs.
- Set the From attribute type to Current item (for each).
You can also iterate through the cases in a dataset and fetch another attribute value (or case metadata value) and map those values to an attribute on the current case or a field in the activity form. For example, you might want to get the value from each order a customer has placed so that you can calculate the customer's total expenditure.
To do this, add a further mapping to the activity and configure the To settings as required. Set the From attribute type to Inline template and use the attribute in which you have stored the case IDs to link to the relevant attribute or metadata on the cases from the dataset.
Depending on your specific use case, there are several different ways in which you can implement For each with mappings. If you're not sure which option to use, please contact your Grexx Coach to discuss your options. You can also use a For each loop when triggering queued tasks.
To trigger an activity on all cases in a dataset, add a trigger as normal and from To type select Cases in dataset. You do not need to use For each.