Set deadlines for activities
You can add activities to your application to enable or require users to create new cases, update details of existing cases, close (or finish) cases and more. You can set deadlines for these activities and configure logic to determine what happens if the deadline passes and the activity has not been completed.
For example, if you had an activity to Check professional indemnity cover on a Supplier casetype, you might set a deadline of 10 working days following initial onboarding to complete the activity. If the deadline passes and the activity has not been completed, you might want to send an email notification to the task assignee or create a new task, assign it to another user and cancel the original activity.
To set deadlines for activities, you need to:
- Add a deadline to the initial activity.
- Trigger a deadline event from the initial activity.
- Add triggers to the deadline event to perform or cancel other activities.
You can also display overdue activities in your application.
Add a deadline to an activity
To add a deadline to an existing activity, open the activity details. In the Deadline field, specify how the deadline should be determined for each case:
- To enter a date relative to the date the activity is initiated, type
date.and select from the available options. For all options other thanCurrent date, click the blue text to configure the relative date. - To use the value of a date or datetime attribute on the current case, type
case.and select from the available options. - To use the same date for all activities, enter a date in the format
DD/MM/YYYY.
Trigger a deadline event
Once you have added a deadline to an activity, you need to create a deadline event activity that will be triggered if the initial activity has not been submitted by the deadline:
- Add a new event activity to the same casetype and set the event type to
Deadline. You will use this activity to configure what happens when the deadline is reached and the initial activity has not been performed. - Return to the activity with the deadline and open the Designer tab.
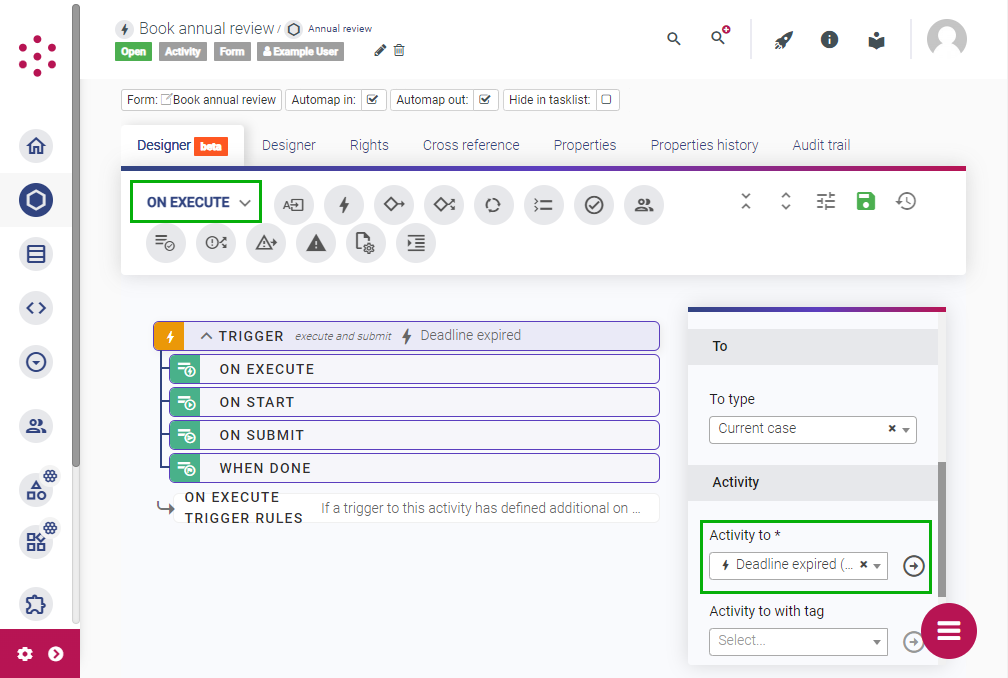
- From the toolbar, select the On trigger stage and then drag and drop a trigger onto the designer canvas.
- Set the trigger type to Execute and submit and set the To type to Current case.
- From the Activity to dropdown, select the deadline event that you just created.
- Click the save icon.

When the activity with the deadline is initiated (by a user or by another activity), it triggers the deadline event. If the deadline is reached and the activity with the deadline has not been submitted, the activity becomes overdue and the deadline activity is performed. You can configure what happens when the activity becomes overdue by adding triggers to the deadline event.
If the case to which the overdue activity belongs has been closed, the deadline event will not be triggered.
Trigger activities from the deadline event
By adding triggers to the When done stage of a deadline event activity, you can automate what happens when an activity deadline is missed. This can include:
- Performing another activity with or without user input, such as sending an email notification.
- Generating another mandatory or optional task and assigning it to another user, such as the assignee's manager.
- Cancelling the original activity so that it is no longer listed as a mandatory or optional task.
Start by configuring the child activities as normal. For example, to send an email notification, use a casetype activity to create a new Send email case. To ask users to add or update details of an existing case, create a form activity.
Once you have configured the activities you want to perform when a deadline is missed, add triggers for those activities to the deadline event:
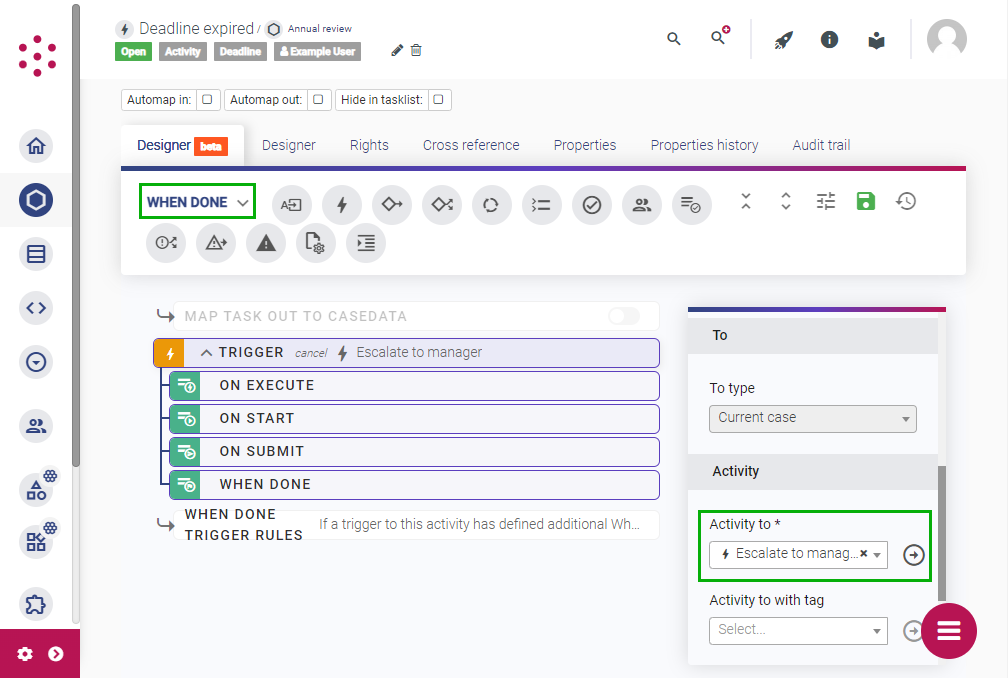
- Return to the deadline event and open the Designer tab.
- From the toolbar, select the
When donestage and then drag and drop a trigger onto the designer canvas. - Select the trigger type according to what you want to do. For example, to remove a mandatory task, use the
Canceltrigger or to remove an optional task, use theDisabletrigger. To initiate another activity, use theExecutetrigger. For more information about trigger types, see Chain activities together. - If you have selected an
Execute and submitorExecutetrigger, use the To type dropdown list to select the parent case of the activity you want to execute. For example, you can execute an activity on a case identified by a case ID attribute or an activity associated with a page in your application, such as the homepage. - From the Activity to dropdown list, select the activity that you want to trigger.

If the deadline is missed, the deadline event activity transitions to the Done stage. The triggers you have added fire and the activities are initiated, performed or cancelled as per the trigger type. For more information about triggering one activity from another, including how to apply conditional logic, see Chain activities together.
You can add mappings to the On start stage of the trigger to populate some or all of the fields on the triggered activity automatically. For more information, see Customize behavior of triggered activities.
Display overdue tasks to users
You can display a list of mandatory tasks using a grid widget and the default Required tasks on platform dataset.
To display the due date for tasks with a deadline:
- Edit the
Required tasks on platformdataset and add a column:- Set the column title to
Deadlineor similar. - From Field type select Task metadata and then from Value select Date due.
- Set the column title to
- Open the relevant page casetype or view and add a grid widget to a container.
- Select the grid and then from the Dataset dropdown select Required tasks on platform.
- Click grid to open the grid widget editor.
- Select Columns and then select the deadline column that you added to the dataset. Ensure Hide is not enabled.
- Set the rights for the widget and then save your changes.
For more information about adding widgets to pages and views, see Configure pages and views.