Add cases
Once you have defined your casetypes and their attributes, the next step is to implement functionality so you can add cases of each type to your application. Depending on your casetypes, this could define how users add new products to your inventory, how orders are processed, or how claims are opened.
Adding cases to your application requires a casetype activity. A casetype activity defines where and when new cases are created. This might be an option on your application's homepage or a view of a case, or something that happens automatically at a specific point in time or when another activity is completed. Each casetype activity, in turn, calls the Start <casetype> activity for the target casetype. The Start <casetype> activity and associated form define the attributes that can or must be populated in order to create the new case.
For example, to add new products to your application, you might want users to click a button on the homepage and submit a form with details of the new product. To achieve this you would:
- Add a casetype activity to the
Homepagecasetype. - Use the
Start Productform on theProductcasetype to define the fields that are included on the form used to create a new product. - Use the casetype activity to configure the rules that populate some of the form fields and the user roles that have permission to add new products.
You can configure multiple casetype activities for the same target casetype. For example, you may want to provide an option to invite new users manually but also automate creating new users when certain conditions are met. You would implement these two options using two separate casetype activities, both of which call the Start Invite user activity.
Configure casetype activities
There are three main ways in which you can use casetype activities to add cases to your application:
- Add an option to a page in your application, such as the homepage, a page displaying a catalog of products or services, or a configuration page.
- Add an option to another case, such as opening a new expense claim for an existing employee, or creating a new order for an existing customer.
- Configure rules to create new cases automatically. For example, you might want to invite new users automatically whenever new employees are added to the system, or send an email reminder when a deadline for another activity expires.
Add a new case from a page
You can add casetype activities to pages in your application. This is useful if you want to provide a button or link that users can click to perform a common task. For example, you might want to include a button on the homepage for adding new products or an option on a configuration page for inviting new users.
To add a casetype activity to a page:
- Open the relevant page casetype and then open the Activities tab.
- Click Add activity and enter a name for the activity.
- Set the Type to Casetype and select the casetype you want to create.
- Click Submit. The activity is created and the activity designer is displayed.
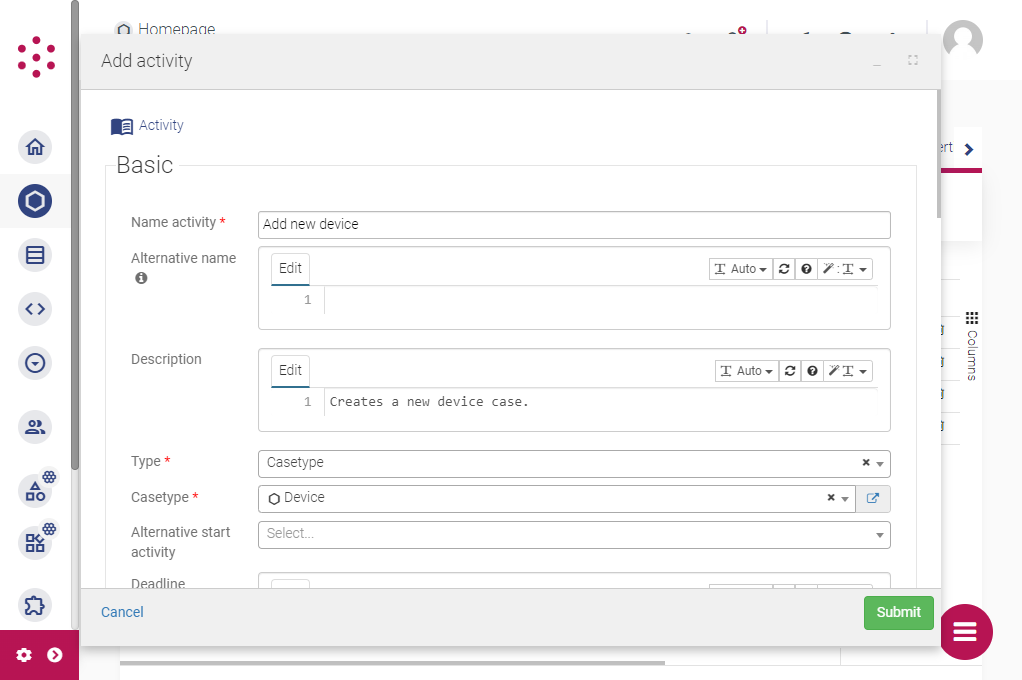
Once you have created the casetype activity, configure the activity rules, review the "Start casetype" behavior and make the activity available to users as described below.
You can edit the activity properties, including the user-facing text and visibility options, after the activity has been created.
Add a new case from an existing case
Usually, most of the standard casetypes within an application are related to each other in some way. For example, in an order management system each Order case might be associated with a Customer case. Similarly, in the example HR application, each Employee case could be associated with one or more Device cases. In this situation, you might want to add a button to the Employee view so that users can assign devices to employees, or include an option for opening a new order in a list of customers.
To allow users to create new cases from the context of an existing case, start by identifying the the relevant casetype for the "parent" case. The parent casetype is normally a different casetype from the case you are creating. For example, you might add a Create new order casetype activity to the Customer casetype so that users can create new Order cases and associate them with existing Customer cases.
You can add mappings to a casetype activity to pass the ID of the parent case to the new case, and/or the ID of the new case to the parent case. For example, you might add a Customer ID attribute to the Order casetype so that you can record the case ID of the parent Customer case. You might then use this to configure computed attributes that fetch other values from the Customer case, so that you can display this data as part of an Order case. To enable this, ensure the casetype has a suitable attribute of type Case ID.
To configure the casetype activity so you can add cases from a standard casetype:
- Open the relevant parent casetype and then open the Activities tab.
- Click Add activity and enter a name for the activity.
- Set the Type to Casetype and select the casetype you want to create.
- Click Submit. The activity is created and the activity designer is displayed.
Once you have created the activity, configure the activity rules to add mappings and automate other behavior, as described below. Then, review the "Start casetype" behavior and make the activity available to users so that they can create new cases as described below.
Add a new case automatically
You can create new cases automatically as a result of another activity. For example, you might have a casetype that represents customers or employees and want to add those customers or employees to your application as users so that they can log in. To invite them automatically, you could trigger an activity that creates an Invite user case (which sends an invitation email) each time a new Customer or Employee case is created. (If the invitee completes the registration process, the Invite user case will, in turn, create a new User case.)
To create cases automatically:
- Identify the parent activity that will trigger the target casetype activity. This could be:
- Another casetype activity, if you want to create a new case when a case of the parent casetype is created.
- A form activity, if you want to create a new case when a particular value is entered in a form, such as when a user selects a "Create account" checkbox.
- A timed activity, if you want to create a new case at a specific point, such as 20 days after a user has completed another activity.
- A process block activity, if you want to create a new case when another case is closed or reopened, or when other processes are performed.
- Open the casetype of that parent activity and select the Activities tab.
- Click Add activity and enter a name for the casetype activity.
- Set the Type to Casetype and select the casetype you want to create.
- Click Submit. The activity is created and the activity designer is displayed.
- As the casetype activity will be performed without any user input, use the activity designer to configure mappings to populate the new case attributes. You can fetch data from the parent case or use an inline template to fetch values from cases related to the parent case. You can also retrieve case IDs from a dataset or specify fixed values. For more information, see Configure activity rules below.
Once you have configured the child casetype activity, open the parent activity and add an Execute and submit trigger to perform the new casetype activity automatically. If you want to initiate the activity automatically, but require a user to review the details of the new case and submit the activity manually, add an Execute trigger instead.
- To create the new case as soon as a parent case has been created, add the trigger to the
On submitstage of the casetype activity that creates the parent case.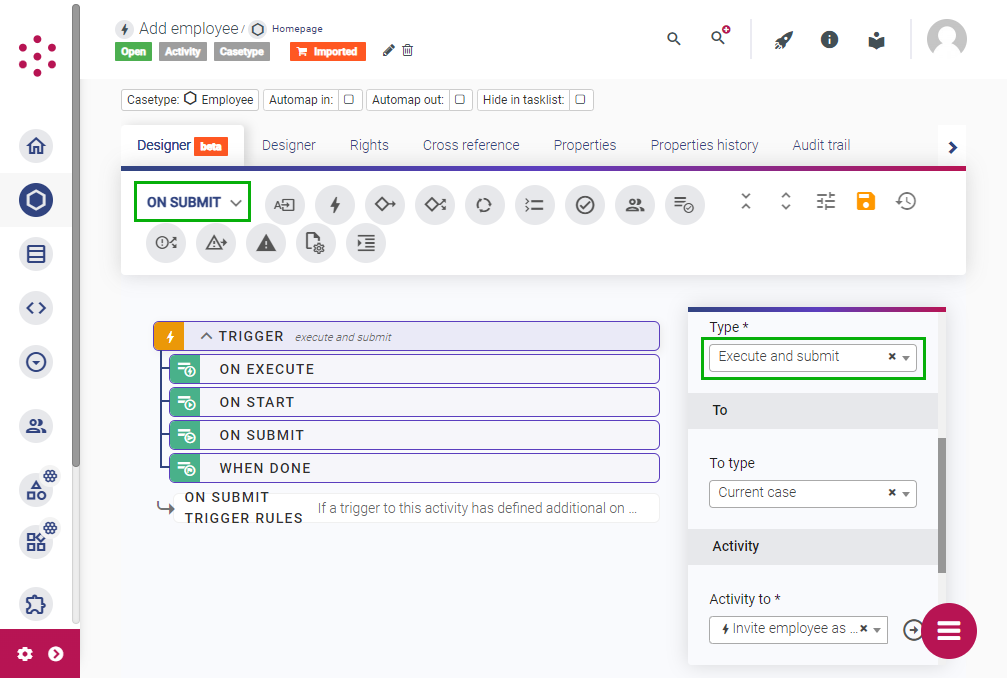
- To create a new case when a particular attribute value is added to an existing case or form field, add the trigger (and appropriate conditional logic) to the
When donestage of the form activity. - To perform the casetype activity at a specific point in time - such as a date or time relative to another case attribute - configure an event activity and trigger the casetype activity from there.
- To perform the casetype activity when another case is closed configure a process block activity.
For more information about configuring triggers to initiate or perform activities automatically, see Chain activities together.
Configure activity rules
Once you have created a casetype activity, you can add rules to automate aspects of the activity. Use the Designer tab to configure mappings and triggers for the relevant stage in the activity lifecycle.
To populate one or more attributes of the new case, add mappings to the On start stage of the casetype activity:
- Set the mapping To option to Task in and then select the field on the
Start <casetype>form that you want to populate. - Use the mapping From option to select the source of the data. For example, to add the case ID of the parent case to the new case, select Case metadata and then select case ID. You can also configure an inline template to fetch values from a related case.
- By default, a mapping copies the value from the specified source. To change the value, select a different mapping operator.
- To configure the available form fields (i.e. the
Task inoptions) and whether users can view or edit particular fields once they have been populated, update theStart <casetype>form, as described below.
To record the case ID of the new case in an attribute on the parent case, add a mapping to the On submit stage:
- Set the mapping To option to Casedata and select the relevant attribute on the parent casetype.
- From the mapping From option, select New case metadata and then select Case ID.
To trigger other activities once the casetype activity has been performed, add rules to the On submit stage. This is useful if you want to trigger those activities each time a new case is created via this casetype activity. (To trigger another activity every time a new case is created, regardless of the activity that creates it, add a trigger to the Start <casetype> activity instead, as described below.) For more information about adding triggers, see Chain activities together.
To trigger other activities when the case created by the activity is closed or to copy details from the closed case to the parent case, add rules to the When done stage. For more information, see Close cases.
If you only want to apply a mapping or trigger when certain conditions are met, you can also apply conditional logic to the activity.
Mappings populate the new case with details from another case as they are at the time that the activity is performed. If you want to populate attributes with details from another case and update them when those values change, consider using a computed attribute. For example, you might use a computed attribute to import the Name and Department values from an Employee case to an Expense claim case so that you can display them alongside the details of each claim. For a comparison of the options, see Populate case details automatically.
Review the "Start casetype" behavior
In order to create a new case, a casetype activity initiates the default Start <casetype> activity on the new (target) casetype. This, in turn, uses the Start <casetype> form on the target casetype.
- The
Start <casetype>form defines the attributes that can or must be populated to create a new case of that type. - The
Start <casetype>activity defines any rules that are applied each time a new case of that type is created (as opposed to when a new case is created by a particular casetype activity).
When configuring a casetype activity, you may want to review the Start <casetype> form and activity for the target casetype.
Each casetype has a single Start <casetype> form and activity. If your application includes more than one casetype activity for the same target casetype, any changes you make to the Start <casetype> form and/or activity will affect each of those casetype activities.
"Start casetype" form
The Start <casetype> form defines the attributes that you can populate when creating a new case. By default, this is a manual process: when the user starts the casetype activity, the Start <casetype> form is displayed. You can add rules to the parent casetype activity to populate some or all of the form fields automatically, as described above.
To view and edit the Start <casetype> form, open the target casetype, select the Forms tab and open the Start casetype form.
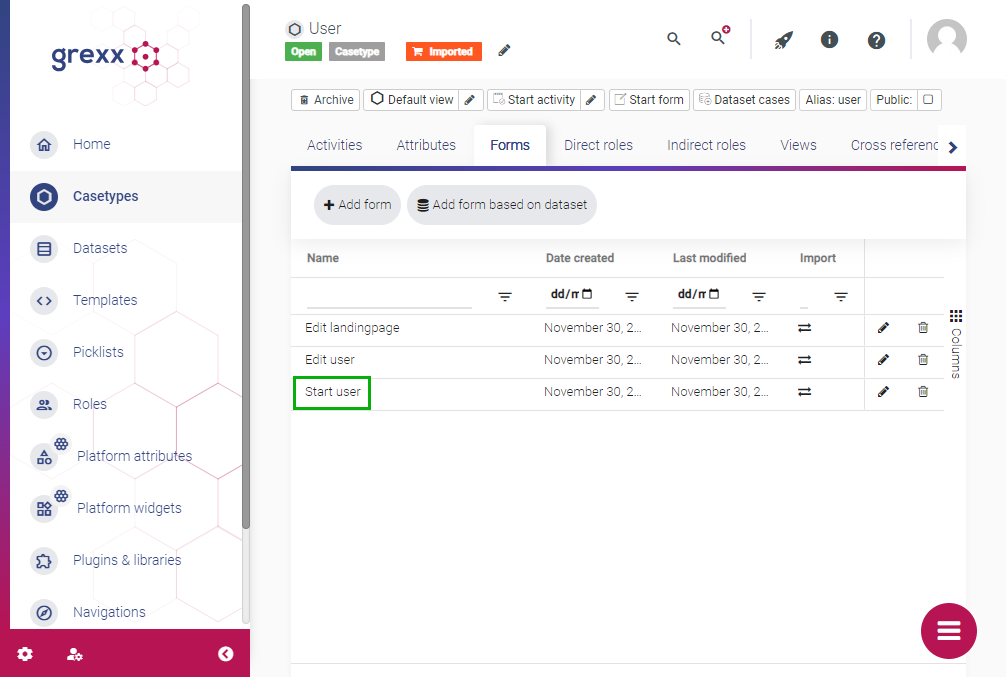
Select the Form designer tab to view the form design. A form can contain:
- Fields for the attributes that you want to populate when creating a new case.
- Additional "bare" fields that are not linked to casetype attributes. You can use these bare fields to implement form logic. The values added to bare fields are not added to the case.
To add attributes to the form, use the Select attributes list and then click the + icon. To add a bare field, click the field icon on the toolbar. Then, select the attribute or bare field to view and edit the field properties, including the label, any additional text to be displayed to users, and any validation rules.
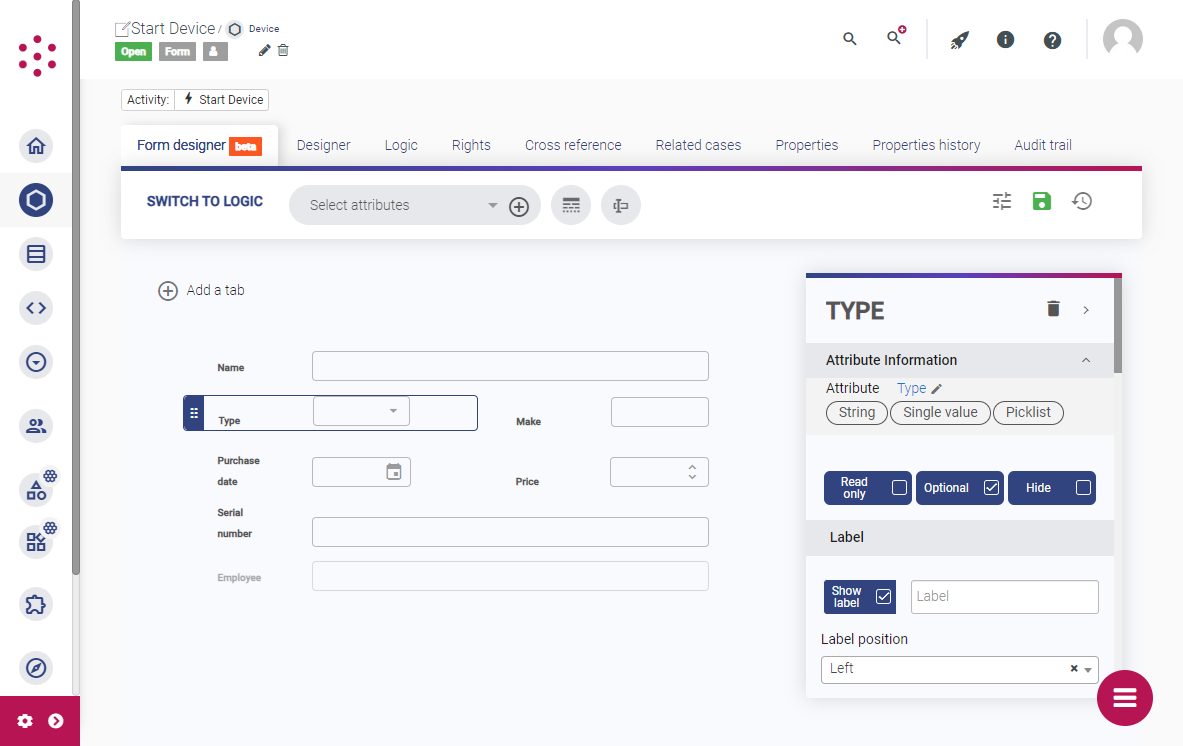
By default, any fields that you add to a form are visible to users. If you want to populate some fields automatically as part of the casetype activity, include the field on the form and select either Read only or Hide to ensure that users cannot change or see the value.
For larger forms, you may want to add fields to groups and/or split them across multiple tabs or steps. For more information about configuring forms, see Configure forms.
"Start casetype" activity
The Start <casetype> activity defines the activity properties together with any rules that are performed each time a new case of that type is created (regardless of the casetype activity that initiated it). You can use this to control what happens whenever a new case of a particular type is created without having to duplicate the configuration across multiple casetype activities.
For example, if you always want to invite new customers to log in to your application as users, you could add a trigger to the Start Customer activity to perform an Invite user casetype activity each time the Start Customer activity is completed. As a result, any casetype activities that create new Customer cases (and therefore perform the Start Customer activity) will also cause the new customer to be invited to log in as a user.
To view and edit the Start <casetype> activity, open the target casetype, select the Activities tab and select the Start casetype activity.
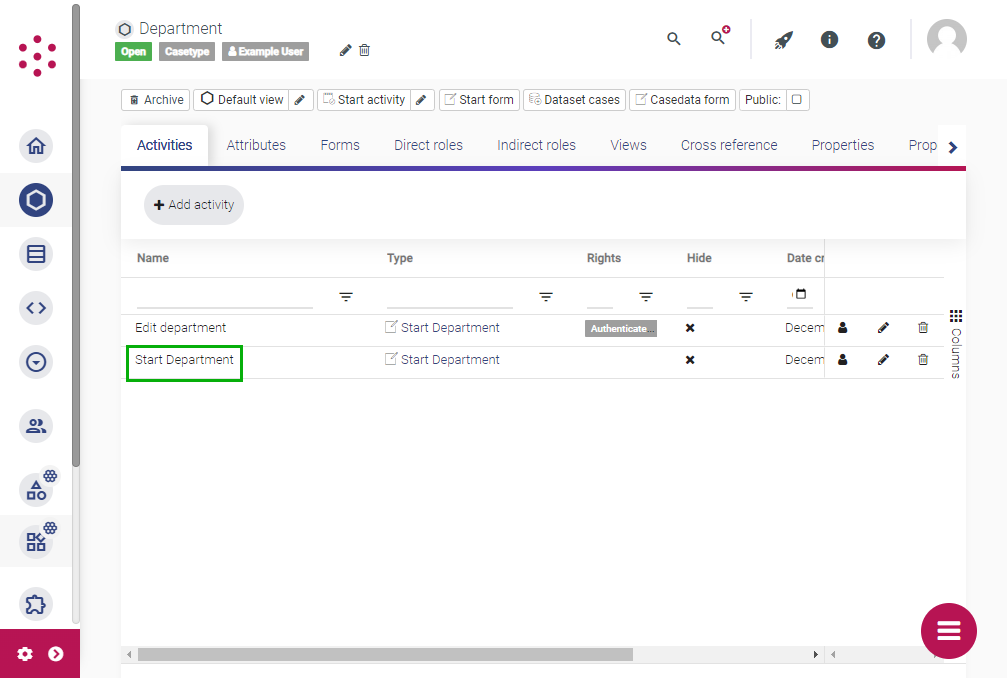
- To edit the activity properties, click the "edit" icon in the top right-hand corner. Use the Edit activity dialog to specify:
- Supporting text: Change the default "Submit" and "Cancel" button text and/or add an instruction to the form and text to display while the activity is being processed.
- Allow to reopen after submit: Give users the option to submit the form (and thereby create the new case) and then automatically reopen the activity form so they can create another case. This is useful when users need to create multiple cases of the same type. Note that this option is only valid for optional activities (i.e. on which
Requestrights are granted). - Auto mapping out: Ensure this option is enabled so that data from the
Start <casetype>form is written to the new case.
- To apply rules, select the Designer tab and then select the relevant stage in the activity lifecycle. Add mappings, triggers and/or logic as required. For more information about configuring activity rules, see Chain activities together.
Make the casetype activity available to users
To allow users of your application to initiate a casetype activity and create new cases, you need to grant one or more user roles permission to perform the activity. You also need to include the activity on a page or view.
Grant permissions
To grant users permissions to perform the activity, edit the activity, open the Rights tab and click Edit rights. Choose the type of permission you want to grant and then select the user role from the list:
- To make the activity mandatory for users in a particular role, add the role to the Execute right.
- To make the activity optional for users in a particular role, add the role to the Request right.
For more information about adding users to roles and configuring permissions in your applications, see Manage users and permissions.
Add the activity to pages or views
You can make activities available to users from your application's pages or views with widgets:
- To embed the activity form in a page or view, add an activity widget to the view of the parent casetype or page.
- To include a button to start an activity from a table listing other cases of the same type (such as an Add customer button above a list of existing customers), add a grid widget to a view and add the activity to the grid.
- To create a custom display element containing an activity, use a template widget or a plugin.
Ensure that the user roles with permission to perform the activity also have permission to view the relevant widgets. For more information about designing views and adding widgets, see Configure pages and views.
To change the help text or label of the "Submit" button displayed on the activity form, open the activity and click the pencil icon near the top of the page.
Next steps
To test your new functionality, click the rocket icon to compile your application and then open the Development environment from the Studio homepage or from the information icon.
Once you have provided users with a way to create new cases manually, you may want to give them the option to edit those cases or view details of existing cases. For more information, see Edit case details.
You can also build more sophisticated automated processes by chaining activities together. For more information, see Chain activities together.